本文最后更新于:2 年前
从这里开始我们正式迈入互联网分布式相关的应用和开发,下面将先学习Dubbo,然后Spring Boot等,操作操作!!!
分布式结构
- 若干独立系统的集合,但是用户使用起来像是在使用一套系统
- 原因:
- CRM集中式开发则是性能不太好嗷!!!
- 架构演变:
- 单一架构:
- 垂直应用架构:
- 将大应用拆分为小应用
- 拓展容易
- 易改,交互,相互调用问题
- 分布式架构:
- 业务拆分后,实现各个模块的远程调用和复用。
- RPC: 远程过程调用。
Dubbo概述
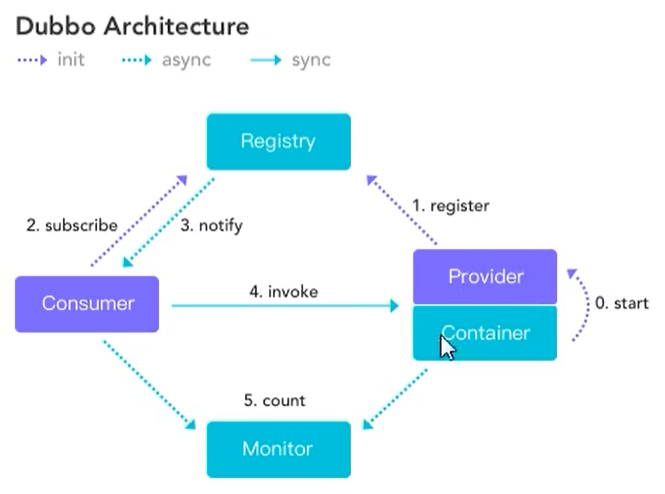
- 解决了分布式系统中相互调用的问题
- 注册中心:统一管理调度
- 网络进行传输:
- 序列化才能网路通信,类似于xml , json , 二进制流都可以序列化。二进制流序列化效率最高,Dubbo采用的就是效率最高的二进制。
- 网络通信:
- Socket通信机制。
- 提升通信效率,不用反复连接,直接传数据。
前世今生:
- SpringCloud横空出世,Dubbo就更新了。。。
- SpringCloud还是要学的,这两个国内都用的多嗷!!!
Apache Dubbo
直连方式解决架构:
服务提供者:
- Dubbo和Spring是完全直连的,因此要添加Spring的依赖。
- Dubbo依赖添加:
1
2
3
4
5
6
7
8
9
10
11
12
13
14
15
16
17
| <dependency>
<groupId>org.springframework</groupId>
<artifactId>spring-context</artifactId>
<version>5.2.5.RELEASE</version>
</dependency>
<dependency>
<groupId>org.springframework</groupId>
<artifactId>spring-webmvc</artifactId>
<version>5.2.5.RELEASE</version>
</dependency>
<dependency>
<groupId>com.alibaba</groupId>
<artifactId>dubbo</artifactId>
<version>2.6.2</version>
</dependency>
|
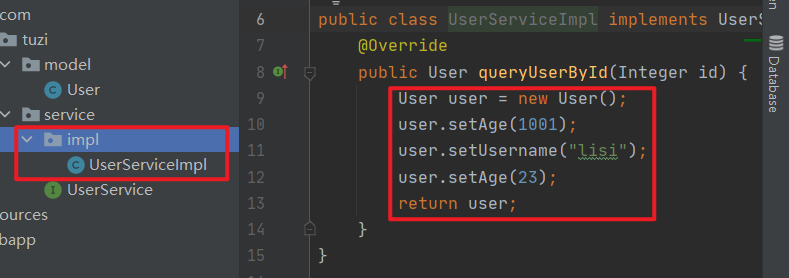
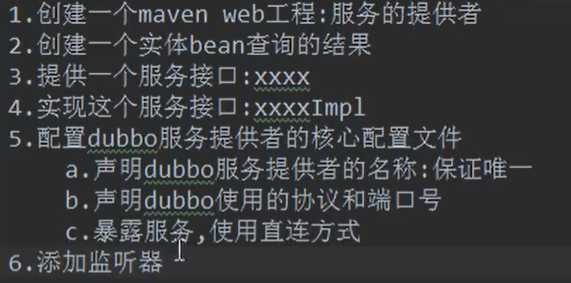
- 创建了一个实体类user
- 创建了一个service包,包里面有一个queryUser的方法,这个方法的本质就是我们的图中的provider,方法的规范:
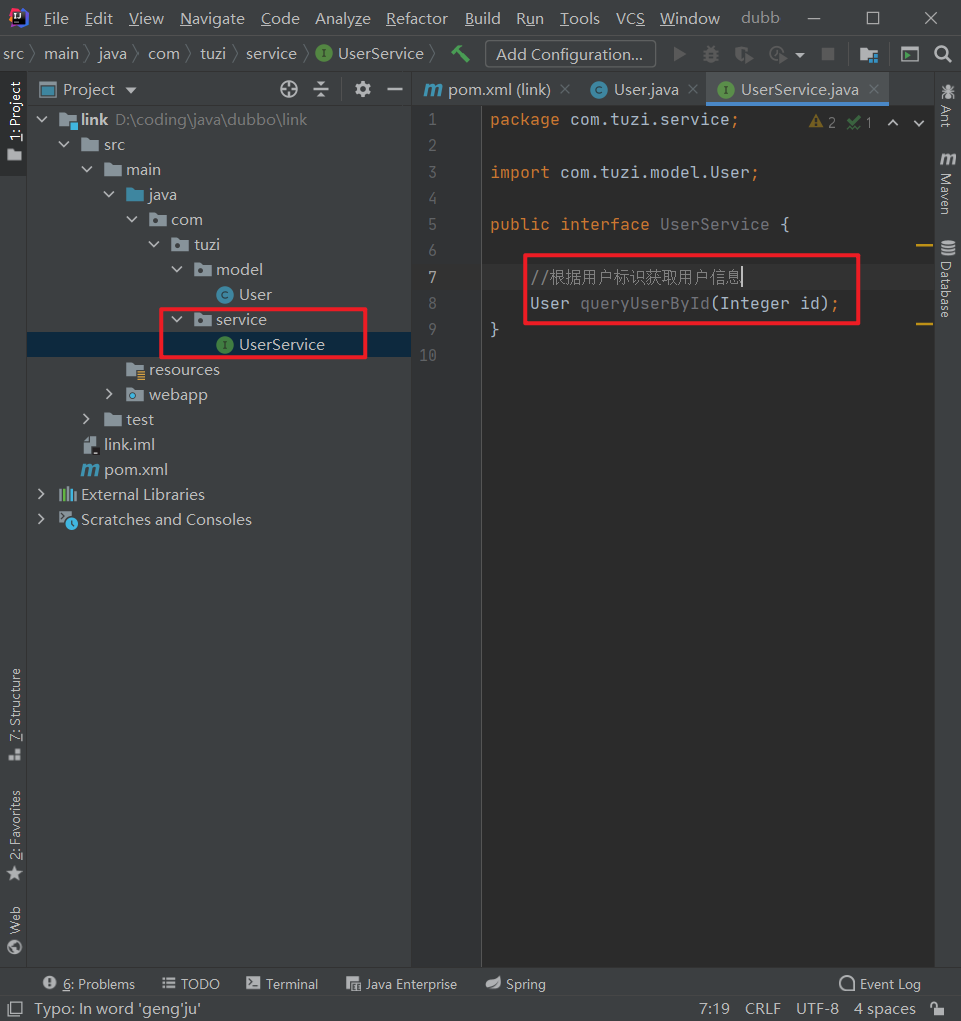
- 下面要想方法把我们定义的功能“暴露”出去:
- 使用配置文件(resources中的spring类型的xml文件)来规定如何暴露嗷!!!
- 引入标签的时候别引入错了:

1
2
3
4
5
6
7
8
9
10
11
12
13
14
15
16
17
18
19
20
21
22
23
24
25
26
27
28
| <?xml version="1.0" encoding="UTF-8"?>
<beans xmlns="http://www.springframework.org/schema/beans"
xmlns:xsi="http://www.w3.org/2001/XMLSchema-instance" xmlns:dubbo="http://dubbo.apache.org/schema/dubbo"
xsi:schemaLocation="http://www.springframework.org/schema/beans http://www.springframework.org/schema/beans/spring-beans.xsd http://dubbo.apache.org/schema/dubbo http://dubbo.apache.org/schema/dubbo/dubbo.xsd">
<dubbo:application name="001-link-userservice-provider" />
<dubbo:protocol name="dubbo" port="20880" />
<dubbo:service interface="com.tuzi.service.UserService" ref="userService" registry="N/A"/>
<bean id="userService" class="com.tuzi.service.impl.UserServiceImpl" />
</beans>
|
- dubbo内的数据设置成功后,我们在web.xml配置文件中,加入相关的内容:
1
2
3
4
5
6
7
8
9
10
11
12
13
14
| <?xml version="1.0" encoding="UTF-8"?>
<web-app xmlns="http://xmlns.jcp.org/xml/ns/javaee"
xmlns:xsi="http://www.w3.org/2001/XMLSchema-instance"
xsi:schemaLocation="http://xmlns.jcp.org/xml/ns/javaee http://xmlns.jcp.org/xml/ns/javaee/web-app_4_0.xsd"
version="4.0">
<context-param>
<param-name>contextConfigLocation</param-name>
<param-value>classpath:dubbo-userservice-provider.xml</param-value>
</context-param>
<listener>
<listener-class>org.springframework.web.context.ContextLoaderListener</listener-class>
</listener>
</web-app>
|
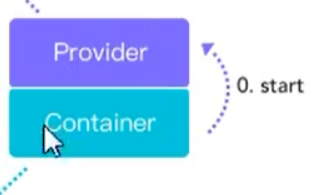
通过Spring这个Container来生成Provider也就是服务的提供者嗷!!!
服务消费者:
- 本质上也是一个module,一个单独的东西和项目。
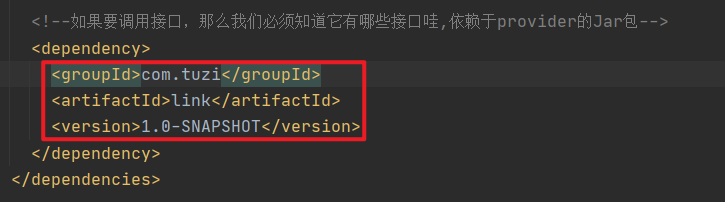
- 由于consumer需要知道provider提供的接口和接口中的方法,因此我们这儿要导入provider
- 导入provider的方法是将provider打成jar包,然后在consumer中引入这个jar包。
- 打包provider为jar包的方法为:
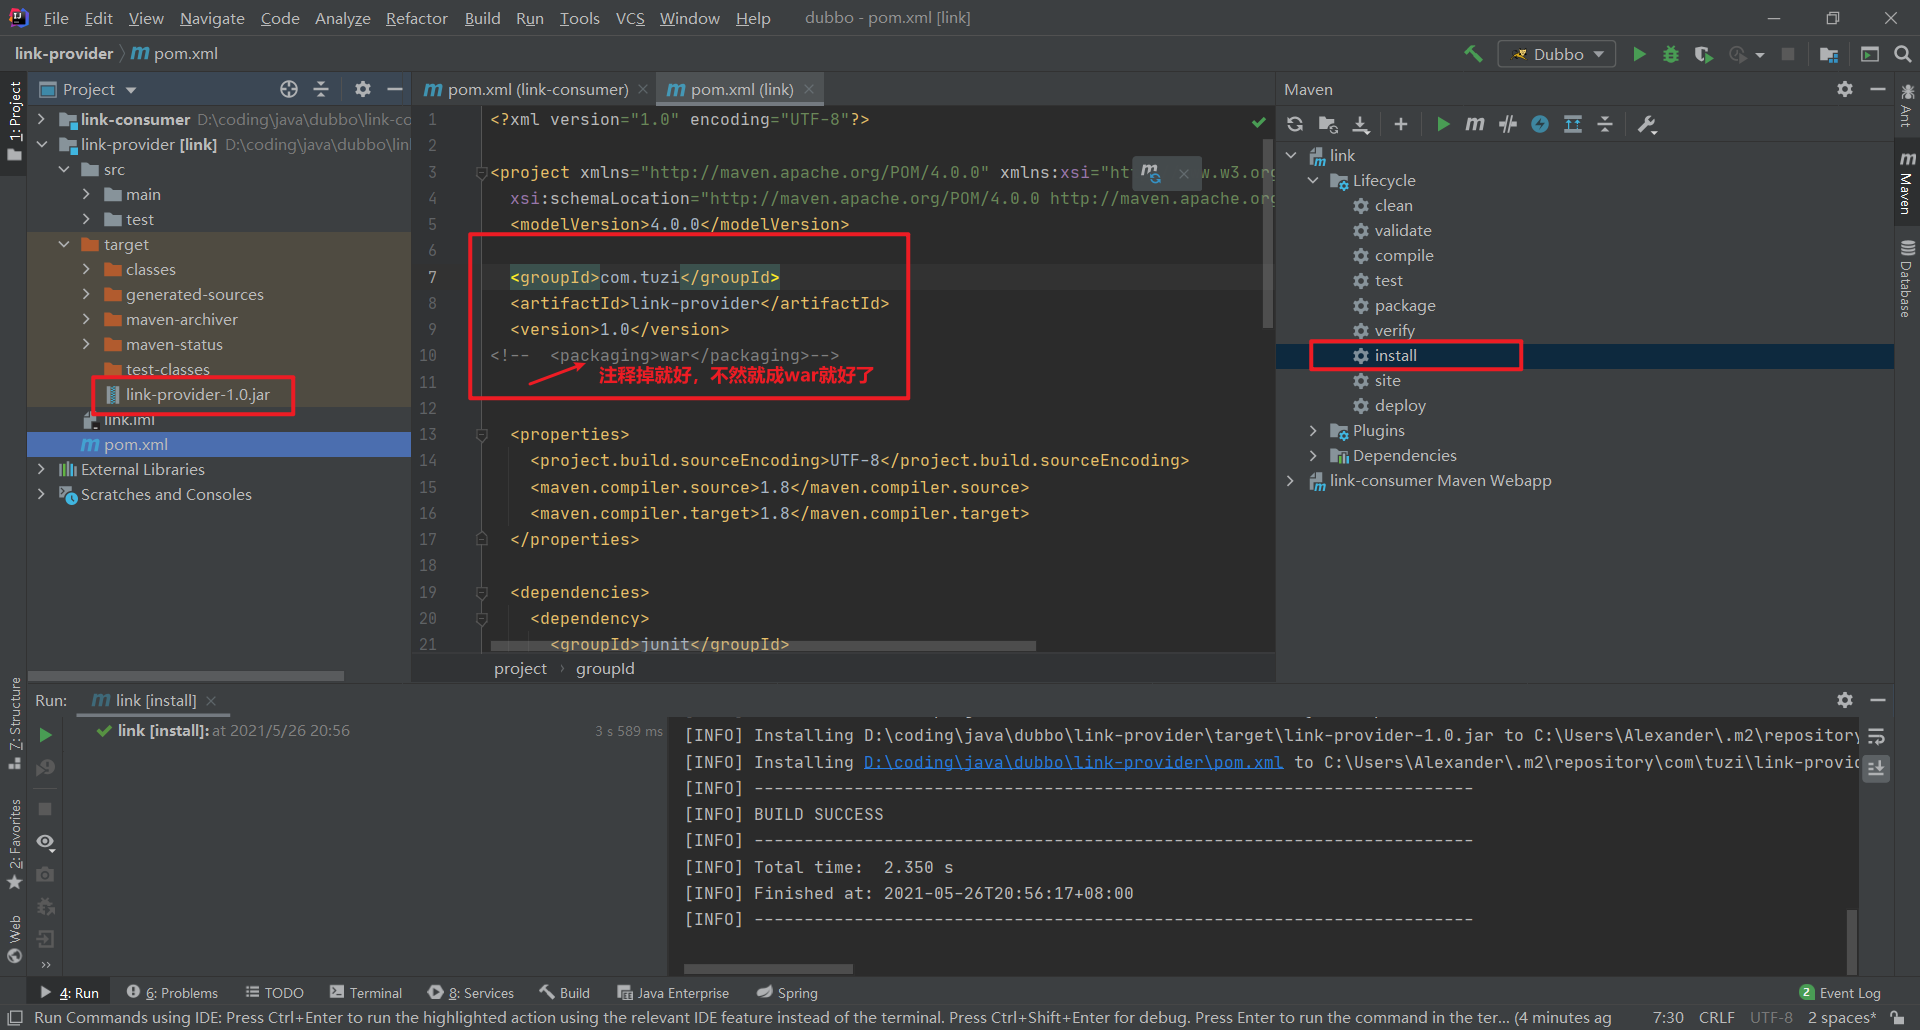
- 上面写错了,这里打包成war就有点顶了,注释掉默认就是打包成jar包了。右边点击Maven中的install就成功将这个项目打成了jar包嗷!!!
- 这儿就是导入了相应的包:
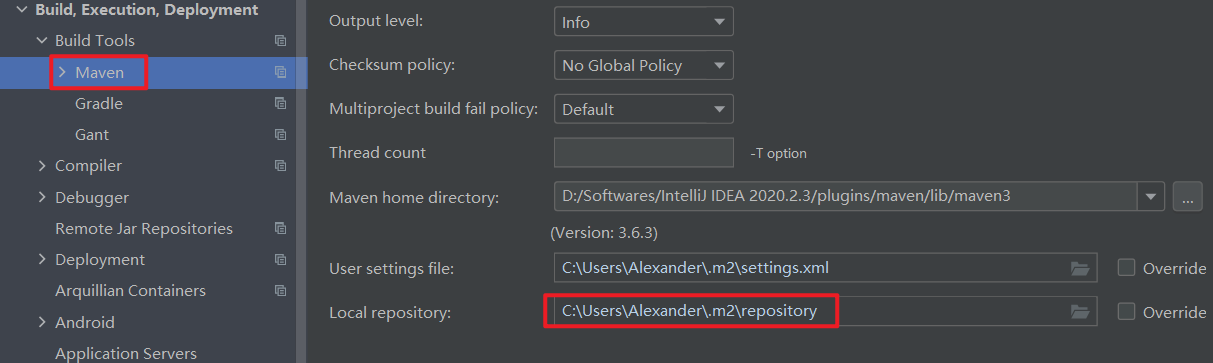
- 上面这里可以看到local repository,其实可以在里面看到我们的com.tuzi里面的内容嗷!!!就知道在哪里了嘛!
- pom.xml完整配置文件:
1
2
3
4
5
6
7
8
9
10
11
12
13
14
15
16
17
18
19
20
21
22
23
24
25
26
27
28
29
30
31
32
33
34
35
36
37
38
39
40
41
42
43
44
45
46
47
48
49
50
51
52
53
54
55
56
57
| <?xml version="1.0" encoding="UTF-8"?>
<project xmlns="http://maven.apache.org/POM/4.0.0" xmlns:xsi="http://www.w3.org/2001/XMLSchema-instance"
xsi:schemaLocation="http://maven.apache.org/POM/4.0.0 http://maven.apache.org/xsd/maven-4.0.0.xsd">
<modelVersion>4.0.0</modelVersion>
<groupId>com.tuzi</groupId>
<artifactId>link-consumer</artifactId>
<version>1.0-SNAPSHOT</version>
<packaging>war</packaging>
<properties>
<project.build.sourceEncoding>UTF-8</project.build.sourceEncoding>
<maven.compiler.source>1.8</maven.compiler.source>
<maven.compiler.target>1.8</maven.compiler.target>
</properties>
<dependencies>
<dependency>
<groupId>junit</groupId>
<artifactId>junit</artifactId>
<version>4.11</version>
<scope>test</scope>
</dependency>
<dependency>
     <groupId>org.springframework</groupId>
     <artifactId>spring-context</artifactId>
     <version>5.2.5.RELEASE</version>
   </dependency>

   <dependency>
     <groupId>org.springframework</groupId>
     <artifactId>spring-webmvc</artifactId>
     <version>5.2.5.RELEASE</version>
   </dependency>

   <dependency>
     <groupId>com.alibaba</groupId>
     <artifactId>dubbo</artifactId>
     <version>2.6.2</version>
   </dependency>
<dependency>
<groupId>com.tuzi</groupId>
<artifactId>link</artifactId>
<version>1.0-SNAPSHOT</version>
</dependency>
</dependencies>
<build>
</build>
</project>
|
- 下面编写consumer的核心配置文件(也就是spring文件):
1
2
3
4
5
6
7
8
9
10
11
12
13
14
15
16
17
18
| <?xml version="1.0" encoding="UTF-8"?>
<beans xmlns="http://www.springframework.org/schema/beans"
xmlns:xsi="http://www.w3.org/2001/XMLSchema-instance" xmlns:dubbo="http://dubbo.apache.org/schema/dubbo"
xsi:schemaLocation="http://www.springframework.org/schema/beans http://www.springframework.org/schema/beans/spring-beans.xsd http://dubbo.apache.org/schema/dubbo http://dubbo.apache.org/schema/dubbo/dubbo.xsd">
<dubbo:application name="link-consumer" />
<dubbo:reference id="userService" interface="com.tuzi.service.UserService" url="dubbo://localhost:20880" registry="N/A"/>
</beans>
|
- 接着配置springmvc的配置文件,里面的内容为:
1
2
3
4
5
6
7
8
9
10
11
12
13
14
15
16
17
18
19
20
21
22
| package com.tuzi.web;
import com.tuzi.model.User;
import com.tuzi.service.UserService;
import org.springframework.beans.factory.annotation.Autowired;
import org.springframework.stereotype.Controller;
import org.springframework.ui.Model;
import org.springframework.web.bind.annotation.RequestMapping;
@Controller
public class UserController {
@Autowired
private UserService userService;
@RequestMapping(value = "/user")
public String userDetail(Model model, Integer id){
User user = userService.queryUserById(id);
model.addAttribute("user",user);
return "userDetail";
}
}
|
1
2
3
4
5
6
7
8
9
10
11
12
13
14
15
16
17
18
19
20
| <?xml version="1.0" encoding="UTF-8"?>
<web-app xmlns="http://xmlns.jcp.org/xml/ns/javaee"
xmlns:xsi="http://www.w3.org/2001/XMLSchema-instance"
xsi:schemaLocation="http://xmlns.jcp.org/xml/ns/javaee http://xmlns.jcp.org/xml/ns/javaee/web-app_4_0.xsd"
version="4.0">
<servlet>
<servlet-name>dispatcherServlet</servlet-name>
<servlet-class>org.springframework.web.servlet.DispatcherServlet</servlet-class>
<init-param>
<param-name>contextConfigLocation</param-name>
<param-value>classpath:application.xml,classpath:dubbo-consumer.xml</param-value>
</init-param>
</servlet>
<servlet-mapping>
<servlet-name>dispatcherServlet</servlet-name>
<url-pattern>/</url-pattern>
</servlet-mapping>
</web-app>
|
- 添加userDetail这个jsp , 内容如下:
1
2
3
4
5
6
7
8
9
10
11
12
13
14
15
16
17
18
19
20
21
22
23
24
25
| <%--
Created by IntelliJ IDEA.
User: Alexander Liu
Date: 2021/5/27
Time: 9:09
To change this template use File | Settings | File Templates.
--%>
<%@ page contentType="text/html;charset=UTF-8" language="java" %>
<html>
<head>
<title>用户详情</title>
</head>
<body>
<h1>用户详情</h1>
<div>
用户标识:${user.id}
</div>
<div>
用户名称:${user.username}
</div>
<div>
用户年龄:${user.age}
</div>
</body>
</html>
|
课程到这里问题很多,老师讲的也不是很好,暂缓学习。