D2L-8-Computer Vision

本文最后更新于:1 年前

这一章节本质上是几个章节的融合:计算机视觉章节计算性能章节

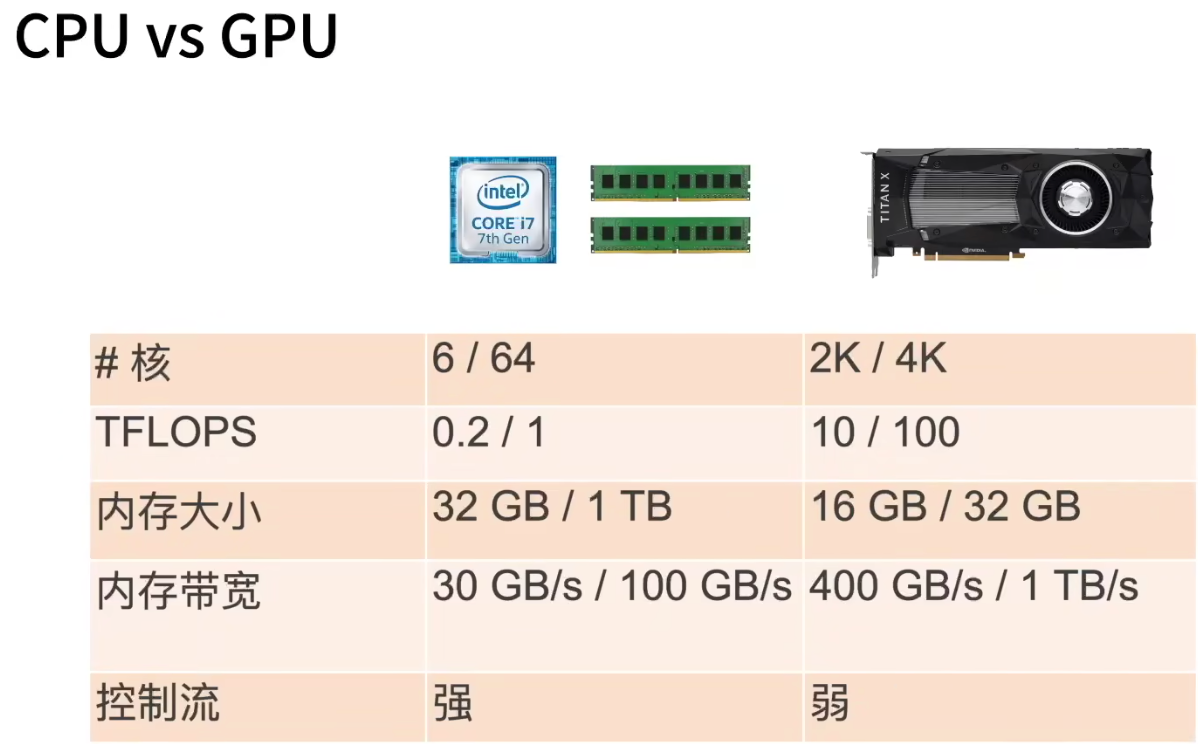
CPU vs GPU

GPU和CPU

image-20230808092103497

  • 提升CPU利用率:

    • 缓存:
      • 时间:重用数据使得保持它们在缓存里
      • 空间:按序读写数据使得它们可以预读取
    • 并行利用所有核
  • 提升GPU利用率:

    • 并行:使用数千个线程
    • 内存本地性:缓存更小,架构更简单
    • 少用控制语句:
      • 支持有限
      • 同步开销很大
  • 不要频繁在CPU和GPU之间传数据:

    • 带宽限制
    • 同步开销
  • CPU/GPU高性能计算编程

    • CPU: cpp or 其他高性能语言,编译器成熟!
    • GPU:
      • Nvidia上用CUDA:编译器和驱动成熟
      • 其他用OpenCL
  • 总结:

    • CPU:通用计算,性能优化考虑读写效率和多线程。
    • GPU:大规模并行计算任务,使用更多的小核和更好的内存带宽。

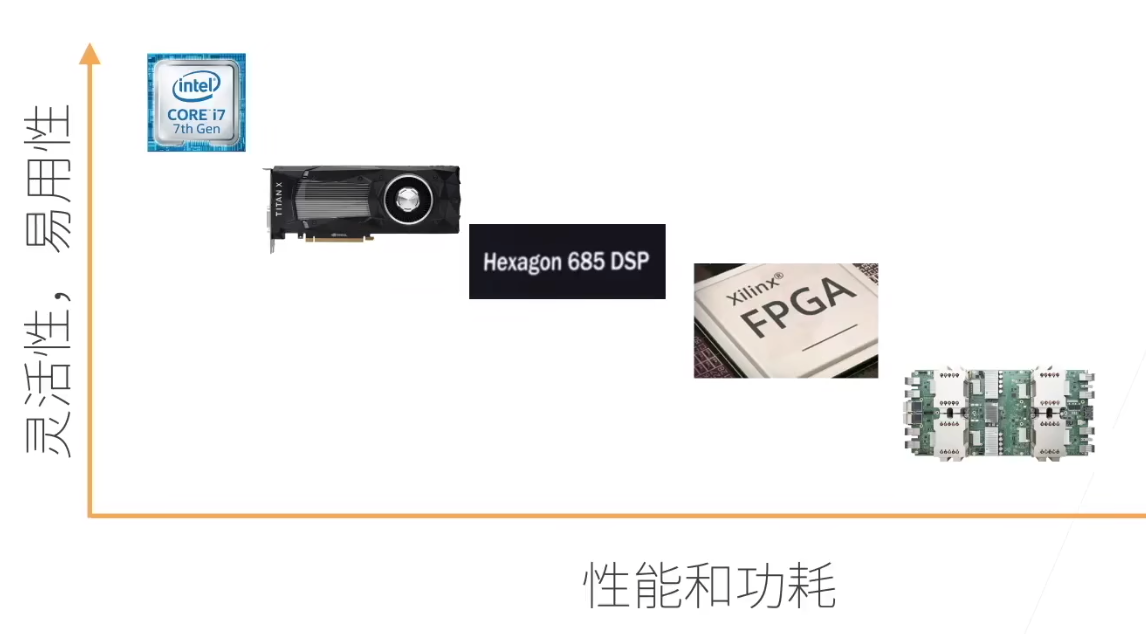
更多的芯片

  • DSP:Digital Signal Process芯片
    • 数字信号处理芯片,擅长卷积,傅立叶变换等。
    • 特点:性能高、功耗低。
    • VLIW: Very long instruction word,超长指令处理很牛。
    • 编程&调试困难,编译器质量良莠不齐。
  • FPGA:可编程阵列
    • 可编程逻辑单元和可配置连接
    • 可以配置成计算复杂函数,编程语言:VHDL, Verilog
    • 通常比通用硬件更高效
    • 工具链质量良莠不齐
    • 一次“编译”需要数小时
  • AI ASIC:Application Specific Integrated Circuit
    • 深度学习的热门领域
    • Google TPU是标志性芯片
      • 媲美Nvidia GPU性能
      • 在Google大量部署
      • 核心是systolic array
    • Systolic Array
      • 计算单元(PE)阵列
      • 特别适合做矩阵乘法
      • 设计和制造相对简单。
      • 对于一般的矩阵乘法,通过切分和填充来匹配SA的大小
      • 批量输入来降低延时
      • 通常有其他硬件单元来处理别的NN操作子,例如激活层

image-20230809091040946

越专用,越难卖,但是对于特定领域性能越高,功耗越低!!!

单机多卡并行

  • 单机多卡并行:
    • 一台机器可以装多个GPU(1-16)
    • 训练和预测时,我们将一个小批量计算切分到多个GPU上来达到加速目的
    • 常用切分方案有:
      • 数据并行
      • 模型并行
      • 通道并行(数据+模型并行)
  • 数据并行 vs 模型并行
    • 数据并行:小批量分为n块,每个GPU拿到完整参数计算一块儿数据的梯度。通常性能更好。 -> 单卡计算拓展到多卡计算
    • 模型并行:模型分为n块,每个GPU拿到一块儿模型计算它的前向和方向结果。通常用于模型大到单GPU放不下。 -> 超大模型并行

多GPU训练实现

手写

  • allreduce方法简介实现

    • 在一个核上完成所有核中数据的累加
    • 将这个核上的结果,广播到其他所有核
    1
    2
    3
    4
    5
    def allreduce(data):
    for i in range(1, len(data)):
    data[0][:] += data[i].to(data[0].device)
    for i in range(1, len(data)):
    data[i] = data[0].to(data[i].device)
  • 小批量数据均匀分布到多个GPU上

1
2
3
4
5
6
data = torch.arange(20).reshape(4, 5)
devices = [torch.device('cuda:0'), torch.device('cuda:1')]
split = nn.parallel.scatter(data, devices )
print('input: ', data)
print('load into:', devices)
print('output: ' , split)
  • Split_batch函数:
1
2
3
4
def split_batch(X, y, devices):
assert X.shape[0] == y.shape[0]
return (nn.parallel.scatter(X, devices),
nn.parallel.scatter(y, devices))
  • 训练:
1
2
3
4
5
6
7
8
9
10
11
12
13
14
15
def train_batch(X, y, device_params, devices, lr):
X_shards, y_shards = split_batch(X, y, devices)
ls = [
loss(lenet(X_shard, device_W), y_shard).sum()
for X_shard, y_shard, device_W in zip(X_shards, y_shards, device_params)
]
for l in ls:
l.backward()
with torch.no_grad():
for i in range(len(device_params[0])):
allreduce(
[device_params[c][i].grad for c in range(len(devices))]
)
for param in device_params:
d2l.sgd(param, lr, X.shape(0))

简洁实现

  • 引入依赖
1
2
3
import torch
from torch import nn
from d2l import torch as d2l
  • 简单网络
1
2
3
4
5
6
7
8
9
10
11
12
13
14
15
16
17
18
19
20
21
22
23
24
25
26
27
28
def resnet18(num_classes, in_channels=1):
"""稍加修改的 ResNet-18 模型。"""
def resnet_block(in_channels, out_channels, num_residuals,
first_block=False):
blk = []
for i in range(num_residuals):
if i == 0 and not first_block:
blk.append(
d2l.Residual(in_channels, out_channels, use_1x1conv=True,
strides=2))
else:
blk.append(d2l.Residual(out_channels, out_channels))
return nn.Sequential(*blk)

net = nn.Sequential(
nn.Conv2d(in_channels, 64, kernel_size=3, stride=1, padding=1),
nn.BatchNorm2d(64), nn.ReLU())
net.add_module("resnet_block1", resnet_block(64, 64, 2, first_block=True))
net.add_module("resnet_block2", resnet_block(64, 128, 2))
net.add_module("resnet_block3", resnet_block(128, 256, 2))
net.add_module("resnet_block4", resnet_block(256, 512, 2))
net.add_module("global_avg_pool", nn.AdaptiveAvgPool2d((1, 1)))
net.add_module("fc",
nn.Sequential(nn.Flatten(), nn.Linear(512, num_classes)))
return net

net = resnet18(10)
devices = d2l.try_all_gpus()
  • 训练
1
2
3
4
5
6
7
8
9
10
11
12
13
14
15
16
17
18
19
20
21
22
23
24
25
26
27
def train(net, num_gpus, batch_size, lr):
train_iter, test_iter = d2l.load_data_fashion_mnist(batch_size)
devices = [d2l.try_gpu(i) for i in range(num_gpus)]

def init_weights(m):
if type(m) in [nn.Linear, nn.Conv2d]:
nn.init.normal_(m.weight, std=0.01)

net.apply(init_weights)
net = nn.DataParallel(net, device_ids=devices)
trainer = torch.optim.SGD(net.parameters(), lr)
loss = nn.CrossEntropyLoss()
timer, num_epochs = d2l.Timer(), 10
animator = d2l.Animator('epoch', 'test acc', xlim=[1, num_epochs])
for epoch in range(num_epochs):
net.train()
timer.start()
for X, y in train_iter:
trainer.zero_grad()
X, y = X.to(devices[0]), y.to(devices[0])
l = loss(net(X), y)
l.backward()
trainer.step()
timer.stop()
animator.add(epoch + 1, (d2l.evaluate_accuracy_gpu(net, test_iter),))
print(f'test acc: {animator.Y[0][-1]:.2f}, {timer.avg():.1f} sec/epoch '
f'on {str(devices)}')
  • 训练结果:
1
2
3
4
5
6
7
在单个GPU上训练网络
train(net, num_gpus=1, batch_size=256, lr=0.1)
test acc: 0.92, 14.1 sec/epoch on [device(type='cuda', index=0)]

使用 2 个 GPU 进行训练
train(net, num_gpus=2, batch_size=512, lr=0.2)
test acc: 0.87, 9.2 sec/epoch on [device(type='cuda', index=0), device(type='cuda', index=1)]

Batch_size本质上是从全部样本中抽样

  • 由于GPU变多,我们为了增大性能,可以通过增大batch_size(一台GPU就256,两台GPU就应该512嘛),不然性能提升不明显。但是如果我们提升了batch_size,训练精度可能出现降低的情况,是可能由于:抽样的样本增多,学习率没有调整到位。样本本身太少,抽样的样本太多,重复样本多,重复的数据学不到东西捏!
  • 验证集准确率震荡较大是learning rate这个参数影响最大。

分布式训练

上面是单机多卡,这里直接就是多机,其实是类似的,本质上没有什么区别昂!!!

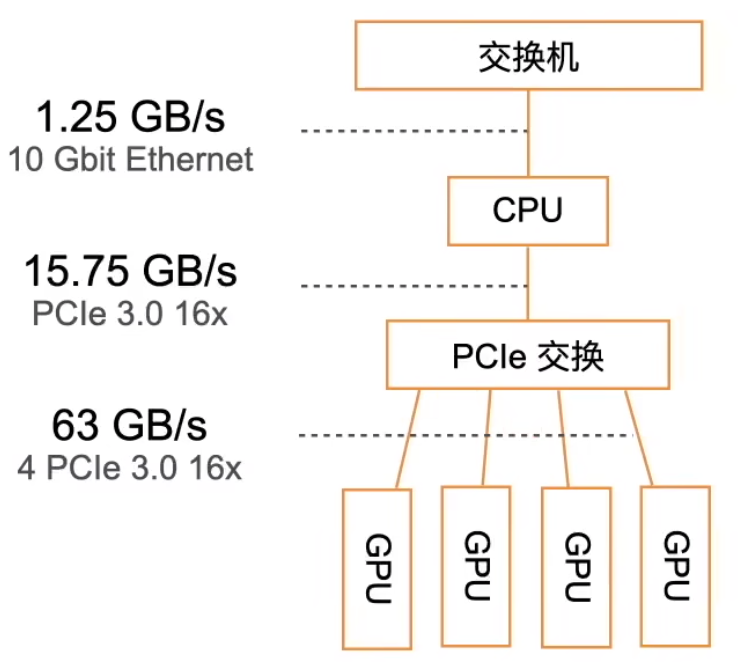
  • GPU架构(老的架构)

image-20230809211545507

尽量少的搬运数据

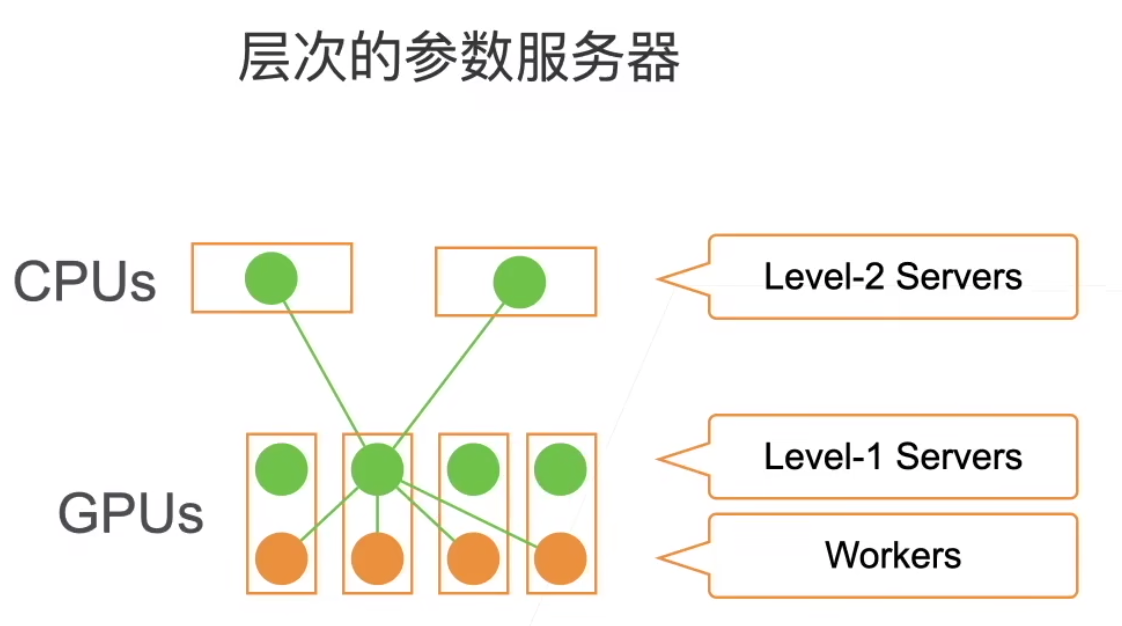
  • 层次的参数服务器:

image-20230809211638051

一样的,本地尽可能完成梯度更新的加和,每个服务器对梯度求和,并更新参数。

  • 同步SGD
    • 这里每个worker都是同步计算一 个批量,称为同步SGD
    • 假设有n个GPU,每个GPU每次处理b个样本,那么同步SGD等价于在单GPU运行批量大小为nb的SGD
    • 在理想情况下,n个GPU可以得到相对个单GPU的n倍加速
    • 性能:
      • t1=在单GPU_上计算b个样本梯度时间
      • 假设有m个参数,一个worker每次发送和接收m个参数、梯度
        • t2 = 发送和接收所用时间
      • 每个批量的计算时间为max(t1, t2)
        • 选取足够大的b使得t1 > t2(数据计算的时间 > 数据收发的时间)
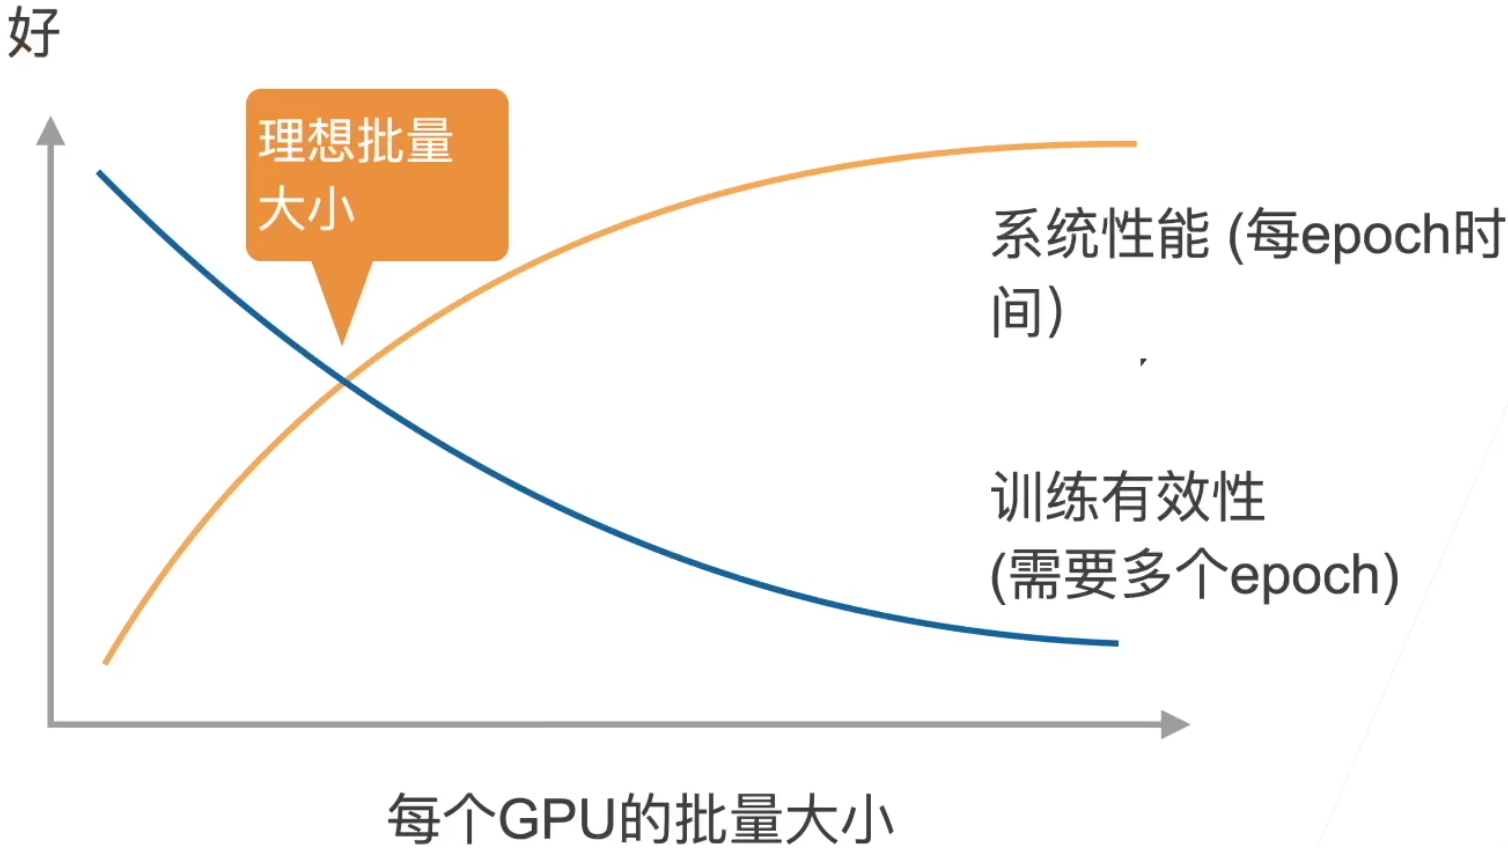
        • 增加b或n导致更大的批量大小,导致需要更多计算来得到给定的模型精度
  • 性能的权衡:

image-20230809212636682

  • 收敛指的是:需要多少个epoch,才能达到我们的训练精度。沐神太强了,小批量里数据多样性强,性能好。大批量数据的重复度高,对于梯度计算来说冗余,白费了计算性能。
  • 我觉得是因为batchsize越大,每个epoch里的iter数越少,iter少到一定程度,导致每个epoch更新参数不到位,所以需要更多epoch才够。那要是数据足够大呢?大到后面某些step梯度都不怎么变了呢。这里的训练有效性不是从准确率上讲的,是从计算有效性上,属于计算效率。
  • 样本多了,需要花更多的时间去计算梯度,收敛效率降低,我认为可以理解为达到某个精度需要的时间长了
  • 实践的建议:
    • 使用一个大数据集
    • 需要好的GPU-GPU和机器-机器带宽
    • 高效的数据读取和预处理
    • 模型需要有好的计算(FLOP) 通讯(model size)
      • Inception > ResNet > AlexNet
    • 使用足够大的批量大小来得到好的系统性能
    • 使用高效的优化算法对对应大批量大小

数据增广

  • 增加一个已有的数据集,使得有更多的多样性
    • 语言里面加入各种背景噪音
    • 改变图片形状,色温,亮度等
  • 如何使用:在线生成!从原始数据读取图片,随机进行增强,生成不一样的图片,再进行训练。只有训练的时候用,测试的时候不用昂!!
  • 常见方法:

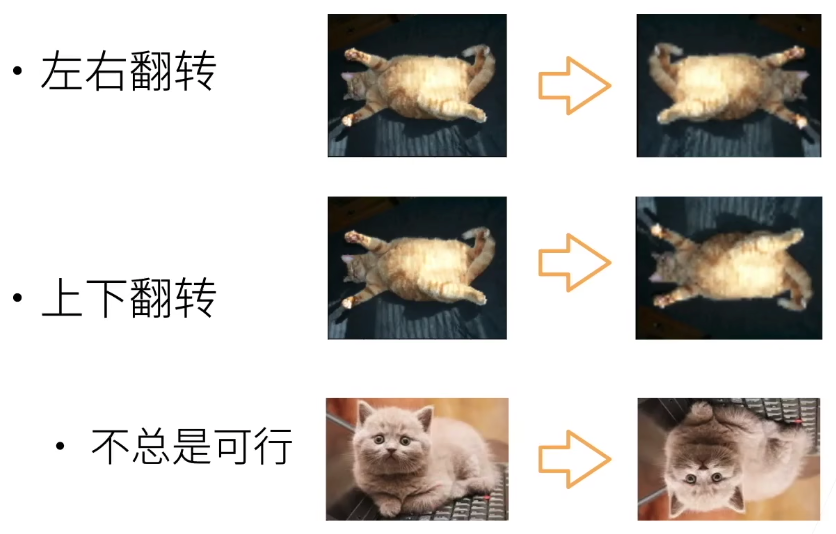
翻转

image-20230810095845340

切割

  • 从图片中切割一块,变形到固定形状
    • 随机高宽比
    • 随机大小
    • 随机位置

颜色

  • 色调,饱和度,明亮度

还有几十种其他方法,photoshop能干的,都能作用于图片上面!从后往前推,测试集 or 实际情况下可能遇到某些情况,我们才去对训练集做某些调整!

  • 上面的很重要,讲清楚了,我们什么时候应该做数据增广,如何去做!!!不能随便做哈!!!

代码实现

  • Dependency:
1
2
3
4
5
6
7
8
9
%matplotlib inline
import torch
import torchvision
from torch import nn
from d2l import torch as d2l

d2l.set_figsize()
img = d2l.Image.open('../img/cat1.jpg')
d2l.plt.imshow(img);
  • 图片增广方法:
1
2
3
def apply(img, aug, num_rows=2, num_cols=4, scale=1.5):
Y = [aug(img) for _ in range(num_rows * num_cols)]
d2l.show_images(Y, num_rows, num_cols, scale=scale)
  • 左右翻转
1
apply(img, torchvision.transforms.RandomHorizontalFlip())
  • 上下翻转
1
apply(img, torchvision.transforms.RandomVerticalFlip())
  • 随机裁剪
1
2
3
shape_aug = torchvision.transforms.RandomResizedCrop(
(200, 200), scale=(0.1, 1), ratio=(0.5, 2))
apply(img, shape_aug)
  • 随机更改图像的亮度
1
2
3
4
apply(
img,
torchvision.transforms.ColorJitter(brightness=0.5, contrast=0,saturation=0, hue=0)
)
  • 随机更改图像的色调
1
2
3
4
apply(
img,
torchvision.transforms.ColorJitter(brightness=0, contrast=0, saturation=0,hue=0.5)
)
  • 随机更改图像的亮度(brightness)、对比度(contrast)、饱和度(saturation)和色调(hue
1
2
color_aug = torchvision.transforms.ColorJitter(brightness=0.5, contrast=0.5,saturation=0.5, hue=0.5)
apply(img, color_aug)
  • 结合多种图像增广方法
1
2
augs = torchvision.transforms.Compose([torchvision.transforms.RandomHorizontalFlip(), color_aug, shape_aug])
apply(img, augs)

实战

  • 使用图像增广进行训练
1
2
3
all_images = torchvision.datasets.CIFAR10(train=True, root="../data",
download=True)
d2l.show_images([all_images[i][0] for i in range(32)], 4, 8, scale=0.8);
  • 只使用最简单的随机左右翻转
1
2
3
4
5
6
train_augs = torchvision.transforms.Compose([
torchvision.transforms.RandomHorizontalFlip(),
torchvision.transforms.ToTensor()])

test_augs = torchvision.transforms.Compose([
torchvision.transforms.ToTensor()])
  • 定义一个辅助函数,以便于读取图像和应用图像增广
1
2
3
4
5
6
7
def load_cifar10(is_train, augs, batch_size):
dataset = torchvision.datasets.CIFAR10(root="../data", train=is_train,transform=augs, download=True)

dataloader = torch.utils.data.DataLoader(
dataset, batch_size=batch_size, shuffle=is_train,
num_workers=d2l.get_dataloader_workers())
return dataloader
  • 定义一个函数,使用多GPU对模型进行训练和评估
1
2
3
4
5
6
7
8
9
10
11
12
13
14
15
16
17
18
19
20
21
22
23
24
25
26
27
28
29
30
31
32
33
34
35
36
37
38
39
def train_batch_ch13(net, X, y, loss, trainer, devices):
if isinstance(X, list):
X = [x.to(devices[0]) for x in X]
else:
X = X.to(devices[0])
y = y.to(devices[0])
net.train()
trainer.zero_grad()
pred = net(X)
l = loss(pred, y)
l.sum().backward()
trainer.step()
train_loss_sum = l.sum()
train_acc_sum = d2l.accuracy(pred, y)
return train_loss_sum, train_acc_sum

def train_ch13(net, train_iter, test_iter, loss, trainer, num_epochs,
devices=d2l.try_all_gpus()):
timer, num_batches = d2l.Timer(), len(train_iter)
animator = d2l.Animator(xlabel='epoch', xlim=[1, num_epochs], ylim=[0, 1],
legend=['train loss', 'train acc', 'test acc'])
net = nn.DataParallel(net, device_ids=devices).to(devices[0])
for epoch in range(num_epochs):
metric = d2l.Accumulator(4)
for i, (features, labels) in enumerate(train_iter):
timer.start()
l, acc = train_batch_ch13(net, features, labels, loss, trainer,
devices)
metric.add(l, acc, labels.shape[0], labels.numel())
timer.stop()
if (i + 1) % (num_batches // 5) == 0 or i == num_batches - 1:
animator.add(
epoch + (i + 1) / num_batches,
(metric[0] / metric[2], metric[1] / metric[3], None))
test_acc = d2l.evaluate_accuracy_gpu(net, test_iter)
animator.add(epoch + 1, (None, None, test_acc))
print(f'loss {metric[0] / metric[2]:.3f}, train acc '
f'{metric[1] / metric[3]:.3f}, test acc {test_acc:.3f}')
print(f'{metric[2] * num_epochs / timer.sum():.1f} examples/sec on '
  • 定义 train_with_data_aug 函数,使用图像增广来训练模型
1
2
3
4
5
6
7
8
9
10
11
12
13
14
15
16
17
18
19
20
batch_size, devices, net = 256, d2l.try_all_gpus(), d2l.resnet18(10, 3)

def init_weights(m):
if type(m) in [nn.Linear, nn.Conv2d]:
nn.init.xavier_uniform_(m.weight)

net.apply(init_weights)

def train_with_data_aug(train_augs, test_augs, net, lr=0.001):
train_iter = load_cifar10(True, train_augs, batch_size)
test_iter = load_cifar10(False, test_augs, batch_size)
loss = nn.CrossEntropyLoss(reduction="none")
trainer = torch.optim.Adam(net.parameters(), lr=lr)
train_ch13(net, train_iter, test_iter, loss, trainer, 10, devices)


训练模型
train_with_data_aug(train_augs, test_augs, net)
loss 0.171, train acc 0.941, test acc 0.833
4850.8 examples/sec on [device(type='cuda', index=0), device(type='cuda', index=1)]

总结

  • 由于样本的多样性不够!我们就需要数据增广,手动增加样本的多样性!!!增广的目的本来的就是:让训练集更加像测试集!!!要是一样就更好啦!想让训练集 cover 所有测试集中的情况or现实生活中可能出现的数据。
  • 对于极度偏斜数据,也可以尝试使用重采样或者数据增广来进行数据增强!!!
  • 图片增广后,数据分布大致是不改变的,但是数据多样性增加了,variance变大了。可以理解为:均值不变,方差变大了!
  • mix-up增广很有效!

微调(Fine-tuning)

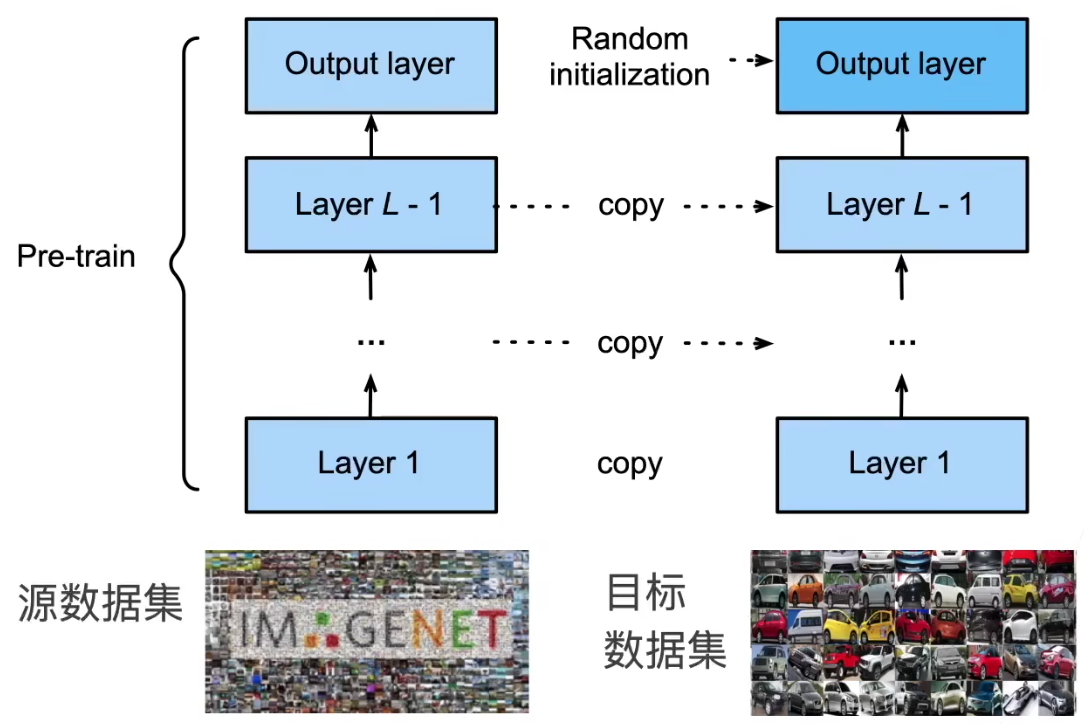
  • 网络架构:

    • 特征抽取将原始像素变成容易线性分割的特征(特征抽取)
    • 线性分类器来做分类(Softmax回归)
  • 预训练模型(Pretrained-Model):

    • 特征抽取的部分,我们想拿来继续复用一下!
    • 但是分类器我们要改成我们自己的捏!

    image-20230810111153415

    复用别人训练好的,特征提取模块!

  • 训练:

    • 是一个目标数据集上的正常训练任务,但使用更强的正则化:
      • 更小的学习率
      • 更少的数据迭代
    • 源数据集远复杂于目标数据,通常微调效果更好
  • 重用分类器权重:

    • 源数据集可能也有目标数据中的部分标号
    • 可以使用预训练好分类器中对应标号对应的向量来做初始化
  • 固定一些层

    • 神经网络通常学习有层次的特征表示:
      • 低层次的特征更加通用
      • 高层次的特征则更跟数据集相关
    • 可以固定底部一些层的参数,不参与更新
      • 更强的正则

别人训练好的可以直接拿来用,因此!工业界非常欢迎!

代码

  • dependency
1
2
3
4
5
6
7
8
9
10
11
12
13
14
15
16
17
18
19
%matplotlib inline
import os
import torch
import torchvision
from torch import nn
from d2l import torch as d2l

d2l.DATA_HUB['hotdog'] = (d2l.DATA_URL + 'hotdog.zip',
'fba480ffa8aa7e0febbb511d181409f899b9baa5')

data_dir = d2l.download_extract('hotdog')

train_imgs = torchvision.datasets.ImageFolder(os.path.join(data_dir, 'train'))
test_imgs = torchvision.datasets.ImageFolder(os.path.join(data_dir, 'test'))
# 图像的大小和纵横比各有不同

hotdogs = [train_imgs[i][0] for i in range(8)]
not_hotdogs = [train_imgs[-i - 1][0] for i in range(8)]
d2l.show_images(hotdogs + not_hotdogs, 2, 8, scale=1.4);
  • 数据增广
1
2
3
4
5
6
7
8
9
10
11
12
normalize = torchvision.transforms.Normalize([0.485, 0.456, 0.406],
[0.229, 0.224, 0.225])

train_augs = torchvision.transforms.Compose([
torchvision.transforms.RandomResizedCrop(224),
torchvision.transforms.RandomHorizontalFlip(),
torchvision.transforms.ToTensor(), normalize])

test_augs = torchvision.transforms.Compose([
torchvision.transforms.Resize(256),
torchvision.transforms.CenterCrop(224),
torchvision.transforms.ToTensor(), normalize])
  • 定义和初始化模型:
1
2
3
4
5
6
pretrained_net = torchvision.models.resnet18(pretrained=True)

pretrained_net.fc

# result
Linear(in_features=512, out_features=1000, bias=True)
  • 构造模型:
1
2
3
4
5
finetune_net = torchvision.models.resnet18(pretrained=True)
finetune_net.fc =
# 换掉最后的输出层
nn.Linear(finetune_net.fc.in_features, 2)
nn.init.xavier_uniform_(finetune_net.fc.weight);
  • 微调模型:
1
2
3
4
5
6
7
8
9
10
11
12
13
14
15
16
17
18
19
20
21
22
23
24
25
26
27
def train_fine_tuning(net, learning_rate, batch_size=128, num_epochs=5,
param_group=True):
train_iter = torch.utils.data.DataLoader(
torchvision.datasets.ImageFolder(os.path.join(data_dir, 'train'),
transform=train_augs),
batch_size=batch_size, shuffle=True)
test_iter = torch.utils.data.DataLoader(
torchvision.datasets.ImageFolder(os.path.join(data_dir, 'test'),
transform=test_augs),
batch_size=batch_size)
devices = d2l.try_all_gpus()
loss = nn.CrossEntropyLoss(reduction="none")
if param_group:
params_1x = [
param for name, param in net.named_parameters()
if name not in ["fc.weight", "fc.bias"]]
trainer = torch.optim.SGD([{
'params': params_1x}, {
'params': net.fc.parameters(),
'lr': learning_rate * 10}], lr=learning_rate,
weight_decay=0.001)
else:
trainer = torch.optim.SGD(net.parameters(), lr=learning_rate,
weight_decay=0.001)
d2l.train_ch13(net, train_iter, test_iter, loss, trainer, num_epochs,
devices)

  • 使用较小的学习率:
1
2
3
4
5
train_fine_tuning(finetune_net, 5e-5)

# result
loss 0.263, train acc 0.905, test acc 0.934
841.8 examples/sec on [device(type='cuda', index=0), device(type='cuda', index=1)]
  • 为了进行比较, 所有模型参数初始化为随机值
1
2
3
4
5
6
7
scratch_net = torchvision.models.resnet18()
scratch_net.fc = nn.Linear(scratch_net.fc.in_features, 2)
train_fine_tuning(scratch_net, 5e-4, param_group=False)

# result
loss 0.416, train acc 0.819, test acc 0.750
1570.1 examples/sec on [device(type='cuda', index=0), device(type='cuda', index=1)]

Tips

  • 建议就是fine-tuning,别从头开始。一般不会有坏处,可以先试试。

  • 但是如果我们用的数据,和pre-trained用的数据很不一样,建议从头开始捏!(先试试,不行就从头开始)

  • Fine-Tuning 本质上就是 Transfer Training 中的一种算法

  • 微调对学习率不敏感,选一个比较小的学习率就行了!!!人家抽特征,最重要的部分都训练好了嘛,你就拿来用就行,改一改最后的输出层!

目标检测(Object Detection)

边缘框

用于表示物体的位置

  • 边框表示方式:
    • 左上x,左上y,右下x,右下y
    • 左上x,左上y,宽,高
  • 目标检测数据集
    • 每行表示一个物体,图片文件名,物体类别,边缘框
    • Coco Dataset,80物体,330k图片,1.5M物体

实现

  • Dependencies
1
2
3
4
5
6
7
%matplotlib inline
import torch
from d2l import torch as d2l

d2l.set_figsize()
img = d2l.plt.imread('../img/catdog.jpg')
d2l.plt.imshow(img);
  • 表示位置
1
2
3
4
5
6
7
8
9
10
11
12
13
14
15
16
17
18
19
def box_corner_to_center(boxes):
"""从(左上,右下)转换到(中间,宽度,高度)"""
x1, y1, x2, y2 = boxes[:, 0], boxes[:, 1], boxes[:, 2], boxes[:, 3]
cx = (x1 + x2) / 2
cy = (y1 + y2) / 2
w = x2 - x1
h = y2 - y1
boxes = torch.stack((cx, cy, w, h), axis=-1)
return boxes

def box_center_to_corner(boxes):
"""从(中间,宽度,高度)转换到(左上,右下)"""
cx, cy, w, h = boxes[:, 0], boxes[:, 1], boxes[:, 2], boxes[:, 3]
x1 = cx - 0.5 * w
y1 = cy - 0.5 * h
x2 = cx + 0.5 * w
y2 = cy + 0.5 * h
boxes = torch.stack((x1, y1, x2, y2), axis=-1)
return boxes
  • 定义图像中狗和猫的边界框
1
2
3
4
dog_bbox, cat_bbox = [60.0, 45.0, 378.0, 516.0], [400.0, 112.0, 655.0, 493.0]

boxes = torch.tensor((dog_bbox, cat_bbox))
box_center_to_corner(box_corner_to_center(boxes)) == boxes
  • 将边界框在图中画出
1
2
3
4
5
6
7
8
def bbox_to_rect(bbox, color):
return d2l.plt.Rectangle(xy=(bbox[0], bbox[1]), width=bbox[2] - bbox[0],
height=bbox[3] - bbox[1], fill=False,
edgecolor=color, linewidth=2)

fig = d2l.plt.imshow(img)
fig.axes.add_patch(bbox_to_rect(dog_bbox, 'blue'))
fig.axes.add_patch(bbox_to_rect(cat_bbox, 'red'));

怪不得要转换,matplotlib要使用嘛!!!

数据集

目标检测的数据集没有特别好的,特别小的数据集

  • 手动构造小的数据集的读入:
1
2
3
4
5
6
7
8
9
10
%matplotlib inline
import os
import pandas as pd
import torch
import torchvision
from d2l import torch as d2l

d2l.DATA_HUB['banana-detection'] = (
d2l.DATA_URL + 'banana-detection.zip',
'5de26c8fce5ccdea9f91267273464dc968d20d72')
  • 读取香蕉检测数据集:
1
2
3
4
5
6
7
8
9
10
11
12
13
14
15
16
17
def read_data_bananas(is_train=True):
"""读取香蕉检测数据集中的图像和标签。"""
data_dir = d2l.download_extract('banana-detection')
csv_fname = os.path.join(data_dir,
'bananas_train' if is_train else 'bananas_val',
'label.csv')
csv_data = pd.read_csv(csv_fname)
csv_data = csv_data.set_index('img_name')
images, targets = [], []
for img_name, target in csv_data.iterrows():
images.append(
torchvision.io.read_image(
os.path.join(data_dir,
'bananas_train' if is_train else 'bananas_val',
'images', f'{img_name}')))
targets.append(list(target))
return images, torch.tensor(targets).unsqueeze(1) / 256
  • 创建一个自定义 Dataset 实例
1
2
3
4
5
6
7
8
9
10
11
12
class BananasDataset(torch.utils.data.Dataset):
"""一个用于加载香蕉检测数据集的自定义数据集。"""
def __init__(self, is_train):
self.features, self.labels = read_data_bananas(is_train)
print('read ' + str(len(self.features)) + (
f' training examples' if is_train else f' validation examples'))

def __getitem__(self, idx):
return (self.features[idx].float(), self.labels[idx])

def __len__(self):
return len(self.features)
  • 为训练集和测试集返回两个数据加载器实例
1
2
3
4
5
6
7
def load_data_bananas(batch_size):
"""加载香蕉检测数据集。"""
train_iter = torch.utils.data.DataLoader(BananasDataset(is_train=True),
batch_size, shuffle=True)
val_iter = torch.utils.data.DataLoader(BananasDataset(is_train=False),
batch_size)
return train_iter, val_iter
  • 读取一个小批量,并打印其中的图像和标签的形状
1
2
3
4
batch_size, edge_size = 32, 256
train_iter, _ = load_data_bananas(batch_size)
batch = next(iter(train_iter))
batch[0].shape, batch[1].shape
  • 示范
1
2
3
4
imgs = (batch[0][0:10].permute(0, 2, 3, 1)) / 255
axes = d2l.show_images(imgs, 2, 5, scale=2)
for ax, label in zip(axes, batch[1][0:10]):
d2l.show_bboxes(ax, [label[0][1:5] * edge_size], colors=['w'])

锚框(Anchor box)

  • 目标检测算法是基于锚框

    • 提出多个被锚框的区域(边缘框)
    • 预测每个锚框里是否含有关注的物体
    • 如果是,预测从这个锚框到真实边缘框的偏移
  • IoU - 交并比

    • 用于计算框的相似度,0表示无重叠,1表示重合
    • Jacquard指数的特殊情况:$\frac{|A\ \cap\ B|}{|A\ \cup\ B|}$
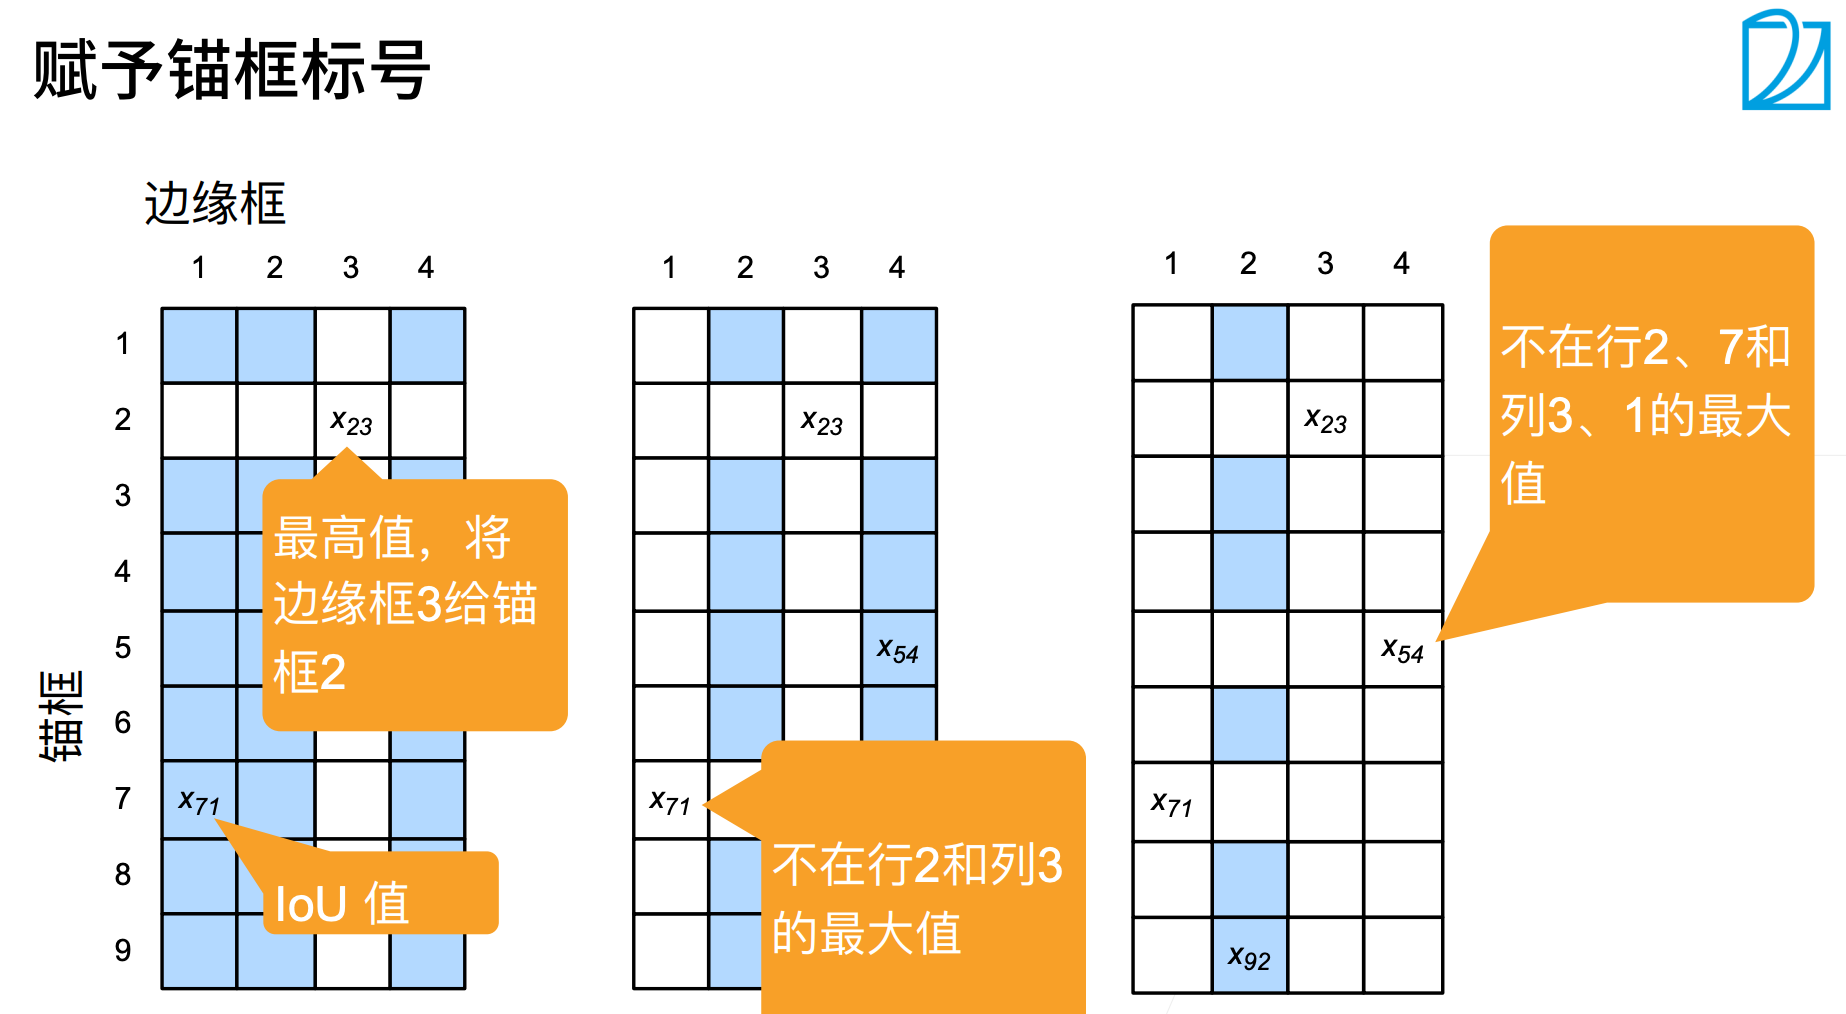
  • 赋予锚框标号:

    • 每个框是一个训练样本
    • 每个框要么是背景,要么关联一个真实边缘框
    • 一个算法,可能会生成大量的框,其中大多数都是背景(负类样本)

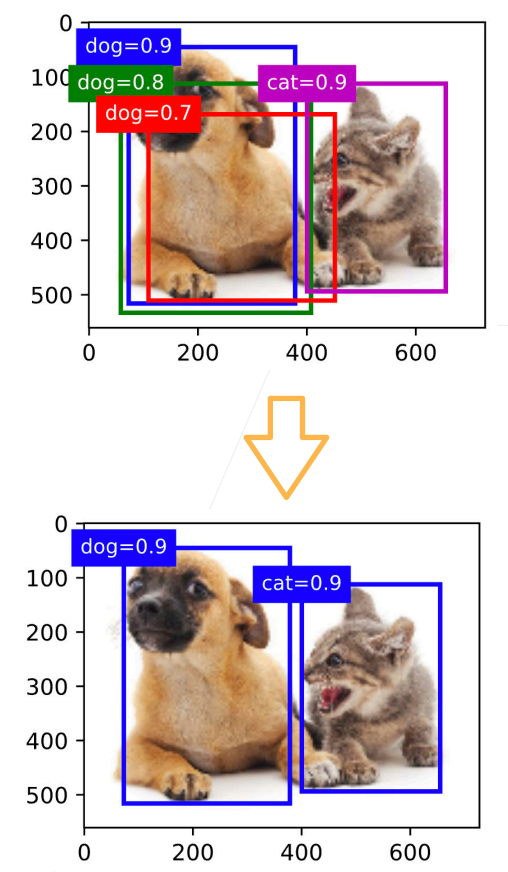
image-20230811104325075

  • 使用非极大值抑制(NMS)输出

    • 每个框预测一个边缘框
    • NMS可以合并相似的预测
      • 选中的非背景累的最大值
      • 去掉所有其它和它IoU值大于$\theta$的预测
      • 重复上述过程所有预测要么被选中,要么被去掉

    image-20230811113428629

总结

  • 一类目标检测算法基于锚框来预测
  • 首先生成大量锚框,并赋予标号,每个锚框作为一个样本进行训练
  • 在预测时,使用NMS来去掉冗余的预测

代码

  • Dependencies:
1
2
3
4
5
%matplotlib inline
import torch
from d2l import torch as d2l

torch.set_printoptions(2)
  • 锚框的宽度和高度分别是$ws\sqrt{r}$和$ws/\sqrt{r}$,我们只考虑组合:

$$
(s_1, r_1), (s_1, r_2), \ldots, (s_1, r_m), (s_2, r_1), (s_3, r_1), \ldots, (s_n, r_1)
$$

1
2
3
4
5
6
7
8
9
10
11
12
13
14
15
16
17
18
19
20
21
22
23
24
25
26
27
28
def multibox_prior(data, sizes, ratios):
"""生成以每个像素为中心具有不同形状的锚框。"""
in_height, in_width = data.shape[-2:]
device, num_sizes, num_ratios = data.device, len(sizes), len(ratios)
boxes_per_pixel = (num_sizes + num_ratios - 1)
size_tensor = torch.tensor(sizes, device=device)
ratio_tensor = torch.tensor(ratios, device=device)

offset_h, offset_w = 0.5, 0.5
steps_h = 1.0 / in_height
steps_w = 1.0 / in_width

center_h = (torch.arange(in_height, device=device) + offset_h) * steps_h
center_w = (torch.arange(in_width, device=device) + offset_w) * steps_w
shift_y, shift_x = torch.meshgrid(center_h, center_w)
shift_y, shift_x = shift_y.reshape(-1), shift_x.reshape(-1)

w = torch.cat((size_tensor * torch.sqrt(ratio_tensor[0]),
sizes[0] * torch.sqrt(ratio_tensor[1:])))\
* in_height / in_width
h = torch.cat((size_tensor / torch.sqrt(ratio_tensor[0]),
sizes[0] / torch.sqrt(ratio_tensor[1:])))
anchor_manipulations = torch.stack(
(-w, -h, w, h)).T.repeat(in_height * in_width, 1) / 2

out_grid = torch.stack([shift_x, shift_y, shift_x, shift_y],
dim=1).repeat_interleave(boxes_per_pixel, dim=0)
output = out_grid + anchor_manipulations
  • 返回的锚框变量 Y 的形状
1
2
3
4
5
6
7
img = d2l.plt.imread('../img/catdog.jpg')
h, w = img.shape[:2]

print(h, w)
X = torch.rand(size=(1, 3, h, w))
Y = multibox_prior(X, sizes=[0.75, 0.5, 0.25], ratios=[1, 2, 0.5])
Y.shape
  • 访问以 (250, 250) 为中心的第一个锚框
1
2
boxes = Y.reshape(h, w, 5, 4)
boxes[250, 250, 0, :]
  • 显示以图像中一个像素为中心的所有锚框
1
2
3
4
5
6
7
8
9
10
11
12
13
14
15
16
17
18
19
20
21
22
23
24
25
26
27
def show_bboxes(axes, bboxes, labels=None, colors=None):
"""显示所有边界框。"""
def _make_list(obj, default_values=None):
if obj is None:
obj = default_values
elif not isinstance(obj, (list, tuple)):
obj = [obj]
return obj

labels = _make_list(labels)
colors = _make_list(colors, ['b', 'g', 'r', 'm', 'c'])
for i, bbox in enumerate(bboxes):
color = colors[i % len(colors)]
rect = d2l.bbox_to_rect(bbox.detach().numpy(), color)
axes.add_patch(rect)
if labels and len(labels) > i:
text_color = 'k' if color == 'w' else 'w'
axes.text(rect.xy[0], rect.xy[1], labels[i], va='center',
ha='center', fontsize=9, color=text_color,
bbox=dict(facecolor=color, lw=0))

d2l.set_figsize()
bbox_scale = torch.tensor((w, h, w, h))
fig = d2l.plt.imshow(img)
show_bboxes(fig.axes, boxes[250, 250, :, :] * bbox_scale, [
's=0.75, r=1', 's=0.5, r=1', 's=0.25, r=1', 's=0.75, r=2', 's=0.75, r=0.5'
])
  • 交并比(IoU)
1
2
3
4
5
6
7
8
9
10
11
12
def box_iou(boxes1, boxes2):
"""计算两个锚框或边界框列表中成对的交并比。"""
box_area = lambda boxes: ((boxes[:, 2] - boxes[:, 0]) *
(boxes[:, 3] - boxes[:, 1]))
areas1 = box_area(boxes1)
areas2 = box_area(boxes2)
inter_upperlefts = torch.max(boxes1[:, None, :2], boxes2[:, :2])
inter_lowerrights = torch.min(boxes1[:, None, 2:], boxes2[:, 2:])
inters = (inter_lowerrights - inter_upperlefts).clamp(min=0)
inter_areas = inters[:, :, 0] * inters[:, :, 1]
union_areas = areas1[:, None] + areas2 - inter_areas
return inter_areas / union_areas
  • 将真实边界框分配给锚框
1
2
3
4
5
6
7
8
9
10
11
12
13
14
15
16
17
18
19
20
def assign_anchor_to_bbox(ground_truth, anchors, device, iou_threshold=0.5):
"""将最接近的真实边界框分配给锚框。"""
num_anchors, num_gt_boxes = anchors.shape[0], ground_truth.shape[0]
jaccard = box_iou(anchors, ground_truth)
anchors_bbox_map = torch.full((num_anchors,), -1, dtype=torch.long,
device=device)
max_ious, indices = torch.max(jaccard, dim=1)
anc_i = torch.nonzero(max_ious >= 0.5).reshape(-1)
box_j = indices[max_ious >= 0.5]
anchors_bbox_map[anc_i] = box_j
col_discard = torch.full((num_anchors,), -1)
row_discard = torch.full((num_gt_boxes,), -1)
for _ in range(num_gt_boxes):
max_idx = torch.argmax(jaccard)
box_idx = (max_idx % num_gt_boxes).long()
anc_idx = (max_idx / num_gt_boxes).long()
anchors_bbox_map[anc_idx] = box_idx
jaccard[:, box_idx] = col_discard
jaccard[anc_idx, :] = row_discard
return anchors_bbox_map

给定框A和B,中心坐标分别为$(x_a,y_a)$, 和$(x_b,y_b)$,宽度分别为$w_a$和$w_b$,高度分别为$h_a$和$h_b$。 我们可以将𝐴的偏移量标记为

$$
\left( \frac{ \frac{x_b - x_a}{w_a} - \mu_x }{\sigma_x},
\frac{ \frac{y_b - y_a}{h_a} - \mu_y }{\sigma_y},
\frac{ \log \frac{w_b}{w_a} - \mu_w }{\sigma_w},
\frac{ \log \frac{h_b}{h_a} - \mu_h }{\sigma_h}\right)
$$

1
2
3
4
5
6
7
8
def offset_boxes(anchors, assigned_bb, eps=1e-6):
"""对锚框偏移量的转换。"""
c_anc = d2l.box_corner_to_center(anchors)
c_assigned_bb = d2l.box_corner_to_center(assigned_bb)
offset_xy = 10 * (c_assigned_bb[:, :2] - c_anc[:, :2]) / c_anc[:, 2:]
offset_wh = 5 * torch.log(eps + c_assigned_bb[:, 2:] / c_anc[:, 2:])
offset = torch.cat([offset_xy, offset_wh], axis=1)
return offset
  • 标记锚框的类和偏移量
1
2
3
4
5
6
7
8
9
10
11
12
13
14
15
16
17
18
19
20
21
22
23
24
25
26
27
def multibox_target(anchors, labels):
"""使用真实边界框标记锚框。"""
batch_size, anchors = labels.shape[0], anchors.squeeze(0)
batch_offset, batch_mask, batch_class_labels = [], [], []
device, num_anchors = anchors.device, anchors.shape[0]
for i in range(batch_size):
label = labels[i, :, :]
anchors_bbox_map = assign_anchor_to_bbox(label[:, 1:], anchors,
device)
bbox_mask = ((anchors_bbox_map >= 0).float().unsqueeze(-1)).repeat(
1, 4)
class_labels = torch.zeros(num_anchors, dtype=torch.long,
device=device)
assigned_bb = torch.zeros((num_anchors, 4), dtype=torch.float32,
device=device)
indices_true = torch.nonzero(anchors_bbox_map >= 0)
bb_idx = anchors_bbox_map[indices_true]
class_labels[indices_true] = label[bb_idx, 0].long() + 1
assigned_bb[indices_true] = label[bb_idx, 1:]
offset = offset_boxes(anchors, assigned_bb) * bbox_mask
batch_offset.append(offset.reshape(-1))
batch_mask.append(bbox_mask.reshape(-1))
batch_class_labels.append(class_labels)
bbox_offset = torch.stack(batch_offset)
bbox_mask = torch.stack(batch_mask)
class_labels = torch.stack(batch_class_labels)
return (bbox_offset, bbox_mask, class_labels)
  • 在图像中绘制这些地面真相边界框和锚框
1
2
3
4
5
6
7
8
9
ground_truth = torch.tensor([[0, 0.1, 0.08, 0.52, 0.92],
[1, 0.55, 0.2, 0.9, 0.88]])
anchors = torch.tensor([[0, 0.1, 0.2, 0.3], [0.15, 0.2, 0.4, 0.4],
[0.63, 0.05, 0.88, 0.98], [0.66, 0.45, 0.8, 0.8],
[0.57, 0.3, 0.92, 0.9]])

fig = d2l.plt.imshow(img)
show_bboxes(fig.axes, ground_truth[:, 1:] * bbox_scale, ['dog', 'cat'], 'k')
show_bboxes(fig.axes, anchors * bbox_scale, ['0', '1', '2', '3', '4']);
  • 根据狗和猫的真实边界框,标注这些锚框的分类和偏移量
1
2
3
4
labels = multibox_target(anchors.unsqueeze(dim=0),
ground_truth.unsqueeze(dim=0))

labels[2]
  • 应用逆偏移变换来返回预测的边界框坐标
1
2
3
4
5
6
7
8
def offset_inverse(anchors, offset_preds):
"""根据带有预测偏移量的锚框来预测边界框。"""
anc = d2l.box_corner_to_center(anchors)
pred_bbox_xy = (offset_preds[:, :2] * anc[:, 2:] / 10) + anc[:, :2]
pred_bbox_wh = torch.exp(offset_preds[:, 2:] / 5) * anc[:, 2:]
pred_bbox = torch.cat((pred_bbox_xy, pred_bbox_wh), axis=1)
predicted_bbox = d2l.box_center_to_corner(pred_bbox)
return predicted_bbox
  • 以下 nms 函数按降序对置信度进行排序并返回其索引
1
2
3
4
5
6
7
8
9
10
11
12
13
def nms(boxes, scores, iou_threshold):
"""对预测边界框的置信度进行排序。"""
B = torch.argsort(scores, dim=-1, descending=True)
keep = []
while B.numel() > 0:
i = B[0]
keep.append(i)
if B.numel() == 1: break
iou = box_iou(boxes[i, :].reshape(-1, 4),
boxes[B[1:], :].reshape(-1, 4)).reshape(-1)
inds = torch.nonzero(iou <= iou_threshold).reshape(-1)
B = B[inds + 1]
return torch.tensor(keep, device=boxes.device)
  • 将非极大值抑制应用于预测边界框
1
2
3
4
5
6
7
8
9
10
11
12
13
14
15
16
17
18
19
20
21
22
23
24
25
26
27
28
def multibox_detection(cls_probs, offset_preds, anchors, nms_threshold=0.5,
pos_threshold=0.009999999):
"""使用非极大值抑制来预测边界框。"""
device, batch_size = cls_probs.device, cls_probs.shape[0]
anchors = anchors.squeeze(0)
num_classes, num_anchors = cls_probs.shape[1], cls_probs.shape[2]
out = []
for i in range(batch_size):
cls_prob, offset_pred = cls_probs[i], offset_preds[i].reshape(-1, 4)
conf, class_id = torch.max(cls_prob[1:], 0)
predicted_bb = offset_inverse(anchors, offset_pred)
keep = nms(predicted_bb, conf, nms_threshold)

all_idx = torch.arange(num_anchors, dtype=torch.long, device=device)
combined = torch.cat((keep, all_idx))
uniques, counts = combined.unique(return_counts=True)
non_keep = uniques[counts == 1]
all_id_sorted = torch.cat((keep, non_keep))
class_id[non_keep] = -1
class_id = class_id[all_id_sorted]
conf, predicted_bb = conf[all_id_sorted], predicted_bb[all_id_sorted]
below_min_idx = (conf < pos_threshold)
class_id[below_min_idx] = -1
conf[below_min_idx] = 1 - conf[below_min_idx]
pred_info = torch.cat(
(class_id.unsqueeze(1), conf.unsqueeze(1), predicted_bb), dim=1)
out.append(pred_info)
return torch.stack(out)
  • 将上述算法应用到一个带有四个锚框的具体示例中
1
2
3
4
5
6
anchors = torch.tensor([[0.1, 0.08, 0.52, 0.92], [0.08, 0.2, 0.56, 0.95],
[0.15, 0.3, 0.62, 0.91], [0.55, 0.2, 0.9, 0.88]])
offset_preds = torch.tensor([0] * anchors.numel())
cls_probs = torch.tensor([[0] * 4,
[0.9, 0.8, 0.7, 0.1],
[0.1, 0.2, 0.3, 0.9]])
  • 在图像上绘制这些预测边界框和置信度
1
2
3
fig = d2l.plt.imshow(img)
show_bboxes(fig.axes, anchors * bbox_scale,
['dog=0.9', 'dog=0.8', 'dog=0.7', 'cat=0.9'])
  • 返回结果的形状是(批量大小,锚框的数量,6)
1
2
3
4
output = multibox_detection(cls_probs.unsqueeze(dim=0),
offset_preds.unsqueeze(dim=0),
anchors.unsqueeze(dim=0), nms_threshold=0.5)
output
  • 输出由非极大值抑制保存的最终预测边界框
1
2
3
4
5
6
fig = d2l.plt.imshow(img)
for i in output[0].detach().numpy():
if i[0] == -1:
continue
label = ('dog=', 'cat=')[int(i[0])] + str(i[1])
show_bboxes(fig.axes, [torch.tensor(i[2:]) * bbox_scale], label)

R-CNN

  • 使用启发式算法来选择锚框
  • 使用预训练模型来对每个锚框抽取特征
  • 训练一个SVM来对类别分类
  • 训练一个线性回归模型来预测边缘框偏移

Rol pooling

  • 兴趣区域汇聚层(RoI pooling -> region of interest)

    • 给定一个锚框,切n x m块,输出每块里面的最大值
    • 不管锚框多大,总是输出nm个值

    ../_images/roi.svg

Fast R-CNN

  • 使用CNN对图片抽取特征。
  • 使用RoI池化层,对每个锚框生成固定长度特征

../_images/fast-rcnn.svg

用CNN对整个图片抽取特征,在用RoI pooling抽取锚框中的特征时,Selective search找出对应位置的特征。这样就不需要和CNN一样,每个锚框分别还要RoI pooling,不再对每个锚框分别抽取特征,变得fast。

Faster R-CNN

  • 使用一个区域提议网络来代替启发式搜索来获得更好的锚框。

../_images/faster-rcnn.svg

Faster R-CNN (Ren et al., 2015)提出将选择性搜索替换为区域提议网络(region proposal network),从而减少提议区域的生成数量,并保证目标检测的精度。

  • 区域提议网络的计算步骤如下:
    • 使用填充为1的的卷积层变换卷积神经网络的输出,并将输出通道数记为$c$。这样,卷积神经网络为图像抽取的特征图中的每个单元均得到一个长度为$c$的新特征。
    • 以特征图的每个像素为中心,生成多个不同大小和宽高比的锚框并标注它们。
    • 使用锚框中心单元长度为$c$的特征,分别预测该锚框的二元类别(含目标还是背景)和边界框。
    • 使用非极大值抑制,从预测类别为目标的预测边界框中移除相似的结果。最终输出的预测边界框即是兴趣区域汇聚层所需的提议区域。

区域提议网络作为Faster R-CNN模型的一部分,是和整个模型一起训练得到的。 换句话说,Faster R-CNN的目标函数不仅包括目标检测中的类别和边界框预测,还包括区域提议网络中锚框的二元类别和边界框预测。 作为端到端训练的结果,区域提议网络能够学习到如何生成高质量的提议区域,从而在减少了从数据中学习的提议区域的数量的情况下,仍保持目标检测的精度。

Mask R-CNN

  • 如果在训练集中还标注了每个目标在图像上的像素级位置,那么Mask R-CNN (He et al., 2017)能够有效地利用这些详尽的标注信息进一步提升目标检测的精度。

../_images/mask-rcnn.svg

R-CNN系列总结

  • R-CNN是最早、最有名的一类,基于锚框和CNN的目标检测算法
  • Fast/Faster R-CNN持续提高性能
  • Faster R-CNN 和 Mask R-CNN是要求高精度场景下的常用算法(可能训练速度会慢一点)

SSD

Single Shot Detection,一发跑完!

  • 生成锚框:
    • 对每个像素,生成多个以它为中心的锚框
    • 给定n个大小$s_1,\dots,s_n$和m个高框比,生成n + m - 1个锚框。
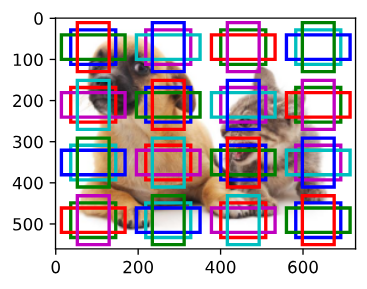
image-20230812095423341

  • 单发多框检测模型主要由基础网络组成,其后是几个多尺度特征块。 基本网络用于从输入图像中提取特征,因此它可以使用深度卷积神经网络。单发多框检测论文中选用了在分类层之前截断的VGG (Liu et al., 2016),现在也常用ResNet替代。 我们可以设计基础网络,使它输出的高和宽较大。 这样一来,基于该特征图生成的锚框数量较多,可以用来检测尺寸较小的目标。 接下来的每个多尺度特征块将上一层提供的特征图的高和宽缩小(如减半),并使特征图中每个单元在输入图像上的感受野变得更广阔。
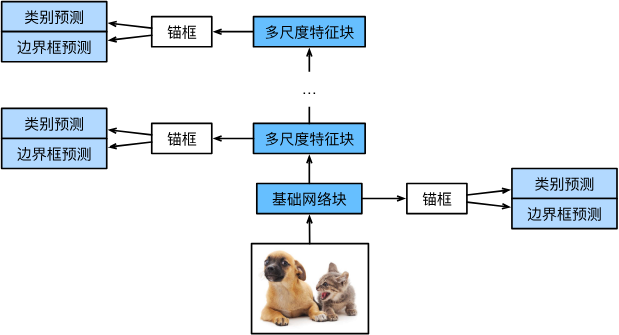
image-20230812095006295

由于接近 图13.7.1顶部的多尺度特征图较小,但具有较大的感受野,它们适合检测较少但较大的物体。通过多尺度特征块,单发多框检测生成不同大小的锚框,并通过预测边界框的类别和偏移量来检测大小不同的目标,因此这是一个多尺度目标检测模型。

  • 一个基础网络来抽取特征,然后多个卷积层块来减半高宽
  • 在每段都生成锚框
    • 底部段来拟合小物体,顶部段来拟合大物体
  • 对每个锚框预测类别和边缘框

总结

  • SSD通过单神经网络来检测模型
  • 以每个像素为中心的产生多个锚框
  • 在多个段的输出。上进行多尺度的检测

YOLO

You Only Look Once

  • SSD中锚框大量重叠,浪费了很多计算
  • YOLO将图片均匀分成S x S个锚框
  • 每个锚框预测B个边缘框

建议看看教程

多尺度目标检测实现

这里主要是代码实现

  • 依赖:
1
2
3
4
5
6
7
%matplotlib inline
import torch
from d2l import torch as d2l

img = d2l.plt.imread('../img/catdog.jpg')
h, w = img.shape[:2]
h, w
  • 在特征图 (fmap) 上生成锚框 (anchors),每个单位(像素)作为锚框的中心
1
2
3
4
5
6
def display_anchors(fmap_w, fmap_h, s):
d2l.set_figsize()
fmap = torch.zeros((1, 10, fmap_h, fmap_w))
anchors = d2l.multibox_prior(fmap, sizes=s, ratios=[1, 2, 0.5])
bbox_scale = torch.tensor((w, h, w, h))
d2l.show_bboxes(d2l.plt.imshow(img).axes, anchors[0] * bbox_scale)
  • 探测小目标:
1
display_anchors(fmap_w=4, fmap_h=4, s=[0.15])
  • 将特征图的高度和宽度减小一半,然后使用较大的锚框来检测较大的目标
1
display_anchors(fmap_w=2, fmap_h=2, s=[0.4])
  • 将特征图的高度和宽度减小一半,然后将锚框的尺度增加到0.8
1
display_anchors(fmap_w=1, fmap_h=1, s=[0.8])

SSD代码实现

  • 依赖:
1
2
3
4
5
6
7
8
9
10
11
%matplotlib inline
import torch
import torchvision
from torch import nn
from torch.nn import functional as F
from d2l import torch as d2l


def cls_predictor(num_inputs, num_anchors, num_classes):
return nn.Conv2d(num_inputs, num_anchors * (num_classes + 1),
kernel_size=3, padding=1)
  • 特征图每个像素对应a锚框,每个锚框对应q个分类,单个像素就要a*(q+1)个预测信息,这个信息,通过卷积核的多个通道来存储, 所以这里进行卷积操作。
  • 图像分类,只预测分类情况,所以接全连接层,这里单个像素的预测结果太多,就用多个通道来存。
  • 边界框预测层:
1
2
def bbox_predictor(num_inputs, num_anchors):
return nn.Conv2d(num_inputs, num_anchors * 4, kernel_size=3, padding=1)
  • 连接多尺度的预测:
1
2
3
4
5
6
7
8
9
10
11
12
13
14
15
16
def forward(x, block):
return block(x)

Y1 = forward(torch.zeros((2, 8, 20, 20)), cls_predictor(8, 5, 10))
Y2 = forward(torch.zeros((2, 16, 10, 10)), cls_predictor(16, 3, 10))
Y1.shape, Y2.shape
# result (torch.Size([2, 55, 20, 20]), torch.Size([2, 33, 10, 10]))

def flatten_pred(pred):
return torch.flatten(pred.permute(0, 2, 3, 1), start_dim=1)

def concat_preds(preds):
return torch.cat([flatten_pred(p) for p in preds], dim=1)

concat_preds([Y1, Y2]).shape
# result torch.Size([2, 25300])
  • 高和宽减半块:
1
2
3
4
5
6
7
8
9
10
11
12
13
def down_sample_blk(in_channels, out_channels):
blk = []
for _ in range(2):
blk.append(
nn.Conv2d(in_channels, out_channels, kernel_size=3, padding=1))
blk.append(nn.BatchNorm2d(out_channels))
blk.append(nn.ReLU())
in_channels = out_channels
blk.append(nn.MaxPool2d(2))
return nn.Sequential(*blk)

forward(torch.zeros((2, 3, 20, 20)), down_sample_blk(3, 10)).shape
# result torch.Size([2, 10, 10, 10])

变换通道数,高宽减半。

  • 基本网络块:
1
2
3
4
5
6
7
8
def base_net():
blk = []
num_filters = [3, 16, 32, 64]
for i in range(len(num_filters) - 1):
blk.append(down_sample_blk(num_filters[i], num_filters[i + 1]))
return nn.Sequential(*blk)

forward(torch.zeros((2, 3, 256, 256)), base_net()).shape

逐步增多通道数,减少高宽捏!!!

  • 完整的单发多框检测模型由五个模块组成
1
2
3
4
5
6
7
8
9
10
def get_blk(i):
if i == 0:
blk = base_net()
elif i == 1:
blk = down_sample_blk(64, 128)
elif i == 4:
blk = nn.AdaptiveMaxPool2d((1, 1))
else:
blk = down_sample_blk(128, 128)
return blk
  • 为每个块定义前向计算
1
2
3
4
5
6
def blk_forward(X, blk, size, ratio, cls_predictor, bbox_predictor):
Y = blk(X)
anchors = d2l.multibox_prior(Y, sizes=size, ratios=ratio)
cls_preds = cls_predictor(Y)
bbox_preds = bbox_predictor(Y)
return (Y, anchors, cls_preds, bbox_preds)
  • 超参数
1
2
3
4
sizes = [[0.2, 0.272], [0.37, 0.447], [0.54, 0.619], [0.71, 0.79],
[0.88, 0.961]]
ratios = [[1, 2, 0.5]] * 5
num_anchors = len(sizes[0]) + len(ratios[0]) - 1
  • 定义完整的模型
1
2
3
4
5
6
7
8
9
10
11
12
13
14
15
16
17
18
19
20
21
22
23
24
25
26
class TinySSD(nn.Module):
def __init__(self, num_classes, **kwargs):
super(TinySSD, self).__init__(**kwargs)
self.num_classes = num_classes
idx_to_in_channels = [64, 128, 128, 128, 128]
for i in range(5):
setattr(self, f'blk_{i}', get_blk(i))
setattr(
self, f'cls_{i}',
cls_predictor(idx_to_in_channels[i], num_anchors,
num_classes))
setattr(self, f'bbox_{i}',
bbox_predictor(idx_to_in_channels[i], num_anchors))

def forward(self, X):
anchors, cls_preds, bbox_preds = [None] * 5, [None] * 5, [None] * 5
for i in range(5):
X, anchors[i], cls_preds[i], bbox_preds[i] = blk_forward(
X, getattr(self, f'blk_{i}'), sizes[i], ratios[i],
getattr(self, f'cls_{i}'), getattr(self, f'bbox_{i}'))
anchors = torch.cat(anchors, dim=1)
cls_preds = concat_preds(cls_preds)
cls_preds = cls_preds.reshape(cls_preds.shape[0], -1,
self.num_classes + 1)
bbox_preds = concat_preds(bbox_preds)
return anchors, cls_preds, bbox_preds
  • 初始化其参数并定义优化算法
1
2
device, net = d2l.try_gpu(), TinySSD(num_classes=1)
trainer = torch.optim.SGD(net.parameters(), lr=0.2, weight_decay=5e-4)
  • 创建一个模型实例,然后使用它执行前向计算
1
2
3
4
5
6
7
8
9
10
11
12
net = TinySSD(num_classes=1)
X = torch.zeros((32, 3, 256, 256))
anchors, cls_preds, bbox_preds = net(X)

print('output anchors:', anchors.shape)
print('output class preds:', cls_preds.shape)
print('output bbox preds:', bbox_preds.shape)

# result
output anchors: torch.Size([1, 5444, 4])
output class preds: torch.Size([32, 5444, 2])
output bbox preds: torch.Size([32, 21776])
  • 读取香蕉检测数据集
1
2
3
4
5
6
batch_size = 32
train_iter, _ = d2l.load_data_bananas(batch_size)

# result
read 1000 training examples
read 100 validation examples
  • 初始化其参数并定义优化算法
1
2
device, net = d2l.try_gpu(), TinySSD(num_classes=1)
trainer = torch.optim.SGD(net.parameters(), lr=0.2, weight_decay=5e-4)
  • 定义损失函数和评价函数
1
2
3
4
5
6
7
8
9
10
11
12
13
14
15
16
17
cls_loss = nn.CrossEntropyLoss(reduction='none')
bbox_loss = nn.L1Loss(reduction='none')

def calc_loss(cls_preds, cls_labels, bbox_preds, bbox_labels, bbox_masks):
batch_size, num_classes = cls_preds.shape[0], cls_preds.shape[2]
cls = cls_loss(cls_preds.reshape(-1, num_classes),
cls_labels.reshape(-1)).reshape(batch_size, -1).mean(dim=1)
bbox = bbox_loss(bbox_preds * bbox_masks,
bbox_labels * bbox_masks).mean(dim=1)
return cls + bbox

def cls_eval(cls_preds, cls_labels):
return float(
(cls_preds.argmax(dim=-1).type(cls_labels.dtype) == cls_labels).sum())

def bbox_eval(bbox_preds, bbox_labels, bbox_masks):
return float((torch.abs((bbox_labels - bbox_preds) * bbox_masks)).sum())
  • 训练模型
1
2
3
4
5
6
7
8
9
10
11
12
13
14
15
16
17
18
19
20
21
22
23
24
25
26
27
28
29
num_epochs, timer = 20, d2l.Timer()
animator = d2l.Animator(xlabel='epoch', xlim=[1, num_epochs],
legend=['class error', 'bbox mae'])
net = net.to(device)
for epoch in range(num_epochs):
metric = d2l.Accumulator(4)
net.train()
for features, target in train_iter:
timer.start()
trainer.zero_grad()
X, Y = features.to(device), target.to(device)
anchors, cls_preds, bbox_preds = net(X)
bbox_labels, bbox_masks, cls_labels = d2l.multibox_target(anchors, Y)
l = calc_loss(cls_preds, cls_labels, bbox_preds, bbox_labels,
bbox_masks)
l.mean().backward()
trainer.step()
metric.add(cls_eval(cls_preds, cls_labels), cls_labels.numel(),
bbox_eval(bbox_preds, bbox_labels, bbox_masks),
bbox_labels.numel())
cls_err, bbox_mae = 1 - metric[0] / metric[1], metric[2] / metric[3]
animator.add(epoch + 1, (cls_err, bbox_mae))
print(f'class err {cls_err:.2e}, bbox mae {bbox_mae:.2e}')
print(f'{len(train_iter.dataset) / timer.stop():.1f} examples/sec on '
f'{str(device)}')

# result
class err 3.19e-03, bbox mae 3.03e-03
5543.0 examples/sec on cuda:0
  • 预测目标
1
2
3
4
5
6
7
8
9
10
11
12
X = torchvision.io.read_image('../img/banana.jpg').unsqueeze(0).float()
img = X.squeeze(0).permute(1, 2, 0).long()

def predict(X):
net.eval()
anchors, cls_preds, bbox_preds = net(X.to(device))
cls_probs = F.softmax(cls_preds, dim=2).permute(0, 2, 1)
output = d2l.multibox_detection(cls_probs, bbox_preds, anchors)
idx = [i for i, row in enumerate(output[0]) if row[0] != -1]
return output[0, idx]

output = predict(X)
  • 筛选所有置信度不低于 0.9 的边界框,做为最终输出
1
2
3
4
5
6
7
8
9
10
11
12
def display(img, output, threshold):
d2l.set_figsize((5, 5))
fig = d2l.plt.imshow(img)
for row in output:
score = float(row[1])
if score < threshold:
continue
h, w = img.shape[0:2]
bbox = [row[2:6] * torch.tensor((w, h, w, h), device=row.device)]
d2l.show_bboxes(fig.axes, bbox, '%.2f' % score, 'w')

display(img, output.cpu(), threshold=0.9)

总结

  • 总共两个损失,一个分类loss,一个回归loss。分类loss是我们对于锚框的分类造成的loss,回归loss是我们对于预测的框框和对应的边缘框框的回归loss。 -> 分别计算
  • 比较的时候,我们是有个真实的Y,有个自己预测的Y。将锚框放在真实的Y上,我们就能得到这个锚框“应该”的值,然后拿我们自己预测的值,和应该的值做个对比,就能算出上面的损失来昂!!!

语义分割

给每个像素打上tag,有监督和无监督都能做,我们这是有监督的。

../_images/segmentation.svg

图像分割和实例分割

  • 图像分割(image segmentation)和实例分割(instance segmentation)
    • 图像分割将图像划分为若干组成区域,这类问题的方法通常利用图像中像素之间的相关性。它在训练时不需要有关图像像素的标签信息,在预测时也无法保证分割出的区域具有我们希望得到的语义。图像分割可能会将狗分为两个区域:一个覆盖以黑色为主的嘴和眼睛,另一个覆盖以黄色为主的其余部分身体。
    • 实例分割也叫同时检测并分割(simultaneous detection and segmentation),它研究如何识别图像中各个目标实例的像素级区域。与语义分割不同,实例分割不仅需要区分语义,还要区分不同的目标实例。例如,如果图像中有两条狗,则实例分割需要区分像素属于的两条狗中的哪一条。(目标检测plus)

我们注重的第一种昂!!!

Pascal VOC2012 语义分割数据集

  • Dependencies:
1
2
3
4
5
6
7
8
9
10
11
%matplotlib inline
import os
import torch
import torchvision
from d2l import torch as d2l

#@save
d2l.DATA_HUB['voc2012'] = (d2l.DATA_URL + 'VOCtrainval_11-May-2012.tar',
'4e443f8a2eca6b1dac8a6c57641b67dd40621a49')

voc_dir = d2l.download_extract('voc2012', 'VOCdevkit/VOC2012')
  • 读入所有的图片:
1
2
3
4
5
6
7
8
9
10
11
12
13
14
15
16
17
#@save
def read_voc_images(voc_dir, is_train=True):
"""读取所有VOC图像并标注"""
txt_fname = os.path.join(voc_dir, 'ImageSets', 'Segmentation',
'train.txt' if is_train else 'val.txt')
mode = torchvision.io.image.ImageReadMode.RGB
with open(txt_fname, 'r') as f:
images = f.read().split()
features, labels = [], []
for i, fname in enumerate(images):
features.append(torchvision.io.read_image(os.path.join(
voc_dir, 'JPEGImages', f'{fname}.jpg')))
labels.append(torchvision.io.read_image(os.path.join(
voc_dir, 'SegmentationClass' ,f'{fname}.png'), mode))
return features, labels

train_features, train_labels = read_voc_images(voc_dir, True)
  • 下面我们绘制前5个输入图像及其标签。 在标签图像中,白色和黑色分别表示边框和背景,而其他颜色则对应不同的类别。
1
2
3
4
n = 5
imgs = train_features[0:n] + train_labels[0:n]
imgs = [img.permute(1,2,0) for img in imgs]
d2l.show_images(imgs, 2, n);
  • 接下来,我们列举RGB颜色值和类名。
1
2
3
4
5
6
7
8
9
10
11
12
13
#@save
VOC_COLORMAP = [[0, 0, 0], [128, 0, 0], [0, 128, 0], [128, 128, 0],
[0, 0, 128], [128, 0, 128], [0, 128, 128], [128, 128, 128],
[64, 0, 0], [192, 0, 0], [64, 128, 0], [192, 128, 0],
[64, 0, 128], [192, 0, 128], [64, 128, 128], [192, 128, 128],
[0, 64, 0], [128, 64, 0], [0, 192, 0], [128, 192, 0],
[0, 64, 128]]

#@save
VOC_CLASSES = ['background', 'aeroplane', 'bicycle', 'bird', 'boat',
'bottle', 'bus', 'car', 'cat', 'chair', 'cow',
'diningtable', 'dog', 'horse', 'motorbike', 'person',
'potted plant', 'sheep', 'sofa', 'train', 'tv/monitor']
  • 通过上面定义的两个常量,我们可以方便地查找标签中每个像素的类索引。 我们定义了voc_colormap2label函数来构建从上述RGB颜色值到类别索引的映射,而voc_label_indices函数将RGB值映射到在Pascal VOC2012数据集中的类别索引。
1
2
3
4
5
6
7
8
9
10
11
12
13
14
15
16
#@save
def voc_colormap2label():
"""构建从RGB到VOC类别索引的映射"""
colormap2label = torch.zeros(256 ** 3, dtype=torch.long)
for i, colormap in enumerate(VOC_COLORMAP):
colormap2label[
(colormap[0] * 256 + colormap[1]) * 256 + colormap[2]] = i
return colormap2label

#@save
def voc_label_indices(colormap, colormap2label):
"""将VOC标签中的RGB值映射到它们的类别索引"""
colormap = colormap.permute(1, 2, 0).numpy().astype('int32')
idx = ((colormap[:, :, 0] * 256 + colormap[:, :, 1]) * 256
+ colormap[:, :, 2])
return colormap2label[idx]
  • 例如,在第一张样本图像中,飞机头部区域的类别索引为1,而背景索引为0。
1
2
y = voc_label_indices(train_labels[0], voc_colormap2label())
y[105:115, 130:140], VOC_CLASSES[1]

预处理数据

图片增广的使用,随机剪裁必须同时作用于图像和标签捏!

  • 在之前的实验,我们通过再缩放图像使其符合模型的输入形状。 然而在语义分割中,这样做需要将预测的像素类别重新映射回原始尺寸的输入图像。 这样的映射可能不够精确,尤其在不同语义的分割区域。 为了避免这个问题,我们将图像裁剪为固定尺寸,而不是再缩放。 具体来说,我们使用图像增广中的随机裁剪,裁剪输入图像和标签的相同区域。
1
2
3
4
5
6
7
8
9
10
11
12
13
14
15
#@save
def voc_rand_crop(feature, label, height, width):
"""随机裁剪特征和标签图像"""
rect = torchvision.transforms.RandomCrop.get_params(
feature, (height, width))
feature = torchvision.transforms.functional.crop(feature, *rect)
label = torchvision.transforms.functional.crop(label, *rect)
return feature, label

imgs = []
for _ in range(n):
imgs += voc_rand_crop(train_features[0], train_labels[0], 200, 300)

imgs = [img.permute(1, 2, 0) for img in imgs]
d2l.show_images(imgs[::2] + imgs[1::2], 2, n);

自定义语义分割数据集类

  • 我们通过继承高级API提供的Dataset类,自定义了一个语义分割数据集类VOCSegDataset。 通过实现__getitem__函数,我们可以任意访问数据集中索引为idx的输入图像及其每个像素的类别索引。 由于数据集中有些图像的尺寸可能小于随机裁剪所指定的输出尺寸,这些样本可以通过自定义的filter函数移除掉。 此外,我们还定义了normalize_image函数,从而对输入图像的RGB三个通道的值分别做标准化。
1
2
3
4
5
6
7
8
9
10
11
12
13
14
15
16
17
18
19
20
21
22
23
24
25
26
27
28
29
30
#@save
class VOCSegDataset(torch.utils.data.Dataset):
"""一个用于加载VOC数据集的自定义数据集"""
def __init__(self, is_train, crop_size, voc_dir):
self.transform = torchvision.transforms.Normalize(
mean=[0.485, 0.456, 0.406], std=[0.229, 0.224, 0.225])
self.crop_size = crop_size
features, labels = read_voc_images(voc_dir, is_train=is_train)
self.features = [self.normalize_image(feature)
for feature in self.filter(features)]
self.labels = self.filter(labels)
self.colormap2label = voc_colormap2label()
print('read ' + str(len(self.features)) + ' examples')

def normalize_image(self, img):
return self.transform(img.float() / 255)

# 去掉过小的图片
def filter(self, imgs):
return [img for img in imgs if (
img.shape[1] >= self.crop_size[0] and
img.shape[2] >= self.crop_size[1])]

def __getitem__(self, idx):
feature, label = voc_rand_crop(self.features[idx], self.labels[idx],
*self.crop_size)
return (feature, voc_label_indices(label, self.colormap2label))

def __len__(self):
return len(self.features)

labels不好拉伸,不好差值,这里就不是resize,是用crop_size来进行剪裁!

读取数据集

  • 我们通过自定义的VOCSegDataset类来分别创建训练集和测试集的实例。 假设我们指定随机裁剪的输出图像的形状为320×480, 下面我们可以查看训练集和测试集所保留的样本个数。
1
2
3
crop_size = (320, 480)
voc_train = VOCSegDataset(True, crop_size, voc_dir)
voc_test = VOCSegDataset(False, crop_size, voc_dir)
  • 设批量大小为64,我们定义训练集的迭代器。 打印第一个小批量的形状会发现:与图像分类或目标检测不同,这里的标签是一个三维数组。
1
2
3
4
5
6
7
8
batch_size = 64
train_iter = torch.utils.data.DataLoader(voc_train, batch_size, shuffle=True,
drop_last=True,
num_workers=d2l.get_dataloader_workers())
for X, Y in train_iter:
print(X.shape)
print(Y.shape)
break

整合所有组件

  • 我们定义以下load_data_voc函数来下载并读取Pascal VOC2012语义分割数据集。 它返回训练集和测试集的数据迭代器。
1
2
3
4
5
6
7
8
9
10
11
12
13
#@save
def load_data_voc(batch_size, crop_size):
"""加载VOC语义分割数据集"""
voc_dir = d2l.download_extract('voc2012', os.path.join(
'VOCdevkit', 'VOC2012'))
num_workers = d2l.get_dataloader_workers()
train_iter = torch.utils.data.DataLoader(
VOCSegDataset(True, crop_size, voc_dir), batch_size,
shuffle=True, drop_last=True, num_workers=num_workers)
test_iter = torch.utils.data.DataLoader(
VOCSegDataset(False, crop_size, voc_dir), batch_size,
drop_last=True, num_workers=num_workers)
return train_iter, test_iter

转置卷积

本质就是卷积的逆运算,同样的卷积核、padding和stride,卷积之后,逆卷积能得到和卷积之前同样的size的矩阵。

  • 卷积不会增大输入的高宽,要么不变,要么减半
  • 转置卷积用于逆转下采样导致的空间尺寸减小,增大输入高宽。

../_images/trans_conv.svg

卷积核为 2×2 的转置卷积。阴影部分是中间张量的一部分,也是用于计算的输入和卷积核张量元素。

基本操作

  • 我们可以对输入矩阵X和卷积核矩阵K实现基本的转置卷积运算trans_conv
1
2
3
4
5
6
7
def trans_conv(X, K):
h, w = K.shape
Y = torch.zeros((X.shape[0] + h - 1, X.shape[1] + w - 1))
for i in range(X.shape[0]):
for j in range(X.shape[1]):
Y[i: i + h, j: j + w] += X[i, j] * K
return Y
  • 转置卷积通过卷积核“广播”输入元素,从而产生大于输入的输出。我们可以构建输入张量X和卷积核张量K从而验证上述实现输出。 此实现是基本的二维转置卷积运算。
1
2
3
X = torch.tensor([[0.0, 1.0], [2.0, 3.0]])
K = torch.tensor([[0.0, 1.0], [2.0, 3.0]])
trans_conv(X, K)
  • 当输入X和卷积核K都是四维张量时,我们可以使用高级API获得相同的结果。
1
2
3
4
X, K = X.reshape(1, 1, 2, 2), K.reshape(1, 1, 2, 2)
tconv = nn.ConvTranspose2d(1, 1, kernel_size=2, bias=False)
tconv.weight.data = K
tconv(X)

填充、步幅和多通道

  • 与常规卷积不同,在转置卷积中,填充被应用于的输出(常规卷积将填充应用于输入)。将高和宽两侧的填充数指定为1时,转置卷积的输出中将删除第一和最后的行与列。
1
2
3
tconv = nn.ConvTranspose2d(1, 1, kernel_size=2, padding=1, bias=False)
tconv.weight.data = K
tconv(X)

老师的意思应该是转置卷积的padding是在输出上的,其效果是使输出的结果的上下减少1行、左右减少1列(padding=1的情况下);所以对比原来没有padding的结果是3X3的,现在的结果是1X1

  • 步幅被指定为中间结果(输出),而不是输入。将步幅从1更改为2会增加中间张量的高和权重。

../_images/trans_conv_stride2.svg

1
2
3
tconv = nn.ConvTranspose2d(1, 1, kernel_size=2, stride=2, bias=False)
tconv.weight.data = K
tconv(X)
  • 对于多个输入和输出通道,转置卷积与常规卷积以相同方式运作。 假设输入有$c_i$个通道,且转置卷积为每个输入通道分配了一个$k_h\times k_w$的卷积核张量。 当指定多个输出通道时,每个输出通道将有一个$c_i\times k_h\times k_w$的卷积核。同样,如果我们将$\mathsf{X}$代入卷积层$f$来输出$\mathsf{Y}=f(\mathsf{X})$,并创建一个与$f$具有相同的超参数、但输出通道数量是$\mathsf{X}$中通道数的转置卷积层$g$,那么$g(Y)$的形状将与$\mathsf{X}$相同。 下面的示例可以解释这一点。
1
2
3
4
X = torch.rand(size=(1, 10, 16, 16))
conv = nn.Conv2d(10, 20, kernel_size=5, padding=2, stride=3)
tconv = nn.ConvTranspose2d(20, 10, kernel_size=5, padding=2, stride=3)
tconv(conv(X)).shape == X.shape

与矩阵变换的联系

  • 卷积:
1
2
3
4
X = torch.arange(9.0).reshape(3, 3)
K = torch.tensor([[1.0, 2.0], [3.0, 4.0]])
Y = d2l.corr2d(X, K)
Y
  • kernel的卷积操作,变换为乘法操作。这样矩阵卷积,就可以简化为两个矩阵相乘:
1
2
3
4
5
6
7
8
def kernel2matrix(K):
k, W = torch.zeros(5), torch.zeros((4, 9))
k[:2], k[3:5] = K[0, :], K[1, :]
W[0, :5], W[1, 1:6], W[2, 3:8], W[3, 4:] = k, k, k, k
return W

W = kernel2matrix(K)
W

卷积核的卷积操作打平

  • W的矩阵乘法和向量化的X给出了一个长度为4的向量。 重塑它之后,可以获得与上面的原始卷积操作所得相同的结果Y:我们刚刚使用矩阵乘法实现了卷积。
1
Y == torch.matmul(W, X.reshape(-1)).reshape(2, 2)
  • 同样,我们可以使用矩阵乘法来实现转置卷积。 在下面的示例中,我们将上面的常规卷积2×2的输出Y作为转置卷积的输入。 想要通过矩阵相乘来实现它:
1
2
Z = trans_conv(Y, K)
Z == torch.matmul(W.T, Y.reshape(-1)).reshape(3, 3)

W.T本质上就是上面trans_conv中的卷积核,又一次解释了转置卷积。卷积核的卷积操作,和卷积核转置后的转置卷积操作,是对应的昂!!!

全连接卷积神经网络

全卷积网络(fully convolutional network,FCN)采用卷积神经网络实现了从图像像素到像素类别的变换 (Long et al., 2015)。 与我们之前在图像分类或目标检测部分介绍的卷积神经网络不同,全卷积网络将中间层特征图的高和宽变换回输入图像的尺寸:这是通过在 13.10节中引入的转置卷积(transposed convolution)实现的。

  • 用转置卷积层来替换CNN最后的全连接层,来实现每个像素的预测

../_images/fcn.svg

核心:转置卷积层可以保留图片的空间信息

构造模型

  • dependencies
1
2
3
4
5
6
%matplotlib inline
import torch
import torchvision
from torch import nn
from torch.nn import functional as F
from d2l import torch as d2l
  • 我们使用在ImageNet数据集上预训练的ResNet-18模型来提取图像特征,并将该网络记为pretrained_net。 ResNet-18模型的最后几层包括全局平均汇聚层和全连接层,然而全卷积网络中不需要它们。
1
2
3
4
5
6
7
8
9
10
11
12
13
14
15
16
17
18
19
20
21
22
23
24
25
26
27
pretrained_net = torchvision.models.resnet18(pretrained=True)
list(pretrained_net.children())[-3:]

# result
[Sequential(
(0): BasicBlock(
(conv1): Conv2d(256, 512, kernel_size=(3, 3), stride=(2, 2), padding=(1, 1), bias=False)
(bn1): BatchNorm2d(512, eps=1e-05, momentum=0.1, affine=True, track_running_stats=True)
(relu): ReLU(inplace=True)
(conv2): Conv2d(512, 512, kernel_size=(3, 3), stride=(1, 1), padding=(1, 1), bias=False)
(bn2): BatchNorm2d(512, eps=1e-05, momentum=0.1, affine=True, track_running_stats=True)
(downsample): Sequential(
(0): Conv2d(256, 512, kernel_size=(1, 1), stride=(2, 2), bias=False)
(1): BatchNorm2d(512, eps=1e-05, momentum=0.1, affine=True, track_running_stats=True)
)
)
(1): BasicBlock(
(conv1): Conv2d(512, 512, kernel_size=(3, 3), stride=(1, 1), padding=(1, 1), bias=False)
(bn1): BatchNorm2d(512, eps=1e-05, momentum=0.1, affine=True, track_running_stats=True)
(relu): ReLU(inplace=True)
(conv2): Conv2d(512, 512, kernel_size=(3, 3), stride=(1, 1), padding=(1, 1), bias=False)
(bn2): BatchNorm2d(512, eps=1e-05, momentum=0.1, affine=True, track_running_stats=True)
)
),
AdaptiveAvgPool2d(output_size=(1, 1)),
Linear(in_features=512, out_features=1000, bias=True)]

  • 我们创建一个全卷积网络net。 它复制了ResNet-18中大部分的预训练层,除了最后的全局平均汇聚层和最接近输出的全连接层
1
net = nn.Sequential(*list(pretrained_net.children())[:-2])
  • 给定高度为320和宽度为480的输入,net的前向传播将输入的高和宽减小至原来的1/32,即10和15。
1
2
X = torch.rand(size=(1, 3, 320, 480))
net(X).shape
  • 接下来使用1×1卷积层将输出通道数转换为Pascal VOC2012数据集的类数(21类)。 最后需要将特征图的高度和宽度增加32倍,从而将其变回输入图像的高和宽。
1
2
3
4
num_classes = 21
net.add_module('final_conv', nn.Conv2d(512, num_classes, kernel_size=1))
net.add_module('transpose_conv', nn.ConvTranspose2d(num_classes, num_classes,
kernel_size=64, padding=16, stride=32))

初始化转置卷积层

  • 在图像处理中,我们有时需要将图像放大,即上采样(upsampling)。 双线性插值(bilinear interpolation) 是常用的上采样方法之一,它也经常用于初始化转置卷积层。
  • 为了解释双线性插值,假设给定输入图像,我们想要计算上采样输出图像上的每个像素。
    1. 将输出图像的坐标$(x,y)$映射到输入图像的坐标$(x’,y’)$上。 例如,根据输入与输出的尺寸之比来映射。 请注意,映射后的$x’$和$y’$是实数。
    2. 在输入图像上找到离坐标$(x’,y’)$最近的4个像素。
    3. 输出图像在坐标$(x,y)$上的像素依据输入图像上这4个像素及其与$(x’,y’)$的相对距离来计算。
1
2
3
4
5
6
7
8
9
10
11
12
13
14
def bilinear_kernel(in_channels, out_channels, kernel_size):
factor = (kernel_size + 1) // 2
if kernel_size % 2 == 1:
center = factor - 1
else:
center = factor - 0.5
og = (torch.arange(kernel_size).reshape(-1, 1),
torch.arange(kernel_size).reshape(1, -1))
filt = (1 - torch.abs(og[0] - center) / factor) * \
(1 - torch.abs(og[1] - center) / factor)
weight = torch.zeros((in_channels, out_channels,
kernel_size, kernel_size))
weight[range(in_channels), range(out_channels), :, :] = filt
return weight
  • 双线性插值的上采样实验
1
2
3
4
5
6
7
8
9
10
11
12
13
14
conv_trans = nn.ConvTranspose2d(3, 3, kernel_size=4, padding=1, stride=2,
bias=False)
conv_trans.weight.data.copy_(bilinear_kernel(3, 3, 4));

img = torchvision.transforms.ToTensor()(d2l.Image.open('../img/catdog.jpg'))
X = img.unsqueeze(0)
Y = conv_trans(X)
out_img = Y[0].permute(1, 2, 0).detach()

d2l.set_figsize()
print('input image shape:', img.permute(1, 2, 0).shape)
d2l.plt.imshow(img.permute(1, 2, 0))
print('output image shape:', out_img.shape)
d2l.plt.imshow(out_img);
  • 用双线性插值的上采样初始化转置卷积层。对于1×1卷积层,我们使用Xavier初始化参数
1
2
W = bilinear_kernel(num_classes, num_classes, 64)
net.transpose_conv.weight.data.copy_(W);

转置卷积初始化 = 转置卷积 + 双线性插值

  • 读取数据集
1
2
batch_size, crop_size = 32, (320, 480)
train_iter, test_iter = d2l.load_data_voc(batch_size, crop_size)
  • 训练
1
2
3
4
5
6
7
8
9
10
def loss(inputs, targets):
return F.cross_entropy(inputs, targets, reduction='none').mean(1).mean(1)

num_epochs, lr, wd, devices = 5, 0.001, 1e-3, d2l.try_all_gpus()
trainer = torch.optim.SGD(net.parameters(), lr=lr, weight_decay=wd)
d2l.train_ch13(net, train_iter, test_iter, loss, trainer, num_epochs, devices)

# result
loss 0.450, train acc 0.861, test acc 0.851
221.5 examples/sec on [device(type='cuda', index=0), device(type='cuda', index=1)]

每个样本是个矩阵,因此取了一个均值。之前的loss都是对于一个一维的,现在是个二维的,因此mean()了一下

  • 预测
1
2
3
4
def predict(img):
X = test_iter.dataset.normalize_image(img).unsqueeze(0)
pred = net(X.to(devices[0])).argmax(dim=1)
return pred.reshape(pred.shape[1], pred.shape[2])
  • 可视化预测的类别
1
2
3
4
5
6
7
8
9
10
11
12
13
14
15
16
17
18
def label2image(pred):
colormap = torch.tensor(d2l.VOC_COLORMAP, device=devices[0])
X = pred.long()
return colormap[X, :]

voc_dir = d2l.download_extract('voc2012', 'VOCdevkit/VOC2012')
test_images, test_labels = d2l.read_voc_images(voc_dir, False)
n, imgs = 4, []
for i in range(n):
crop_rect = (0, 0, 320, 480)
X = torchvision.transforms.functional.crop(test_images[i], *crop_rect)
pred = label2image(predict(X))
imgs += [
X.permute(1, 2, 0),
pred.cpu(),
torchvision.transforms.functional.crop(test_labels[i],
*crop_rect).permute(1, 2, 0)]
d2l.show_images(imgs[::3] + imgs[1::3] + imgs[2::3], 3, n, scale=2);

风格迁移

使用卷积神经网络,自动将一个图像中的风格应用在另一图像之上,即风格迁移(style transfer)。我们需要两张输入图像:一张是内容图像,另一张是风格图像我们将使用神经网络修改内容图像,使其在风格上接近风格图像(不用修改网络)

../_images/style-transfer.svg

方法

  • 我们希望内容一样,风格也一样

../_images/neural-style.svg

实现

  • Dependencies:
1
2
3
4
5
6
7
8
9
%matplotlib inline
import torch
import torchvision
from torch import nn
from d2l import torch as d2l

d2l.set_figsize()
content_img = d2l.Image.open('../img/rainier.jpg')
d2l.plt.imshow(content_img);
  • 预处理和后处理
1
2
3
4
5
6
7
8
9
10
11
12
13
14
rgb_mean = torch.tensor([0.485, 0.456, 0.406])
rgb_std = torch.tensor([0.229, 0.224, 0.225])

def preprocess(img, image_shape):
transforms = torchvision.transforms.Compose([
torchvision.transforms.Resize(image_shape),
torchvision.transforms.ToTensor(),
torchvision.transforms.Normalize(mean=rgb_mean, std=rgb_std)])
return transforms(img).unsqueeze(0)

def postprocess(img):
img = img[0].to(rgb_std.device)
img = torch.clamp(img.permute(1, 2, 0) * rgb_std + rgb_mean, 0, 1)
return torchvision.transforms.ToPILImage()(img.permute(2, 0, 1))

preprocess: Picture -> Tensor, postprocess: Tensor -> Picture

  • 抽取图像特征
1
2
3
4
5
6
7
8
9
10
11
12
13
14
15
16
17
18
19
20
21
22
23
24
25
26
27
28
pretrained_net = torchvision.models.vgg19(pretrained=True)

style_layers, content_layers = [0, 5, 10, 19, 28], [25]

net = nn.Sequential(*[
pretrained_net.features[i]
for i in range(max(content_layers + style_layers) + 1)])

def extract_features(X, content_layers, style_layers):
contents = []
styles = []
for i in range(len(net)):
X = net[i](X)
if i in style_layers:
styles.append(X)
if i in content_layers:
contents.append(X)
return contents, styles

def get_contents(image_shape, device):
content_X = preprocess(content_img, image_shape).to(device)
contents_Y, _ = extract_features(content_X, content_layers, style_layers)
return content_X, contents_Y

def get_styles(image_shape, device):
style_X = preprocess(style_img, image_shape).to(device)
_, styles_Y = extract_features(style_X, content_layers, style_layers)
return style_X, styles_Y
  • 定义损失函数
1
2
3
4
5
6
7
8
9
10
11
12
13
14
def content_loss(Y_hat, Y):
return torch.square(Y_hat - Y.detach()).mean()

def gram(X):
num_channels, n = X.shape[1], X.numel() // X.shape[1]
X = X.reshape((num_channels, n))
return torch.matmul(X, X.T) / (num_channels * n)

def style_loss(Y_hat, gram_Y):
return torch.square(gram(Y_hat) - gram_Y.detach()).mean()

def tv_loss(Y_hat):
return 0.5 * (torch.abs(Y_hat[:, :, 1:, :] - Y_hat[:, :, :-1, :]).mean() +
torch.abs(Y_hat[:, :, :, 1:] - Y_hat[:, :, :, :-1]).mean())
  • 风格转移的损失函数是内容损失、风格损失和总变化损失的加权和
1
2
3
4
5
6
7
8
9
10
11
12
content_weight, style_weight, tv_weight = 1, 1e3, 10

def compute_loss(X, contents_Y_hat, styles_Y_hat, contents_Y, styles_Y_gram):
contents_l = [
content_loss(Y_hat, Y) * content_weight
for Y_hat, Y in zip(contents_Y_hat, contents_Y)]
styles_l = [
style_loss(Y_hat, Y) * style_weight
for Y_hat, Y in zip(styles_Y_hat, styles_Y_gram)]
tv_l = tv_loss(X) * tv_weight
l = sum(10 * styles_l + contents_l + [tv_l])
return contents_l, styles_l, tv_l, l
  • 初始化合成图像
1
2
3
4
5
6
7
8
9
10
11
12
13
14
class SynthesizedImage(nn.Module):
def __init__(self, img_shape, **kwargs):
super(SynthesizedImage, self).__init__(**kwargs)
self.weight = nn.Parameter(torch.rand(*img_shape))

def forward(self):
return self.weight

def get_inits(X, device, lr, styles_Y):
gen_img = SynthesizedImage(X.shape).to(device)
gen_img.weight.data.copy_(X.data)
trainer = torch.optim.Adam(gen_img.parameters(), lr=lr)
styles_Y_gram = [gram(Y) for Y in styles_Y]
return gen_img(), styles_Y_gram, trainer
  • 训练模型
1
2
3
4
5
6
7
8
9
10
11
12
13
14
15
16
17
18
19
20
21
22
23
24
25
def train(X, contents_Y, styles_Y, device, lr, num_epochs, lr_decay_epoch):
X, styles_Y_gram, trainer = get_inits(X, device, lr, styles_Y)
scheduler = torch.optim.lr_scheduler.StepLR(trainer, lr_decay_epoch, 0.8)
animator = d2l.Animator(xlabel='epoch', ylabel='loss',
xlim=[10, num_epochs],
legend=['content', 'style',
'TV'], ncols=2, figsize=(7, 2.5))
for epoch in range(num_epochs):
trainer.zero_grad()
contents_Y_hat, styles_Y_hat = extract_features(
X, content_layers, style_layers)
contents_l, styles_l, tv_l, l = compute_loss(X, contents_Y_hat,
styles_Y_hat, contents_Y,
styles_Y_gram)
l.backward()
trainer.step()
scheduler.step()
if (epoch + 1) % 10 == 0:
animator.axes[1].imshow(postprocess(X))
animator.add(
epoch + 1,
[float(sum(contents_l)),
float(sum(styles_l)),
float(tv_l)])
return X
  • 训练模型
1
2
3
4
5
device, image_shape = d2l.try_gpu(), (300, 450)
net = net.to(device)
content_X, contents_Y = get_contents(image_shape, device)
_, styles_Y = get_styles(image_shape, device)
output = train(content_X, contents_Y, styles_Y, device, 0.3, 500, 50)

总结

  • 我们通过前向传播(实线箭头方向)计算风格迁移的损失函数,并通过反向传播(虚线箭头方向)迭代模型参数,即不断更新合成图像。 风格迁移常用的损失函数由3部分组成:
    1. 内容损失使合成图像与内容图像在内容特征上接近;
    2. 风格损失使合成图像与风格图像在风格特征上接近;
    3. 全变分损失则有助于减少合成图像中的噪点。
  • 我们初始化合成图像,例如将其初始化为内容图像。 该合成图像是风格迁移过程中唯一需要更新的变量,即风格迁移所需迭代的模型参数。 然后,我们选择一个预训练的卷积神经网络来抽取图像的特征,其中的模型参数在训练中无须更新。 这个深度卷积神经网络凭借多个层逐级抽取图像的特征,我们可以选择其中某些层的输出作为内容特征或风格特征。我们首先选择一张内容图像和一张风格图像。通过预训练的CNN模型,分别提取出这两张图像的内容特征和风格特征。接下来,通过调整生成图像的像素值,使得生成图像的内容特征与内容图像的内容特征相似,同时生成图像的风格特征与风格图像的风格特征相似。

References

  1. 计算机视觉章节
  2. 计算性能章节
  3. GPU和CPU讲的很好,Q&A可以看一下!!!
  4. 更多的芯片 Q&A
  5. 单机多卡并行 Q&A
  6. 分布式训练 Q&A
  7. 数据增广 Q&A
  8. Fine-tuning与预训练
  9. 微调 Q&A
  10. Coco Dataset
  11. 物体检测和数据集 Q&A
  12. 锚框 Q&A
  13. Detection Algorithm Behavior
  14. 目标检测算法 Q&A
  15. SSD实现 Q&A
  16. 语义分割 Q&A
  17. 转置卷积 Q&A
  18. 上下采样区别
  19. 全连接卷积神经网络 FCN Q&A
  20. 风格迁移 Q&A

D2L-8-Computer Vision
https://alexanderliu-creator.github.io/2023/08/07/d2l-8-computer-vision/
作者
Alexander Liu
发布于
2023年8月7日
许可协议