SpringBoot俺来啦
本文最后更新于:3 年前
狂神的SpringBoot教程属实感觉一般,尚硅谷的老师讲的还是不错的,看尚硅谷的嗷!!!
SpringBoot简介:
- J2EE开发的一站式解决方案
- 整个Spring技术栈的大整合
- 微服务背景:
- 微服务是一种架构风格
- 一个应用应该是一组小型服务,可以通过Http的方式进行互通。
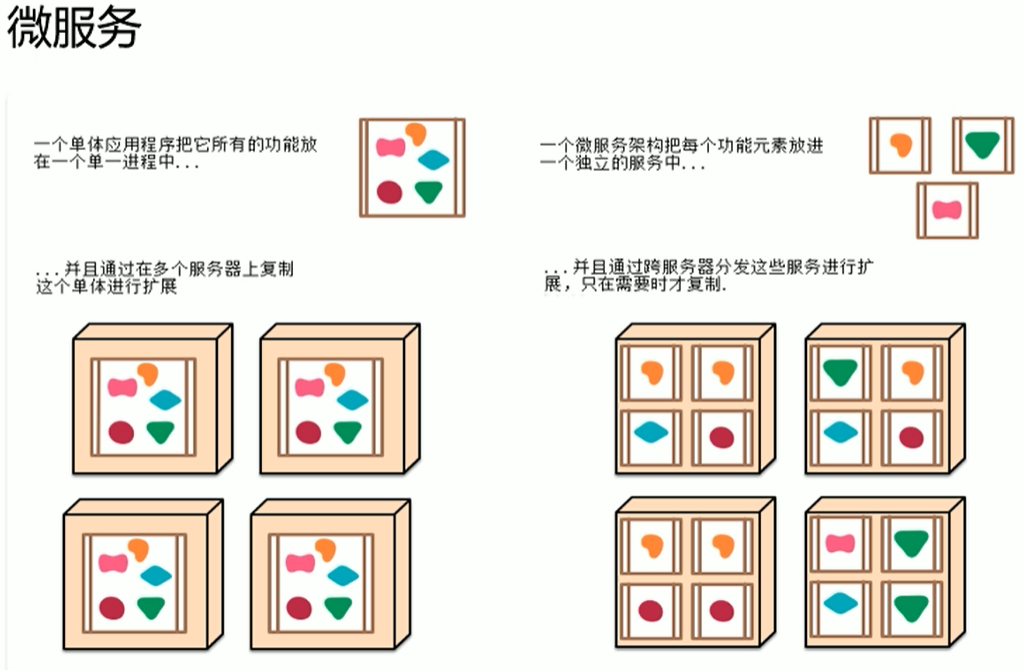
- 每一个功能元素都是可以可独立替换和可独立升级的软件单元。
优点:
- 简化开发难度,减少配置文件的配置。
- 独立运行的Spring项目
- 嵌入式的Servlet,应用不需打包成war , jar就能跑
- starters自动依赖和版本控制
- 大量自动配置,修改默认值
- 无须配置XML,无代码生成,开箱即用
- 准生产环境的运行时应用监控
- 与云计算的天然集成嗷!!!
缺点:
入门容易,精通难!!!
SpringBoot是Spring的封装嗷!!!
教程环境:
- jdk-1.8
- SpringBoot 1.5.9
Spring Boot Maven项目:
- 构建项目过程:
也可以新建一个Maven工程。(不用选那个archtype)
导入Spring Boot相关的依赖。
写主程序类,后面来测试是否工程设置完成:
编写controller等业务逻辑。
运行主程序类来测试程序编写完成之后,SpringBoot是否能够正常完成嗷!!!
简化部署:不用打war包嗷!!!创建可执行的jar包,导入对应的Maven插件就可以了。
- 对应的打包插件的引入为:

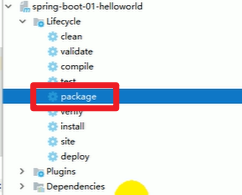
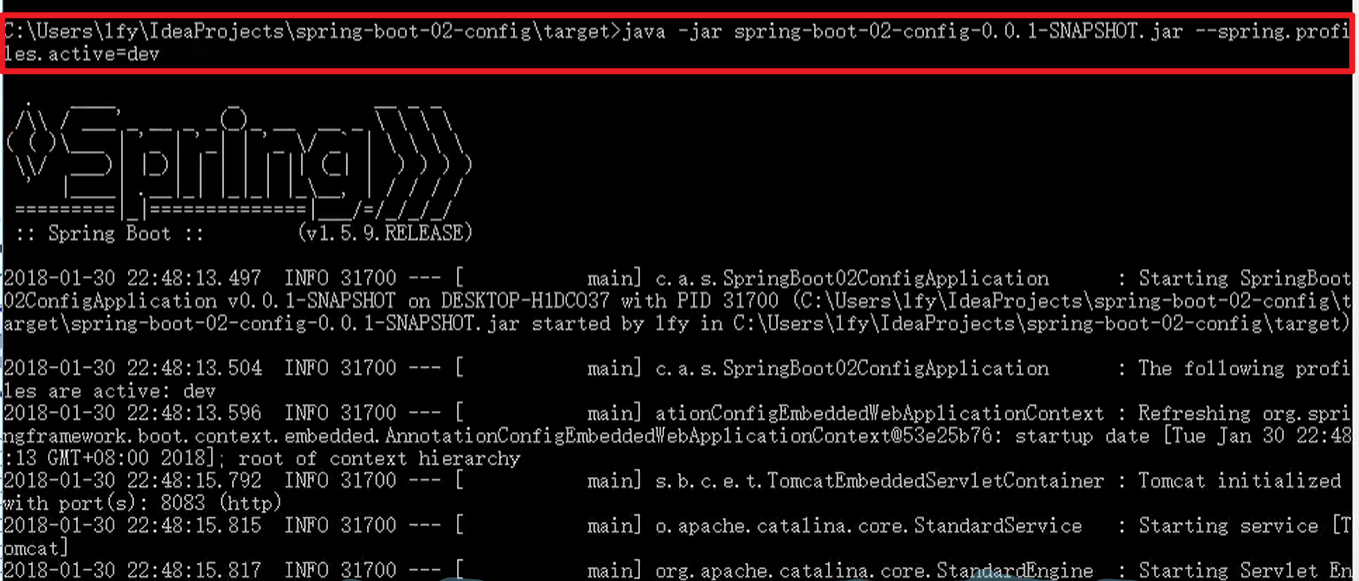
- 生成的jar包,直接通过java -jar jar包名字,就可以直接将整个spring boot项目运行起来,十分方便嗷!!!
底层POM探究:
POM文件父依赖:
父项目(Maven中的那个嗷!)
版本仲裁:父项目中的版本来确认的,有点离谱嗷!!!
如果父项目中没有的,就需要我们自己去定义版本嗷!
导入的依赖:spring-boot-starter-web
spring-boot-starter:场景启动器
spring-boot-starter-web:帮我们导入了web模块的相关的依赖。
官网的对应文档里面,有关于不同starters的介绍,boot帮我们把各种应用场景抽取出来,构成了starter,在我们需要使用的时候引入即可。
要用什么功能,就导入什么场景的启动器。
主程序类(主入口类):
@SpringBootApplication(非常重要嗷!!!),说明这个类是主配置类
点进去可以看到很多东西:
1
2
3
4
5
6
7
8
9
10
11
12
13
14
15
@Target({ElementType.TYPE})
@Retention(RetentionPolicy.RUNTIME)
@Documented
@Inherited
@SpringBootConfiguration
@EnableAutoConfiguration
@ComponentScan(
excludeFilters = {@Filter(
type = FilterType.CUSTOM,
classes = {TypeExcludeFilter.class}
), @Filter(
type = FilterType.CUSTOM,
classes = {AutoConfigurationExcludeFilter.class}
)}
)@SpringBootConfiguration:Spring Boot的配置类,标注在某个类上就代表这是一个Spring Boot的配置类,它里面有:
@Target({ElementType.TYPE}) @Retention(RetentionPolicy.RUNTIME) @Documented @Configuration @Indexed public @interface SpringBootConfiguration { @AliasFor( annotation = Configuration.class ) boolean proxyBeanMethods() default true; }1
2
3
4
5
6
7
8
9
10
11
12
13
14
15
16
17
18
19
20
21
22
23
- 可以看到里面有一个类叫做Configuration:配置类上标注这个注解。
- 配置类实际上起到配置文件的作用,代替了配置文件。
- 配置类本质上也是容器的一个组件!!!
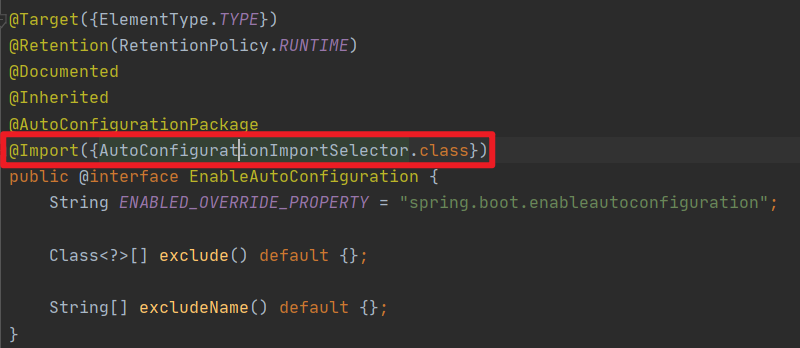
- @EnableAutoConfiguration:开启自动配置功能,它里面有:
- ```java
@Target({ElementType.TYPE})
@Retention(RetentionPolicy.RUNTIME)
@Documented
@Inherited
@AutoConfigurationPackage
@Import({AutoConfigurationImportSelector.class})
public @interface EnableAutoConfiguration {
String ENABLED_OVERRIDE_PROPERTY = "spring.boot.enableautoconfiguration";
Class<?>[] exclude() default {};
String[] excludeName() default {};
}以前我们需要配置的东西,Spring Boot帮我们自动配置。这个注解就告诉了SpringBoot,这个类要启用自动配置。
@AutoConfigurationPackage里面又有:
- ```java
@Target({ElementType.TYPE})
@Retention(RetentionPolicy.RUNTIME)
@Documented
@Inherited
@Import({Registrar.class})
public @interface AutoConfigurationPackage {
String[] basePackages() default {};
Class<?>[] basePackageClasses() default {};
}1
2
3
4
5
6
7
8
9
10
11
12
13
14
15
16
17
18
19
20
21
22
23
24
25
26
27
28
29
30
31
32
33
34
35
36
37
38
39
40
- 这里的Import即为Spring的底层注解,本质上给容器中导入了组件。导入的组件由**AutoConfigurationPackages.Registrar.class决定,它的作用是将主配置类所在包下所有子包里面的组件扫描到Spring容器中。**
- @Import({AutoConfigurationImportSelector.class}):
- 导入了这个组件,从名字可以知道是自动导入包的选择器嗷!
- 将所有需要导入的组件,以全类名的方式返回。会给容器中导入非常多的自动配置类,xxxAutoConfiguration。
- 可以帮我们导入这个场景所需要的所有组件,并自动配置好嗷!!!
- 自动配置类,就免去了我们手动编写配置和注入组件的操作。
- 
- 整体自动配置相关的信息都在spring-boot-autoconfigure-version.RELEASE.jar
## 快速创建Spring Boot项目:
- 使用Spring创建向导创建boot功能。
- 选择需要的模块,向导会联网自动下载相应内容创建boot项目嗷!!!(平常加个Web差不多就够了嗷!!!)
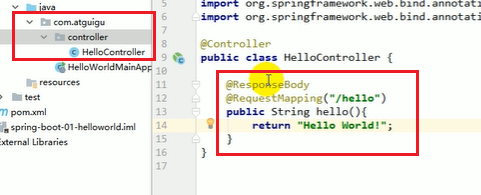
- controller中类的一些特点:
- RESTAPI的方式:
- 发一个数据给浏览器,而不是进行浏览器的跳转。
- @ResponseBody可以放在整个Controller类的前面:
- 表示类中的所有方法都采用@ResponseBody的方法嗷!!!
- 如果返回的是对象的话还能够转为json数据
- @ResponseBody和@Controller两个注解有点复杂,简化为@RestController:
- ```java
@Target({ElementType.TYPE})
@Retention(RetentionPolicy.RUNTIME)
@Documented
@Controller
@ResponseBody
- ```java
这里的RestController就覆盖了前两个,就很方便。
默认生成的项目特点:
- 主程序已经生成好了,直接写业务逻辑就行
- resources文件夹中目录结构:
- static:保存所有的静态资源:js css images;
- template:保存所有的模板页面(boot默认jar包使用嵌入式的Tomcat , 默认不支持JSP页面。),但是我们可以使用模板引擎。
- application.properties:Boot应用的配置文件,可以修改默认设置。(例如server.port)
配置文件:
- 全局的配置文件,配置文件名是固定的:
- application.properties
- application.yml
- 作用:
- 修改自动配置的默认值
- YAML以数据为中心,更加适合作为配置文件。
- YAML实例:
1 | |
YAML基本语法:
k: v来表示键值对
空格的缩进来控制层级关系:只要左对齐的是同一个层级的。
server: port: 8081 path: /hello1
2
3
4
5
6
7
8
9
10
11
12
13
14
15
16
17
18
19
20
21
22
23
24
25
26
- 属性和值也是大小写敏感的嗷!!!
## 值的写法:
- 字面量(普通的值):
- 字符串默认不用加上单引号和双引号
- 单引号和双引号还不一样,双引号会转义特殊字符 , 单引号不会嗷,仅仅是作为字符串的说!!!(有点像前两天复习的shell编程里面嗷orz)
- 对象(属性和值):
- 对象还是k : v的方式
- friends:
lastName: zhangsan
age: 20
- 行内写法:
```yml
friend: {lastName: zhangsan,age: 18}数组(List , Set):
- ```yaml
pets:
- cat
- dog
- pig1
2
3
4
5
- 行内写法:
```yaml
pets: {cat,dog,pig}
- ```yaml
配置文件数据绑定:
- 将配置中的每一个属性的值,映射到组件中:
@ConfigurationProperties,告诉boot本类中的所有属性和配置文件中的进行绑定!!!@ConfigurationProperties(prefix = "person")- 上面的这个的意思就是找到person,然后将其配置与本类中的属性绑定嗷!!!
- 只有组件时容器中的组件,才能使用容器提供的@ConfigurationProperties功能。
- 所以同时一定要加上@Component注释。
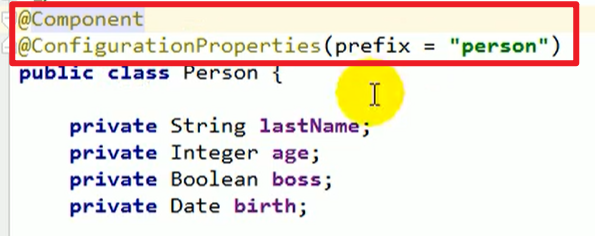
- 上面这里有可能报错哦,因为我们没有引入对应的工具。这个时候,我们打开对应的文档,里面就有写相应的解决方法和解决措施嗷!!!
单元测试(配置文件注入):

- 和Java项目中差不多,加上相应的注释。
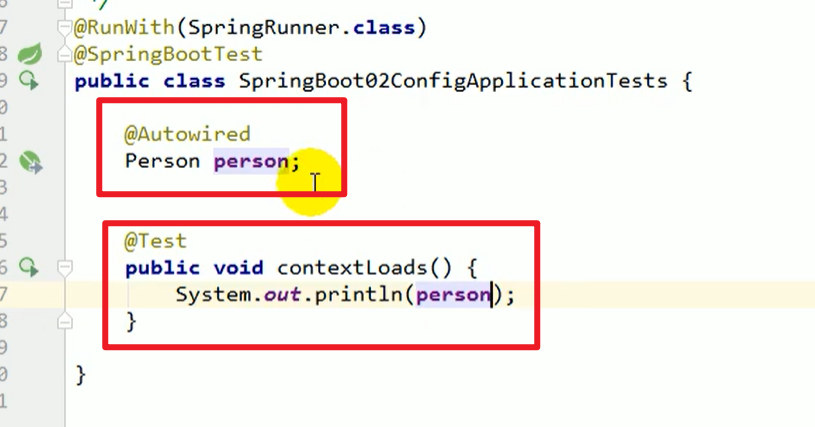
- 就比如我上面配置了Component加入了Person对象进入到容器中,这里我们就通过自动注入的方式。把容器中的person对象拿出来,然后测试他的值对不对嗷!!!
Properties的复活:
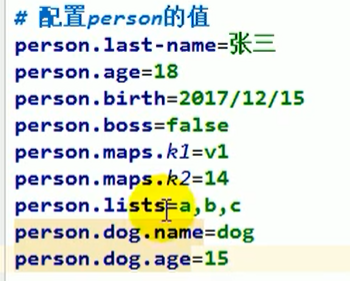
- idea默认使用的utf-8进行编码的
- 配置中的file-encoding可能需要改变成utf-8嗷!!!
@Value注解和@ConfigProp不同
@Value通过${}就可以直接引入配置文件中对应的值,因为配置文件是全局的,就不用专门去引入配置文件嗷!!!
Value可以使用:
- @Value(“${person.age}”) 获取变量对应的值
- @Value(“#{11*2}”) 计算对应的结果
- @Value(“true”) 赋予对应的值
两者对比:
| @ConfigurationProperties | @Value | |
|---|---|---|
| 功能 | 批量注入配置文件属性 | 一个个指定 |
| 松散绑定 | 支持 | 不支持 |
| SpEL | 不支持 | 支持 |
| JSR303数据校验 | 支持 | 不支持 |
| 复杂类型封装 | 支持 | 不支持 |
- 校验的引入:
- 通过注解
@Validated - 然后后面就可以使用:
- Config那个直接就可以对于对应属性检测,但是@Value就不可以嗷!!!
- 通过注解
- 使用的场景:
- 业务逻辑中获取一下某一项的值,那就value就够用了嗷!!!
- 如果说,专门编写了一个JavaBean和配置文件进行映射,我们就直接使用@ConfigurationProperties,这就是区别嗷!!!
@PropertySource和@ImportSource
Property:
- 加载指定的配置文件。
- @ConfigurationProperties(prefix = “person”)默认从全局配置文件中获取,所有配置都放在全局配置文件里面有点太大了嗷!!!

- 上面那个@PropertySource中的value属性后面是一个数组,可以同时有多个配置文件嗷!!!
Import:
导入Spring的配置文件,让配置文件中的内容生效。
判断容器中是否有某个对象,额可以使用containsBean:

- 获得全局的ApplicationContext对象,检测其中是否含有id为helloService的某个对象的存在嗷!
Spring Boot中没有Spring的配置文件,我们自己编写的配置文件,boot也不能自动识别。
这个时候的importSource就起作用了,引入了我们编写的Spring的配置文件,让其生效。

在启动文件中使用import导入对应的Spring配置文件,就可以使我们自定义的Spring配置文件生效。
太麻烦了,SpringBoot推荐的方式(使用全注解):
- 首先写一个配置类—–相当于Spring的配置文件
- 配置文件例子:

- 只要是一个配置类,就要写上@Configuration配置类的注解嗷!!!
- 配置类就是用来代替配置文件的嗷,配置文件中使用bean标签来添加和注册组件,配置类中使用@Bean标签来添加组件嗷!!!

使用@Bean往容器中去添加组件。
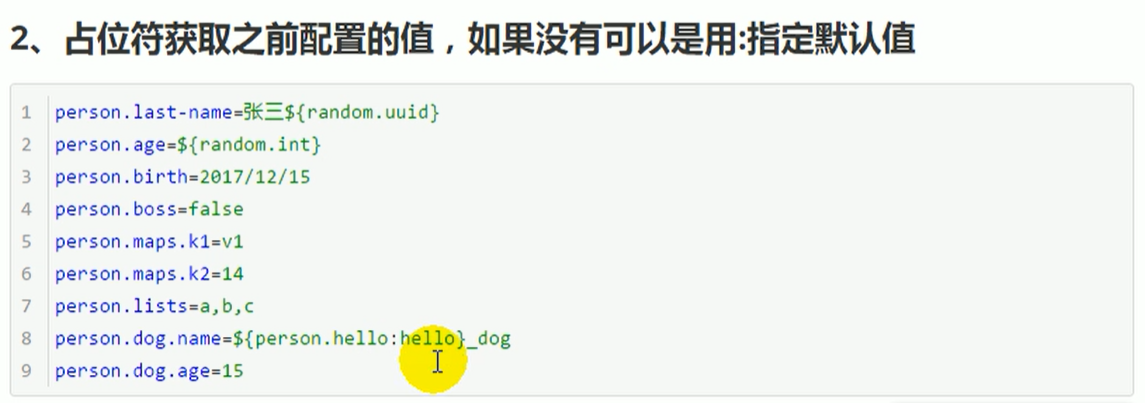
配置文件占位符:
properties和yaml都支持嗷!!!
前面配置的值可以使用:
${person.last-name}这种形式来引入以及可以使用
${random.uuid}这种形式来使用随机的一些函数等不存在的值,是获取不到的
${person.hello:hello}_dog,如果有hello属性就使用hello,如果不存在hello属性就直接为hello
用法归纳:
- 随机数:

- 占位符获取之前的值:
Profile:
- 多profile文件:
- 主配置文件编写的时候,主文件名可以是 application-{profile}.properties/yml
- 默认还是使用application.properties
- 可以使用spring.profiles.active=profile,来指定激活某个配置文件。
- yaml多文档块:
- 通过
---来分为文档块儿 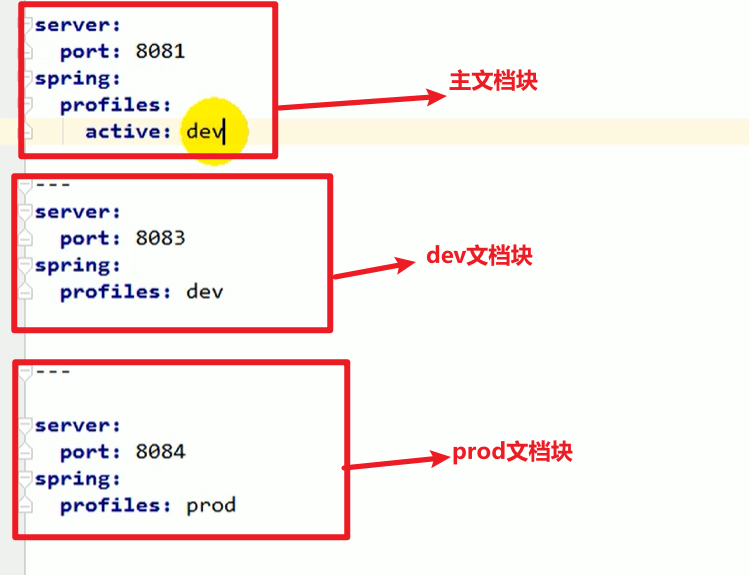
- 第一个是主文档块,可以通过主文档块选择激活的文档块,激活的文档块中的配置项才是生效的嗷!!!激活了别的,自己的配置就被别的代替啦!!!
- 激活指定profile:
- 命令行运行的方式来处理
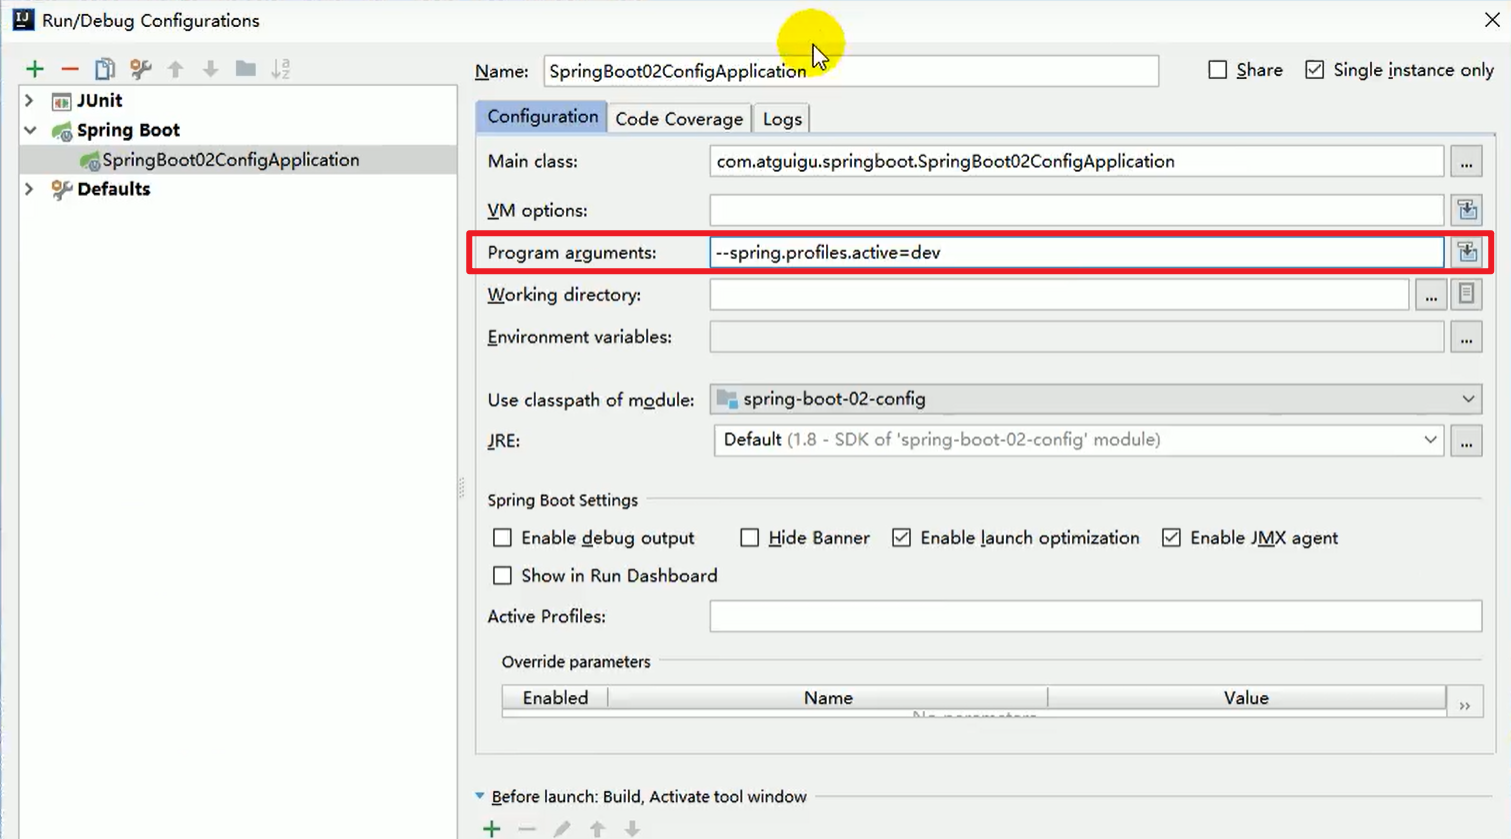
- 命令行和文件都如果都做了配置的话,以命令行参数的配置为准哦!!!
- 打包为jar包跑的时候,也是可以带上命令行参数的嗷!!!
- 虚拟机参数:
配置文件加载位置:
- 默认配置文件位置:

上述的优先级,从高到低排序的嗷!!!
这个file其实就是文件的根目录嗷!!!
都会加载进来,然后使用优先级最高的那个。除此之外,可以实现”互补加载“,高优先级没有的,会使用低优先级中有的嗷!!!
通过spring.config.location来改变默认的配置文件的位置。
指定的配置文件会和默认加载的配置文件共同起作用实现互补配置嗷!!!
这个配置项是在命令行中用java命令来配置的,而且优先级最高。
外部配置加载顺序:
- 也可以从如下位置加载,优先级从高到低。高优先级覆盖低优先级,所有的配置形成互补配置。

- 互补的特性可能在高版本消失了orz。
- 特点:
- ==有限加载带profile的==
- ==由包外向包内加载==
- 可以在命令行通过多个参数进行多个配置:-配置项=值,按空格来区分。
- 参考官方文档,看加载来源嗷!!!
Boot自动加载原理(重要):
- 官方文档最后一章中Appendiex A:Common application properties附录,有给详细的可配置属性和对应的功能。2.5.2发行版本boot官方文档对应Appendix中接口内容
自动配置原理:
主方法 -> @SpringBootApplication -> @EnableAutoConfiguration
@EnableAutoConfiguration的作用:
重点在于:
@Import(EnableAutoConfigurationImportSelector.class)上面这个是利用ImportSeletor为容器导入一些组件
EnableAutoConfigurationImportSelector -> 父类AutoConfigurationImportSelector -> 父类中的selectImports方法。
selectImports()方法中的内容:
List<String> configurations = this.getCandidateConfigurations(annotationMetadata, attributes);然后查看getCandidateConfigurations:
protected List<String> getCandidateConfigurations(AnnotationMetadata metadata, AnnotationAttributes attributes) { List<String> configurations = SpringFactoriesLoader.loadFactoryNames(this.getSpringFactoriesLoaderFactoryClass(), this.getBeanClassLoader()); Assert.notEmpty(configurations, "No auto configuration classes found in META-INF/spring.factories. If you are using a custom packaging, make sure that file is correct."); return configurations; }-  - 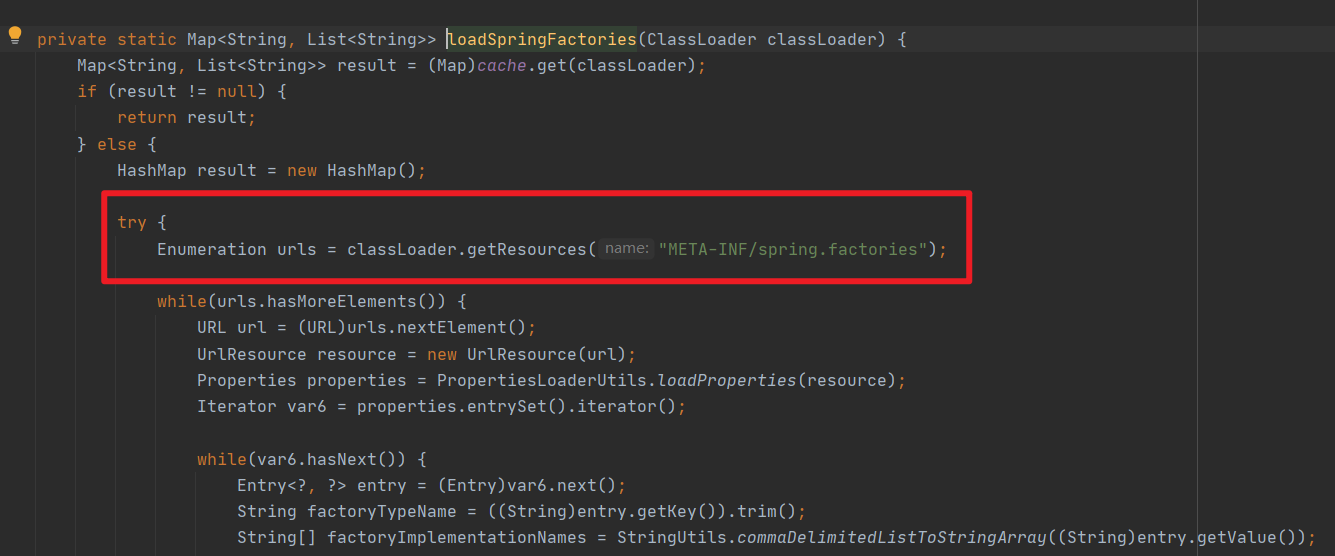1
2
3
4
5
6
7
8
9
10
11
12
13
- 然后看到了LoaderFactoryNames:
- ```java
public static List<String> loadFactoryNames(Class<?> factoryType, @Nullable ClassLoader classLoader) {
ClassLoader classLoaderToUse = classLoader;
if (classLoader == null) {
classLoaderToUse = SpringFactoriesLoader.class.getClassLoader();
}
String factoryTypeName = factoryType.getName();
return (List)loadSpringFactories(classLoaderToUse).getOrDefault(factoryTypeName, Collections.emptyList());
}把扫描到的内容包装为properties对象,然后下面对于这些对象进行遍历,对于获取到的值,就放在我们返回的result里面。

这里调用loadFactoryNames传入的第一个参数的值本质上就是EnableAutoConfiguration.class;
从properties中获取到的EnableConfiguration.class类对应的值,然后把他们添加在容器中。
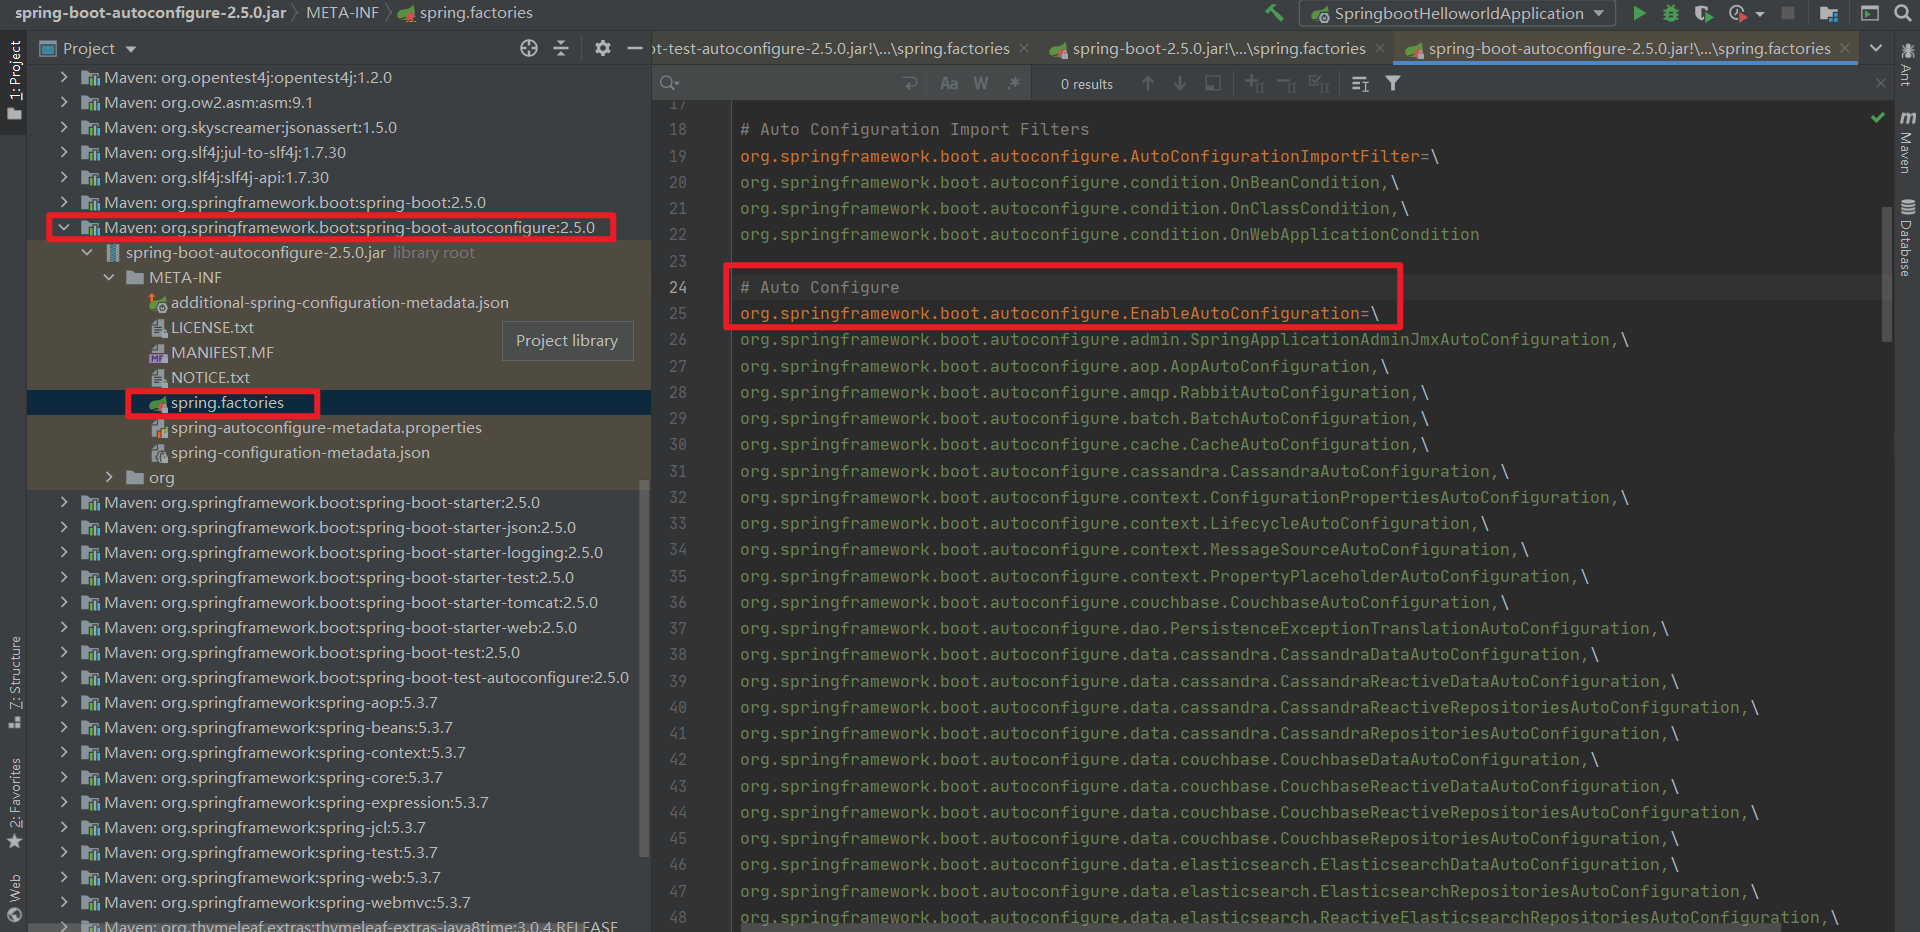
我们在对应的自动配置文件中,找到了EnableAutoConfiguration对应的值嗷!!!
一句话:将META-INF / spring.factories里面配置的所有的EnableAutoConfiguration对应的值,将其添加到容器中。每一个xxxAutoConfiguration都是容器中的一个组件,作用是用他们来做自动配置嗷!这就是自动配置之源头!!!
每一个自动配置类进行自动配置功能。
以HttpEncodingAutoConfiguration为例解释自动配置原理:
```java
@Configuration(
proxyBeanMethods = false
) // 表示这是一个配置类@EnableConfigurationProperties({ServerProperties.class}) // 启动指定类的ConfigurationProperties功能(对于指定的这个类进行配置嗷!!!)
@ConditionalOnWebApplication(
type = Type.SERVLET
) // Spring底层@Conditional注解,根据不同的条件,如果满足指定的条件,整个配置类里面的配置就会生效。判断当前应用是否为Web应用。如果是,生效。如果不是,失效。@ConditionalOnClass({CharacterEncodingFilter.class})// 判断当前项目有没有这个类,CharacterEncodingFilter是我们SpringMVC中进行乱码解决的过滤器。
@ConditionalOnProperty(
prefix = “server.servlet.encoding”,
value = {“enabled”},
matchIfMissing = true
)
//判断配置文件中是否存在某个配置 spring.http.encoding.enabled:如果不存在,判断也是成立的
//即使我们配置文件中不配置spring.http.encoding.enabled=true,也是默认生效的。1
2
3
4
5
6
7
8
9
10
11
12
13
14
15
16
17
18
19
20
21
22
23
24
25
26
27
28
29
30
31
32
33
34
35
36
37
38
39
40
41
42
43
根据当前不同的条件判断,决定配置类是否生效。
- 点进去上面那个指定的类:
```java
@ConfigurationProperties(
prefix = "server",
ignoreUnknownFields = true
)
public class ServerProperties {
private Integer port;
private InetAddress address;
@NestedConfigurationProperty
private final ErrorProperties error = new ErrorProperties();
private ServerProperties.ForwardHeadersStrategy forwardHeadersStrategy;
private String serverHeader;
private DataSize maxHttpHeaderSize = DataSize.ofKilobytes(8L);
private Shutdown shutdown;
@NestedConfigurationProperty
private Ssl ssl;
@NestedConfigurationProperty
private final Compression compression;
@NestedConfigurationProperty
private final Http2 http2;
private final ServerProperties.Servlet servlet;
private final ServerProperties.Tomcat tomcat;
private final ServerProperties.Jetty jetty;
private final ServerProperties.Netty netty;
private final ServerProperties.Undertow undertow;
public ServerProperties() {
this.shutdown = Shutdown.IMMEDIATE;
this.compression = new Compression();
this.http2 = new Http2();
this.servlet = new ServerProperties.Servlet();
this.tomcat = new ServerProperties.Tomcat();
this.jetty = new ServerProperties.Jetty();
this.netty = new ServerProperties.Netty();
this.undertow = new ServerProperties.Undertow();
}
...
}
@ConfigurationProperties(
prefix = “server”,
ignoreUnknownFields = true
)这个属性就是将配置文件中获取到的属性和bean的属性进行绑定。
- 所有在配置文件中能够配置的属性,都有自己对应的xxxProperties类中的封装者,配置文件能配置什么就可以参照某个功能对应的这个属性类。
- 我们能配置的属性都是properties,一旦配置类生效,这个配置类 就会给容器中添加各种属性,都是从properties中获取的。
- 注意一下,在2.5.2版本中:
这里直接就是AutoConfigurationImportSelector
- 精髓:
- SpringBoot启动会加载大量的自动配置类
- 我们看我们需要的功能有没有SpringBoot默认写好的自动配置类
- 我们再来看这个自动配置类中到底配置了哪些组件(有我们要用的组件,就不需要来配置了)
- 给容器添加组件的时候,从properties类中获取某些属性。我们就可以在配置文件中指定这些属性的值
- xxxAutoConfiguration:自动配置类
- xxxProperties:封装配置文件中相关属性
细节:
- @Conditional派生注解(Spring注解原生的@Conditional作用,就是作为判断,boot中相关的组件都是由原生的@Conditional衍生而来的嗷!!!)
- 作用:必须是@Conditional指定的条件成立,配置中的内容才会生效嗷!!!
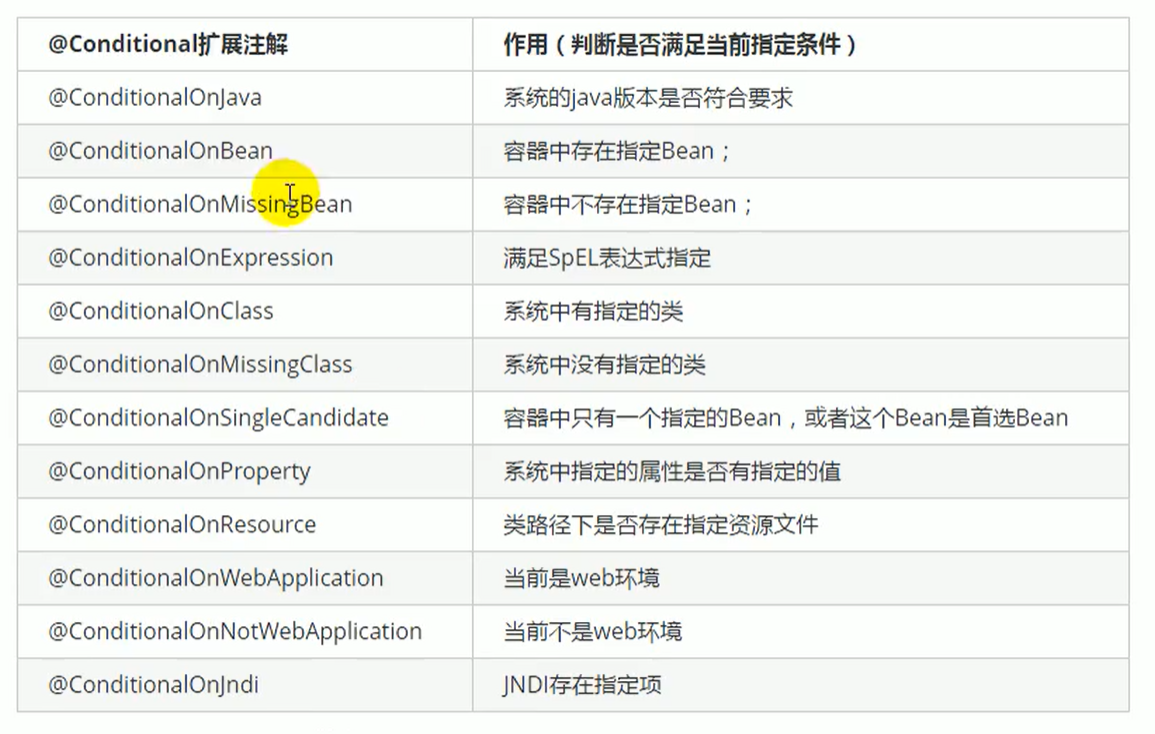
- 自动配置类必须在一定的条件下才能生效
- 我们怎么知道哪些自动配置类生效?
- application.properties中的
debug=true就可以设置开启SpringBoot的debug模式。模式打开之后,就可以在控制台打印自动配置报告,这样我们就可以很方便知道哪些自动配置类生效了。 - 报告中的Positive的就是成功启用了的,Negative就是没有成功启用的。
SpringBoot与日志:
- 日志门面和实现:
| 日志门面(日志的抽象层) | 日志实现 |
|---|---|
| JCL , SLF4j , jboss-logging | Log4j , JUL(java.util.logging) , Log4j2 , Logback |
- 左边选一个门面(抽象层),右边选一个实现。左边jboss-logging不咋使用,JCL版本太老不咋使用。SLF4j成为了不二之选。SLF4j对应的日志就最好是用Log4j或者Logback。
- JUL不咋用(为了抢占市场,和Log4j竞争,不太好用),Log4j不够先进,Log4j2太好用了很多框架不适配。因此综上,使用Logback。
- Boot选用SLF4j和Logback!!!
如何使用SLF4j:
- 以后开发的时候,调用抽象层的方法,而不是调用实现类。
- 调用代码:
1 | |
- 应该给系统里面导入slf4j的jar和logback的实现jar
- slf4j示意图:
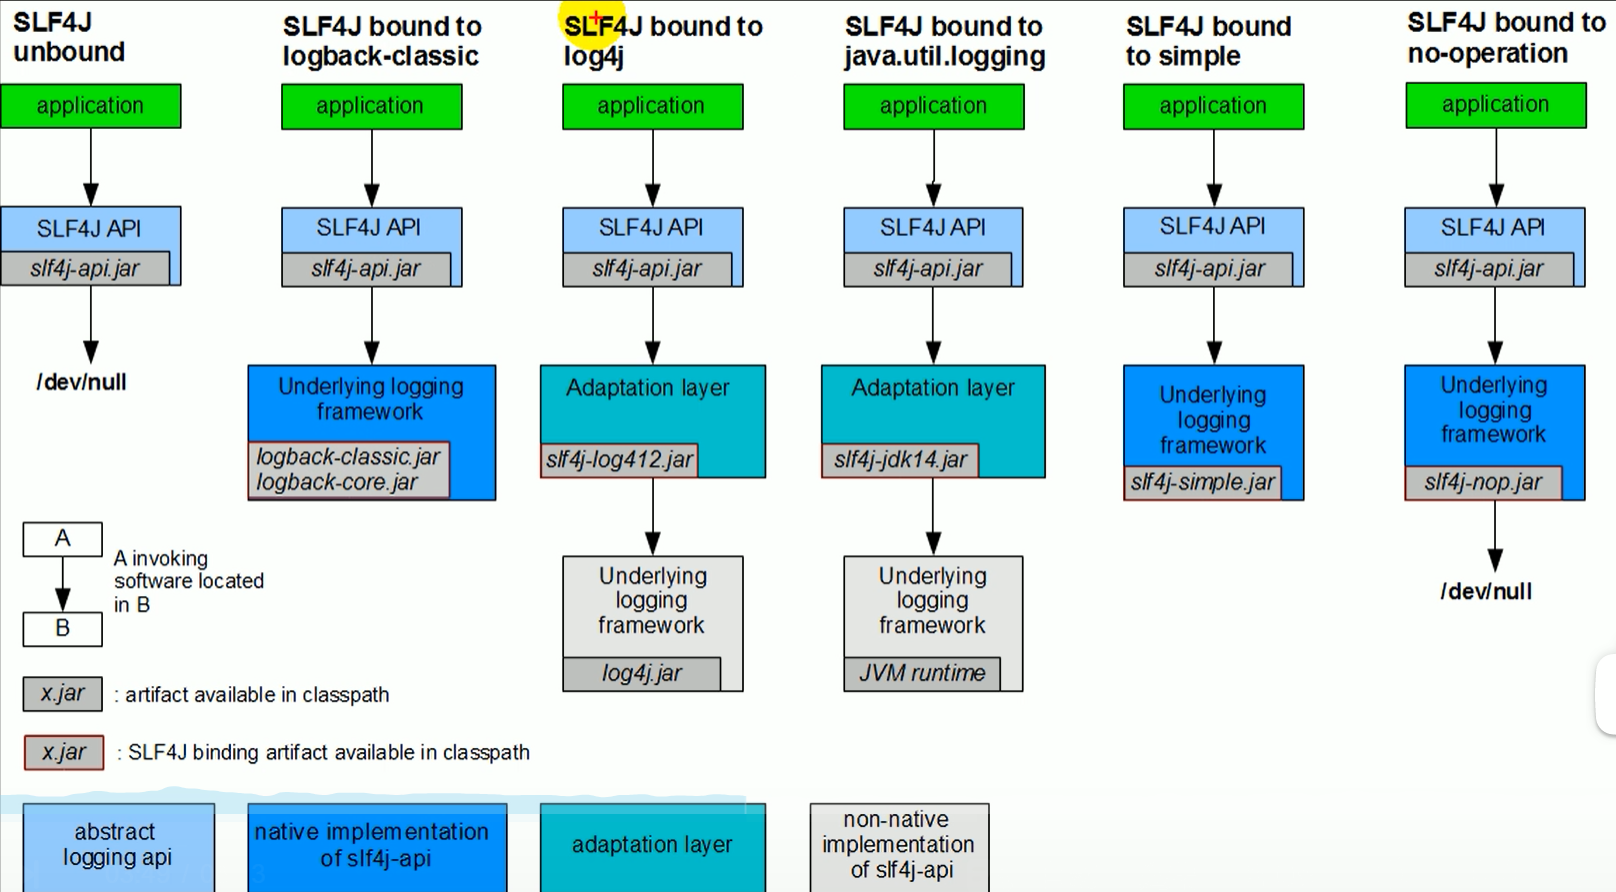
- 每一个日志的实现框架都有自己的配置文件,使用sel4j以后,配置文件还是做成日志实现框架自己本身的配置文件。
遗留问题:
- 系统内的日志太多,很杂。要统一日志记录,即使是别的框架,和我一起用我的嗷!!!
- 统一使用sel4j的图例:
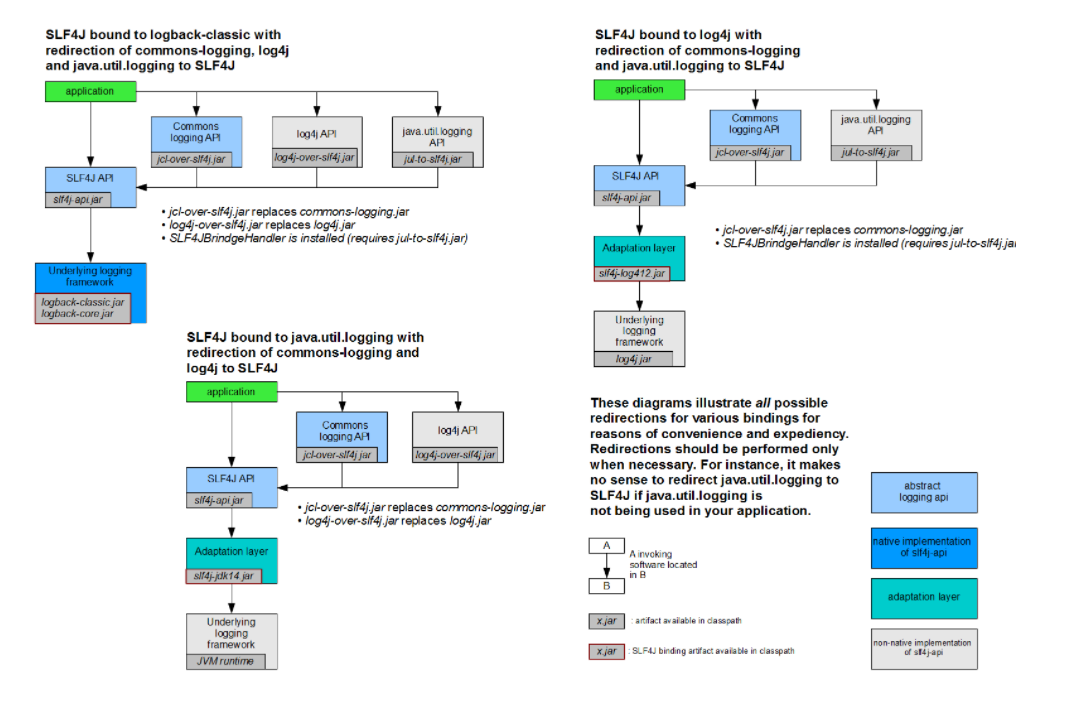
中间狸猫换太子,导入新的中介包,来间接使用我们的sel4j api。
- 如何统一?
- ==将系统中所有其他日志框架先排除出去==
- ==用中间包来替换原有的日志框架==
- ==我们导入sel4j其他的实现==
SpringBoot中的日志使用:
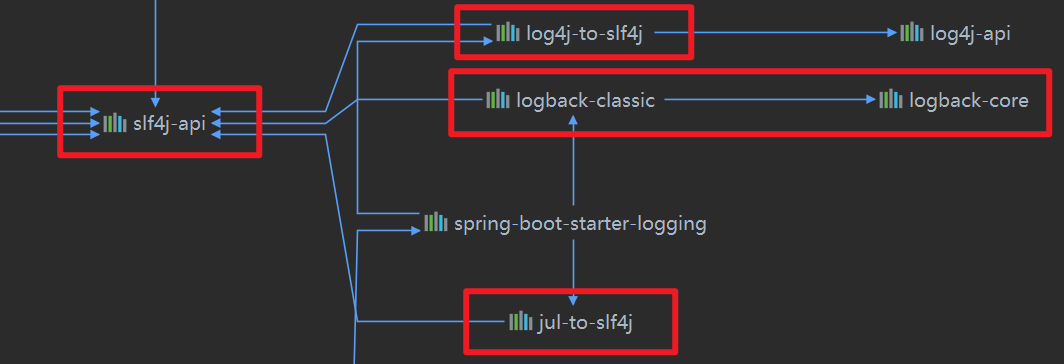
- 将其他框架都转换为slf4j的方式。
- SpringBoot底层也是使用slf4j + logback的方式进行日志记录
- 中间转换包:
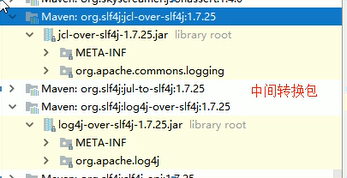
- 包名都没变一下orz,但是内部用的实际上是slf4j中的接口方法。
- 那如何引入其他框架呢?一定要把这个框架默认日志依赖给移除掉嗷!!!
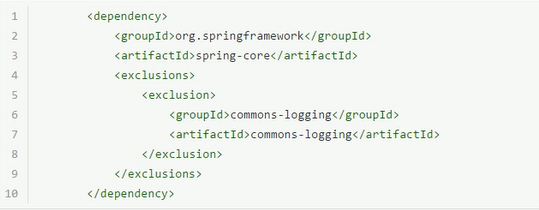
- Boot能够自动适配所有的日志,并且底层使用sel4j + logback的方式记录日志。引入其他框架的时候,只需要把这个框架依赖的日志框架排除掉嗷!!!
日志使用:
- boot默认帮助我们配置好了日志。
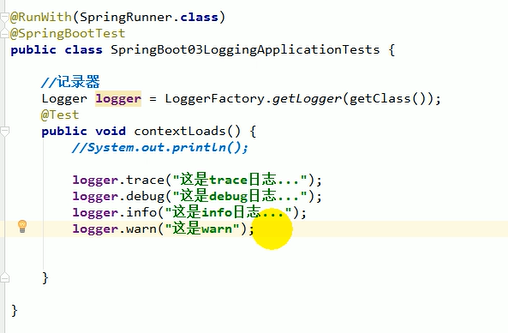
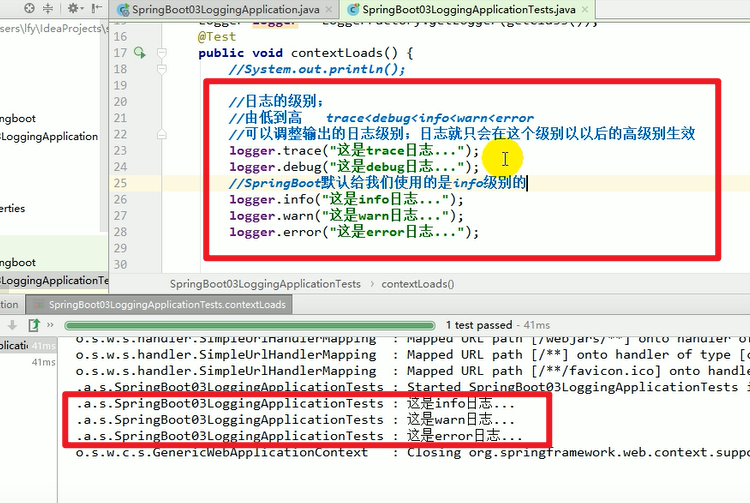
日志配置信息(配置文件中对应的配置):
- logging.level.对应包名 = trace(对应级别)
默认级别(root)为info级别,我们这里可以设置对应的包的级别为特定的级别,改级别及以上的级别都能够输出。
- 指定路径或文件(保存项目的输出信息):
- 控制台输出的日志的格式:
- 指定文件日志输出的格式:

- 上面这两个都只是一个样板,可以根据样本进行定制和修改嗷!!!

自定义日志配置文件:
- 官网中专门有一个章节来介绍对应的内容嗷!!!

- 类路径下每个日志框架放上自己的配置文件即可,SpringBoot就不适用他默认配置的文件。
- lockback.xml:直接被日志框架识别了。
- lockback-spring.xml:日志框架就不直接加载配置项,由springBoot进行加载,就可以使用高级特性。可以指定某段配置只在某个环境下(类似于dev环境)生效。

切换日志(log4j为例子):
- 使用log4j就要排除logback了:

- 狸猫换太子的包也排除掉嗷!
- 导入slf4j-log4j12的adapter:

- 适配层的包会自动导入log4j(本身有依赖关系嘛)。
- 编写log4j对应的配置文件嗷!!!
- 核心:通过上面的日志适配图,来找到不需要的排除的包和需要引入的包。以此来进行操作嗷!!!
- 官方文档中相关的介绍:

- 如果想换成log4j2的话,我们就直接把logging排除,然后换成log4j2就好了嗷!!!(非常简单嗷!!!)
SpringBoot与Web开发(整合MVC):
- 使用Boot:
- 创建应用,选中需要的模块儿
- Boot已经默认将这些场景都配置好了,只需要在配置文件中指定少量配置就可以运行起来
- 自己编写业务编写代码
- 自动配置原理?
- 思考:帮我们配置了什么?能不能改?能不能配置等。
xxxAutoConfiguration , xxxProperties
- BookStrap官网,里面提供了很多模板和很多例子哦,有时间的时候上去翻一翻嗷!!!
静态资源映射规则:
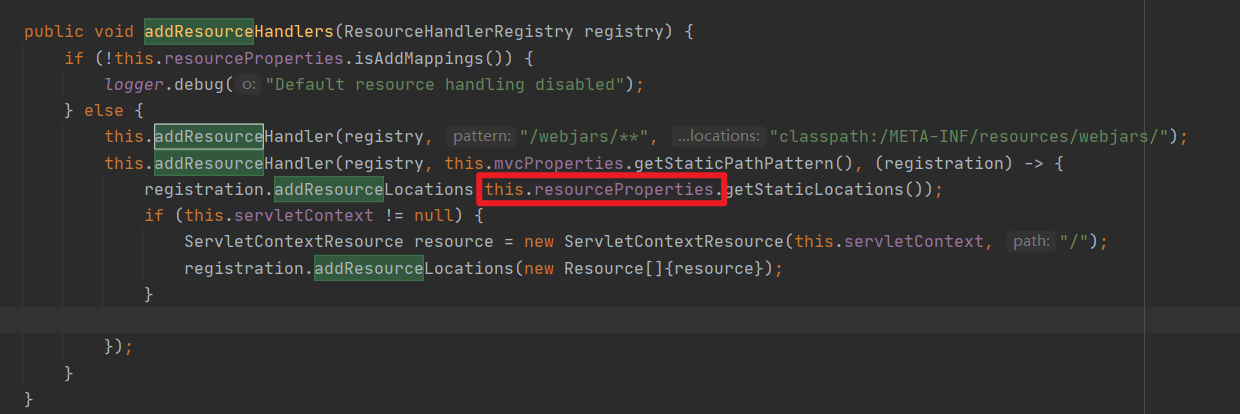
- 配置处于WebMvcAutoConfiguration.class中
- 配置规则代码如下:
1 | |
- 所有/webjars/**下的请求,都去classpath:/META-INF/resources/webjars/下找资源。(webjars本质上就是通过jar包的方式引入资源)
通过在webjars中选择对应的版本,加入到pom中,就自动导入依赖,例如jquery。引入的依赖的结构如下所示:
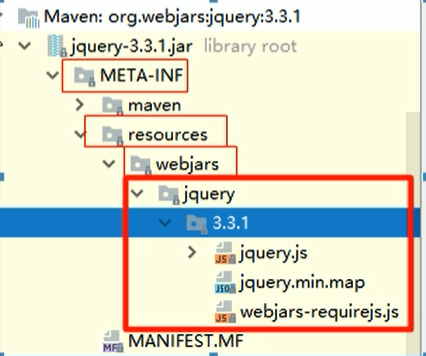
例如:localhost:8080/webjars/jquery/3.3.1/jquery.js
- 进一步分析:
- 自己的静态资源:
- /**,访问当前项目的任何资源,静态资源的文件夹:
1 | |
- 欢迎页的映射:
- 静态资源文件夹下的所有index.html页面,被“/**”映射,就找index.html页面
- 喜欢的图标:
所有的”**/favicon.ico”,都是在静态资源文件下找(新版本的好像没有这个了orz)
spring.web.resources.static-locations=1
2
3
4
5
6
7
8
9
10
11
12
13
14
15
16
17
18
19
20
21
22
23
24
25
26
27
28
29
30
31
32
33
34
- 通过上面这个东西,我们可以对于web的资源路径手工配置,多条路径的话,可以通过,进行分隔。如果配置了的话,默认配置就失效了嗷!!!
## 模板引擎:
- JSP本质上就是模板引擎,Freemarker和Thymeleaf都是嗷!
- 思想:将模板和数据交给TemplateEngine,组装成output,这就是原理。
### Thymeleaf:
#### 配置:
- 语法简单强大
- 引入:官网中的starter有对应的内容嗷!!!
```xml
<dependency>
<groupId>org.springframework.boot</groupId>
<artifactId>spring-boot-starter-thymeleaf</artifactId>
</dependency>
<properties>
<java.version>1.8</java.version>
<thymeleaf.version>3.0.9.RELEASE</thymeleaf.version>
<thymeleaf-layout-dialect.version>2.2.2</thymeleaf-layout-dialect.version>
</properties>thymeleaf3主程序,layout2以上才拥有布局功能的支持程序,所以需要配置版本覆盖。
调整这些版本的话,可以上github查看相关的文档和依赖关系。
使用&语法:
- 查看thymeleaf的自动配置class和properties文件,查看其中的内容,就可以直接让他跑起来了嗷!!!
- properties中的部分代码:
1 | |
- 只要把html中的页面放入类路径下的templates里面,thymeleaf就能够自动渲染了。默认的后缀是会自动帮你加上.html的嗷,源码中写的很清楚了嗷!!!
- 例如:
1 | |
- 只需要把页面放到resources下的templates文件夹中,就能够正常使用thymeleaf了嗷。
- 找thymeleaf官网,下载对应版本的PDF文件,就能够找到其对应的用法了嗷QAQ!!!
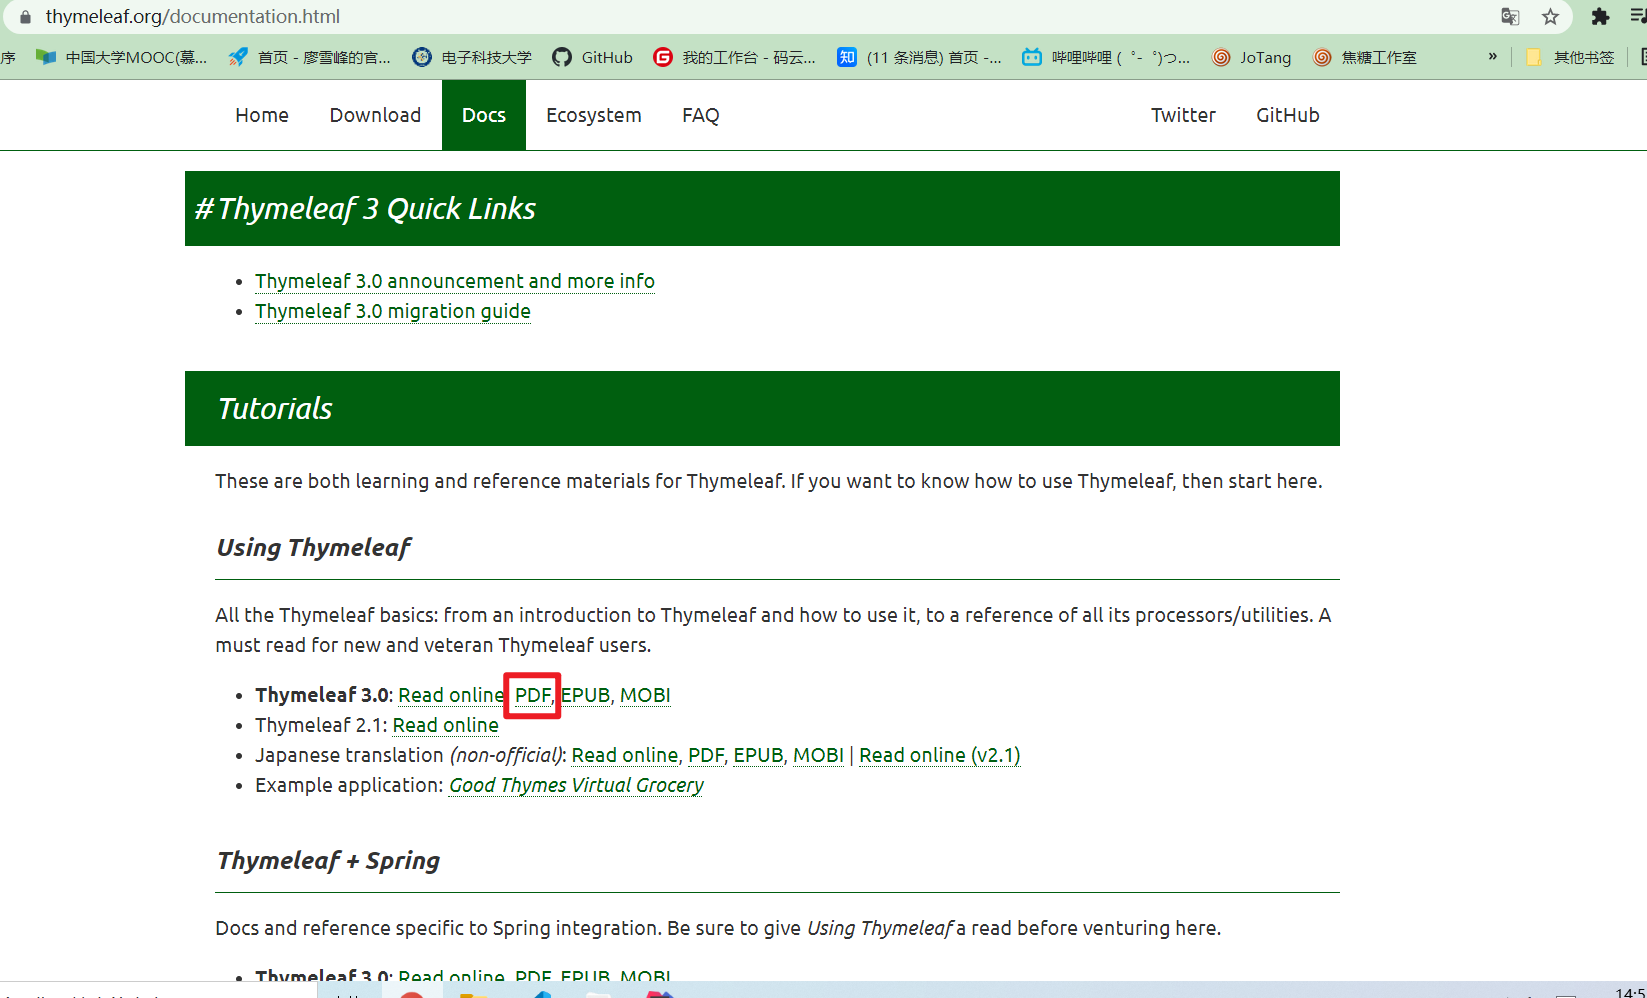
使用:
- 导入名称空间:
<html xmlns:th="http://www.thymeleaf.org">- 使用thymeleaf语法:
- th:text : 将文本内容中的值设置为对应的值
<div th:text="${hello}"></div>语法规则:
- th:text : 改变当前元素里面的文本内容。
- 使用th:任意属性 可以替换原生属性
- 属性优先级:
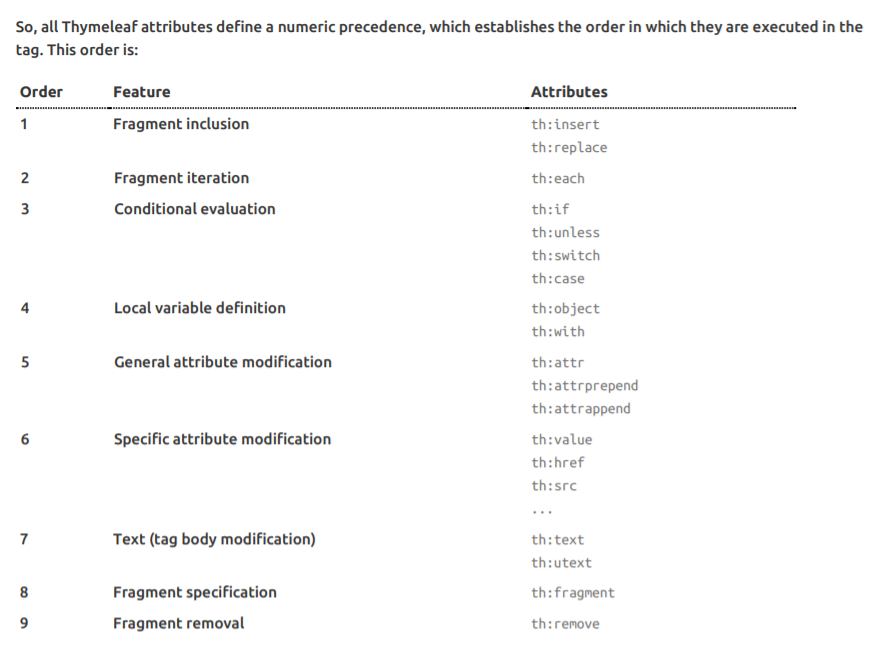
- 第一个是包含功能
- 第二个是遍历功能
- 第三个是条件判断功能
- 第四个是变量声明
- 第五个是任意属性修改(支持前后添加东西)
- 第六个是修改属性默认值
- 第七个是修改标签体内容(utext是不转义特殊字符)
- 第八个是指定声明片段
- 第九个是移除声明片段
表达式语法:
1
2
3
4
5
6
7
8
9
10
11
12
13
14
15
16
17
18
19
20
21
22
23
24
25
26
27
28
29Simple expressions:(表达式语法)
Variable Expressions: ${...}(获取变量值,OGNL为底层):
1. 获取对象属性
2. 调用属性方法返回值
3. 内置对象:(可以查看附件中的对应的对象)
#ctx : the context object.
#vars: the context variables.
#locale : the context locale.
#request : (only in Web Contexts) the HttpServletRequest object.
#response : (only in Web Contexts) the HttpServletResponse object.
#session : (only in Web Contexts) the HttpSession object.
#servletContext : (only in Web Contexts) the ServletContext object.
4. 内置工具对象:
#execInfo : information about the template being processed.
#messages : methods for obtaining externalized messages inside variables expressions, in the same way as they would be obtained using #{…} syntax.
#uris : methods for escaping parts of URLs/URIs
#conversions : methods for executing the configured conversion service (if any).
#dates : methods for java.util.Date objects: formatting, component extraction, etc.
#calendars : analogous to #dates , but for java.util.Calendar objects.
#numbers : methods for formatting numeric objects.
#strings : methods for String objects: contains, startsWith, prepending/appending, etc.
#objects : methods for objects in general.
#bools : methods for boolean evaluation.
#arrays : methods for arrays.
#lists : methods for lists.
#sets : methods for sets.
#maps : methods for maps.
#aggregates : methods for creating aggregates on arrays or collections.
#ids : methods for dealing with id attributes that might be repeated (for example, as a result of an iteration).Selection Variable Expressions: *{...}(变量选择表达式,和${...}功能一样的。): 1. 有一个补充功能,配合th:object进行使用的,参照文档使用 Message Expressions: #{...}(获取国际化内容) Link URL Expressions: @{...}(获取url链接) Fragment Expressions: ~{...}(引用片段)
Literals(字面量):
Text literals: ‘one text’ , ‘Another one!’ ,…
Number literals: 0 , 34 , 3.0 , 12.3 ,…
Boolean literals: true , false
Null literal: null
Literal tokens: one , sometext , main ,…
Text operations(文本操作):
String concatenation: +
Literal substitutions: |The name is ${name}|
Arithmetic operations(数学运算):
Binary operators: + , - , * , / , %
Minus sign (unary operator): -
Boolean operations:
Binary operators: and , or
Boolean negation (unary operator): ! , not
Comparisons and equality(比较运算):
Comparators: > , < , >= , <= ( gt , lt , ge , le )
Equality operators: == , != ( eq , ne )
Conditional operators(条件运算,三元运算符号等):
If-then: (if) ? (then)
If-then-else: (if) ? (then) : (else)
Default: (value) ?: (defaultvalue)
Special tokens(特殊操作):
No-Operation(不做操作): _
All these features can be combined and nested:
1 | |
-> getCandidateViews:
1 | |
拓展MVC:
- 如之前的拦截器啊之类的配置。
- 文档中又说,编写一个配置类(@Configuration),是WebMvcConfigurerAdapter类型,不能标注@EnableWebMvc。
- 使用WebMvcConfigurerAdapter可以拓展MVC的功能嗷!!!(这个东西被弃用了,2.0中实现WebMvcConfigurer接口就行了)
- 拓展SpringMVC:
1 | |
原理:
- WebMvcAutoConfiguration是SpringMVC的自动配置类
- 在做自动配置的时候,会导入@Import(EnableWebMvcConfiguration.calss)
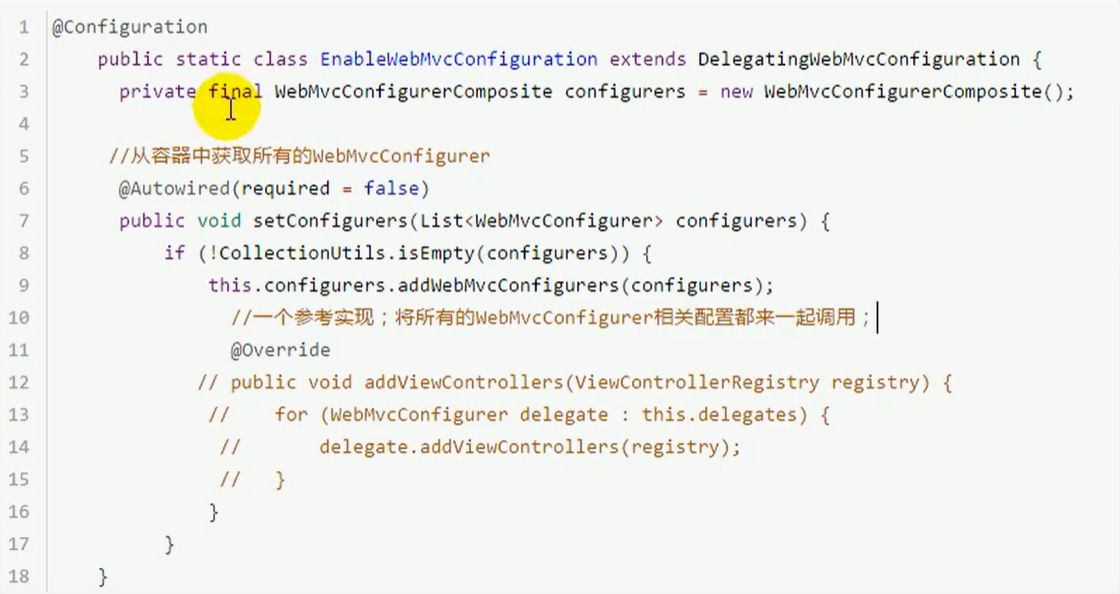
- 所以下面个遍历本质上把容器中所有WebMvcConfigurer相关配置都调用一遍来起作用,因此自己配置的会和系统默认的同时生效。
- 效果:我们的拓展配置和MVC的默认配置都会其作用。
全面接管MVC:
@EnableWebMvc即可
和我们开发MVC的时候就是一样的,该有什么还是要写什么。
全面接管意味着所有的SpringMVC的自动配置全都失效了嗷!!!(默认的扫描包啊,默认的index页面之类的就都gg了,除非自己配置)
原理:
@EnableWebMvc的核心到底有什么:
1
2
3@Import({DelegatingWebMvcConfiguration.class})
public @interface EnableWebMvc {
}DelegatingWebMvcConfiguration和它的父类都是相应的配置。
1
2
3
4@Configuration(
proxyBeanMethods = false
)
public class DelegatingWebMvcConfiguration extends WebMvcConfigurationSupport {- MVC自动配置类中开头标有:
1
2
3
4
5
6
7
8
9
10@Configuration(
proxyBeanMethods = false
)
@ConditionalOnWebApplication(
type = Type.SERVLET
)
@ConditionalOnClass({Servlet.class, DispatcherServlet.class, WebMvcConfigurer.class})
@ConditionalOnMissingBean({WebMvcConfigurationSupport.class})
@AutoConfigureOrder(-2147483638)
@AutoConfigureAfter({DispatcherServletAutoConfiguration.class, TaskExecutionAutoConfiguration.class, ValidationAutoConfiguration.class})- 重点在于@ConditionalOnMissingBean({WebMvcConfigurationSupport.class}),没有这个组件的时候,这个自动配置类才生效。
- 然后你发现DelegatingWebMvcConfiguration往容器中导入了WebMvcConfigurationSupport.class,因此自动配置失效了嗷!!!
- 导入的WebMvcConfigurationSupport.class只是MVC最基本的功能。
项目练手:
SpringBoot中放在static下的静态文件由boot加载,如果想用到thymeleaf的功能,就要放在templates文件夹下哦!!!
public下有index.html,templates下也有index.html , 默认到了public下的index.html怎么办???
- 手动在Controller中配置映射来解决,覆盖boot的默认设置。
- 使用WebMvc的配置文件来配置:
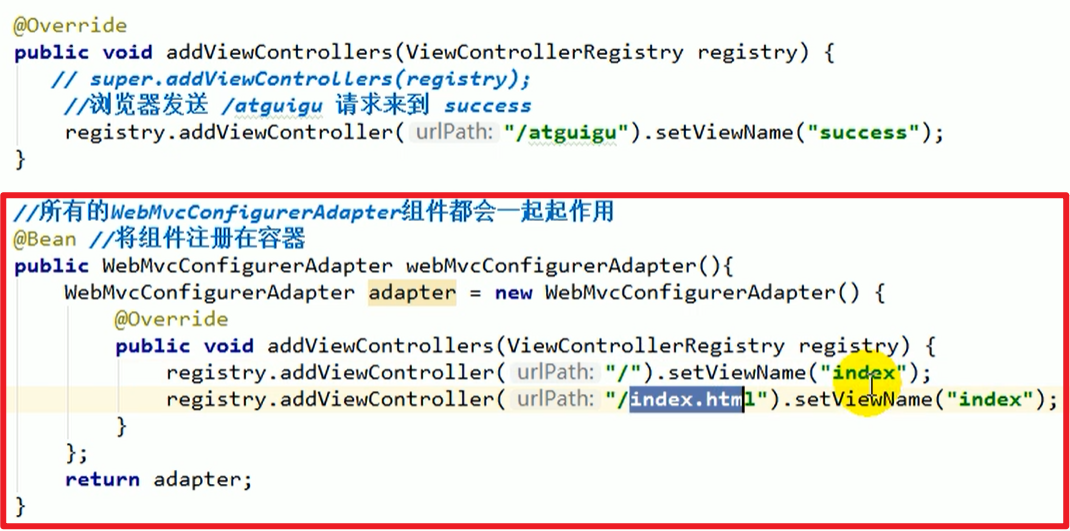
- 通过添加新的映射关系来解决
在templates目录下的页面可以使用thymeleaf的语法规则。最好推荐使用thymeleaf的语法规则:

好处:如果改项目的根目录,例如content-path的话,thymeleaf会自动帮助我们进行修改嗷!!!
国际化:
- 编写国际化配置文件
- 使用ResourceBundleMessageSource管理国际化资源文件
- 在页面使用fmt:message取出国际化内容
编写国际化配置文件:
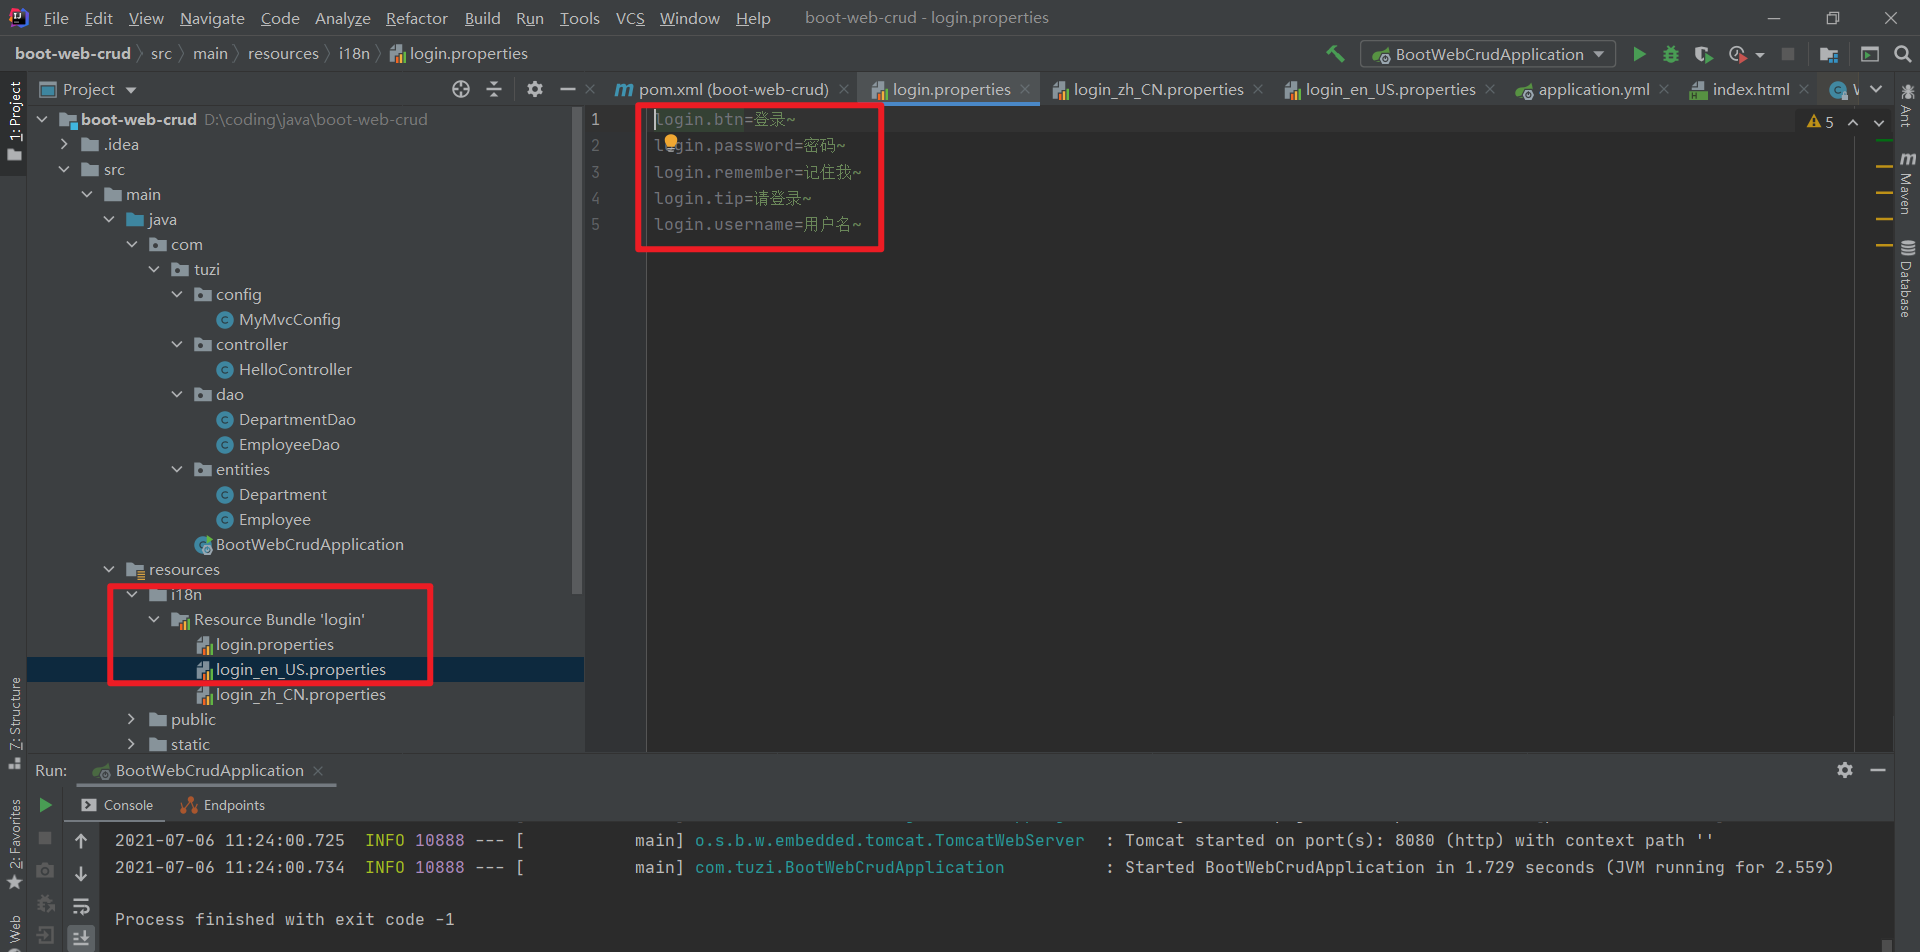
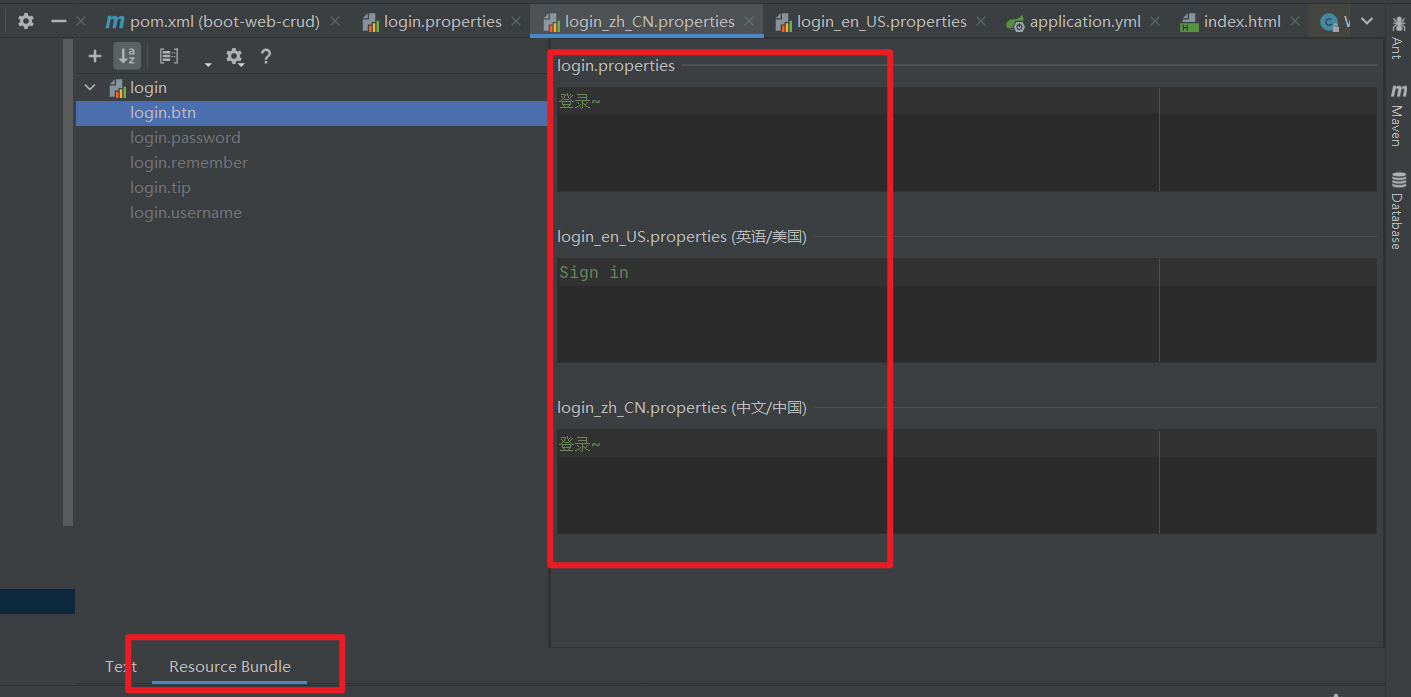
- 这个东西很方便嗷!!!
- SpringBoot自动配置好了管理国际化资源文件的组件
自动配置相应内容:
1 | |
配置的是Properties
配置完对应的包之后,就要去页面获取国际化的值:
- thymeleaf文档中有些嗷!!!
- #{}就是来获取国家化信息的
添加对应的国际化包的配置:
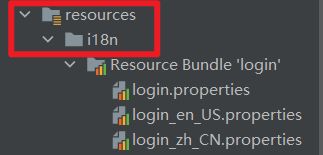
- 配置basename:
spring.messages.basename = i18n.login
- 使用#{}来更改页面中对应位置的值来获取国际化的值。
下面的英文和中文如何相互切换:
- 国际化Locale(区域信息对象) : LocaleResolver(获取区域信息对象)。
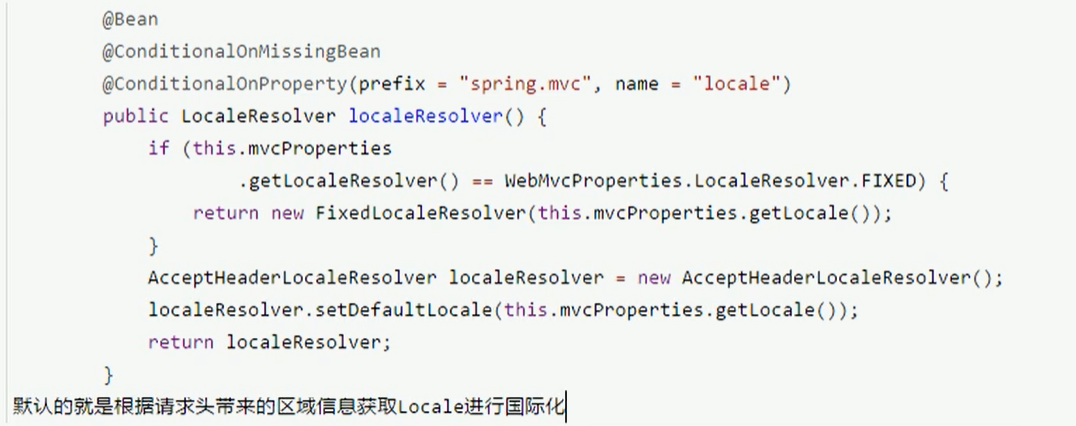
- component.MyLocaleResolver:
- 在链接上携带区域信息。

- 除此之外,还要自己实现区域信息解析器
要实现自己的相关的功能,我们这里需要重新编写一个类:
1 | |
- 覆写之后,我们需要让其加入到我们的容器到,来覆盖默认生效的默认LocaleResolver的实现类嗷,可以在我们定义的config里面,生成这个类并将其加载到容器中!!!
- 相应的配置类:
1 | |
- 点击链接切换国际化:
- 自己写一个Resolver
- 将Resolver添加到容器中去
增加页面跳转(登录):
- HTML的修改:
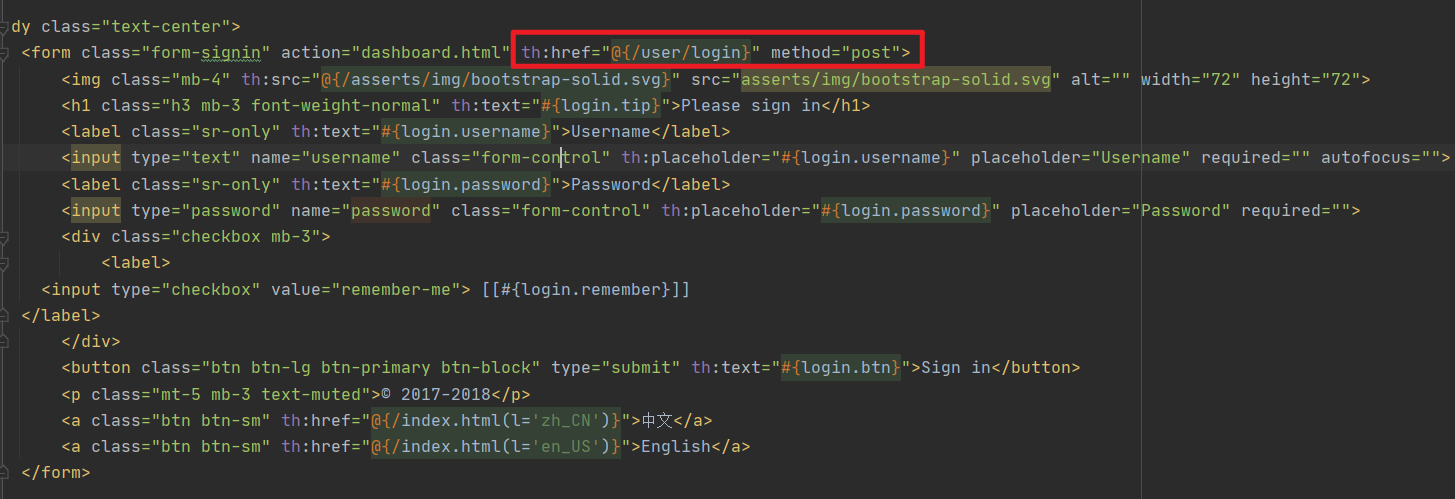
- 添加对应的Controller对象:
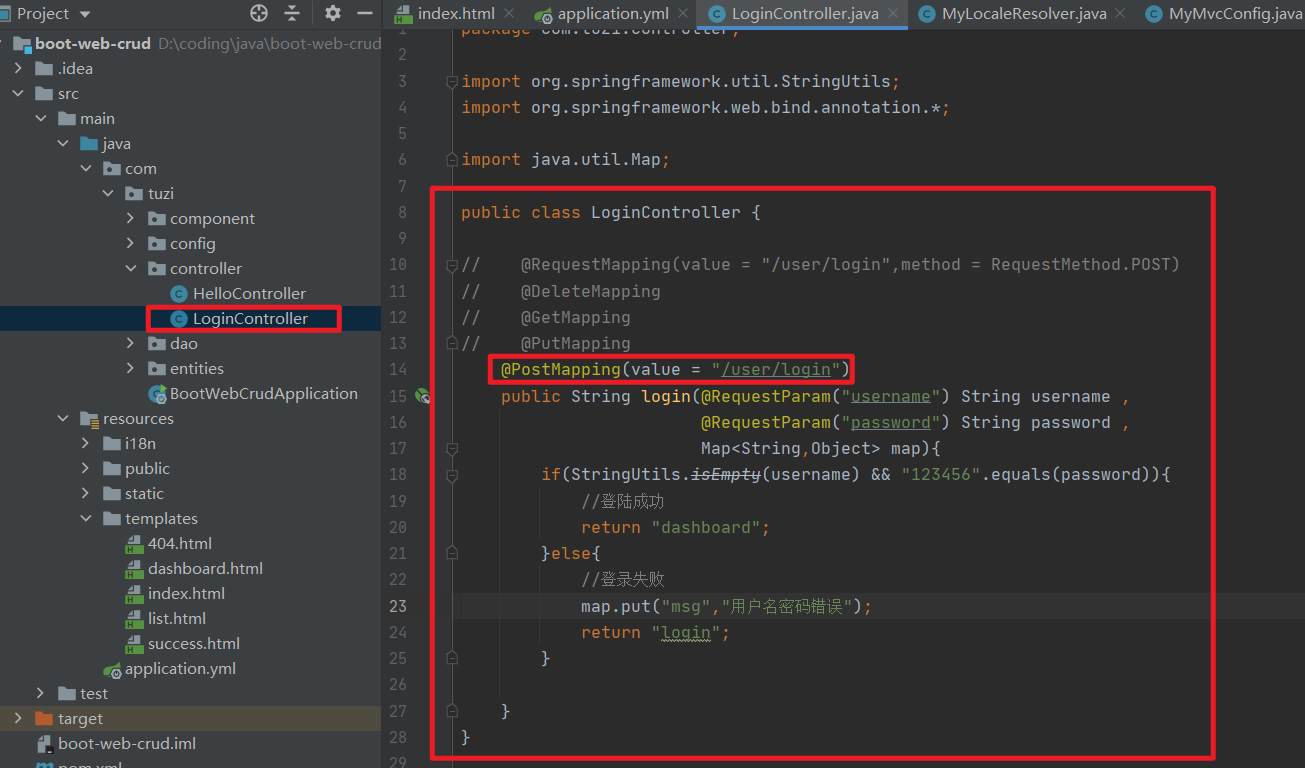
- 由于默认页面有缓存,在进行操作的时候,需要我们去配置清除缓存:
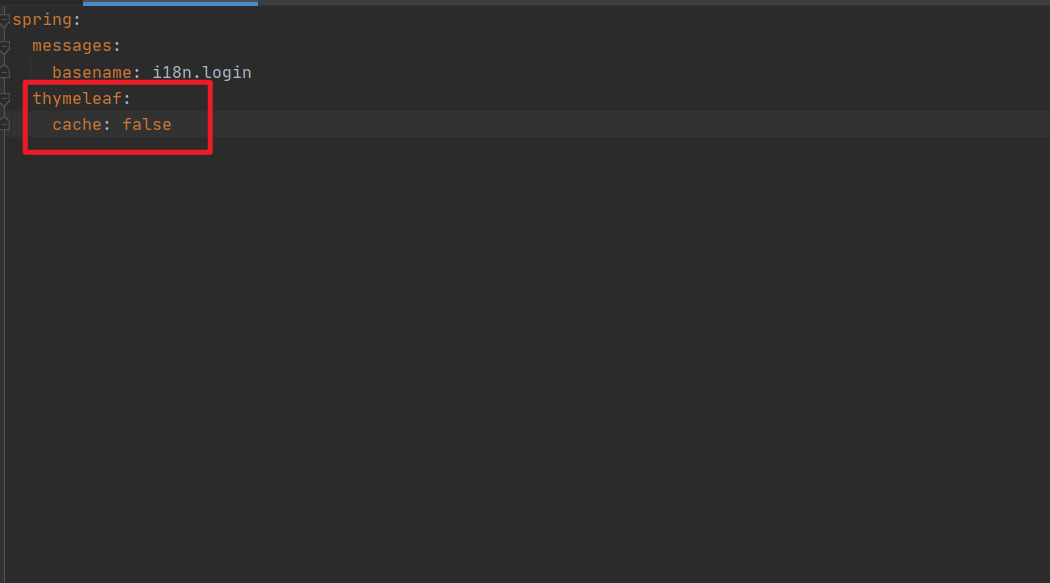
页面修改完成之后可以点击
Ctrl+F9可以进行重新编译刷新,因为IDEA有缓存。模板引擎修改以后如果要实时生效的话:
- 禁用模板引擎的缓存
- 页面修改以后
ctrl + F9,重新编译
如果登录失败返回失败的提示:
- 登录失败返回登录页面
- 如何判断错误信息是否显示?
- 语法:
- th:if
- th:text
- if的优先级比text高,if成立了,才会显示对应的标签是否显示。
- thymeleaf官方文档中,Utility Objects中有有些工具是可以用来判断是否为空的。
- 改写thymeleaf文件:

<!--判断--> <p style="color: #ff0000" th:text="${msg}" th:if="${not #strings.isEmpty(msg)}"></p>1
2
3
4
5
6
7
8
9
10
11
12
13
14
15
16
17
18
19
20
21
22
23
24
25
26
27
28
29
30
31
32
33
34
35
36
37
38
39
40
41
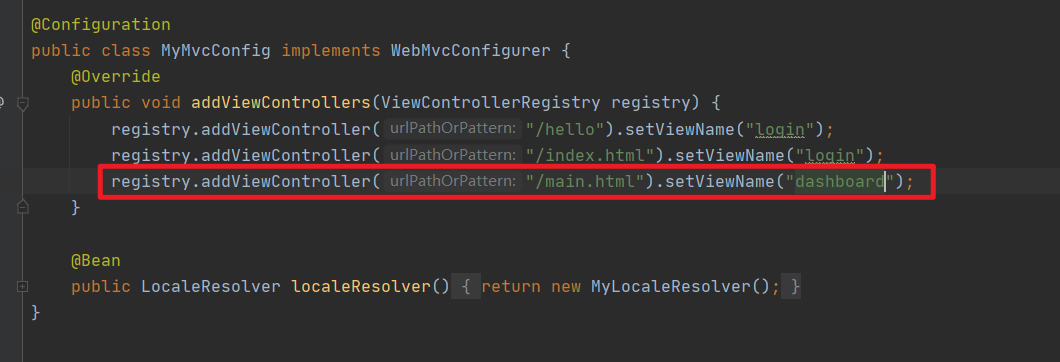
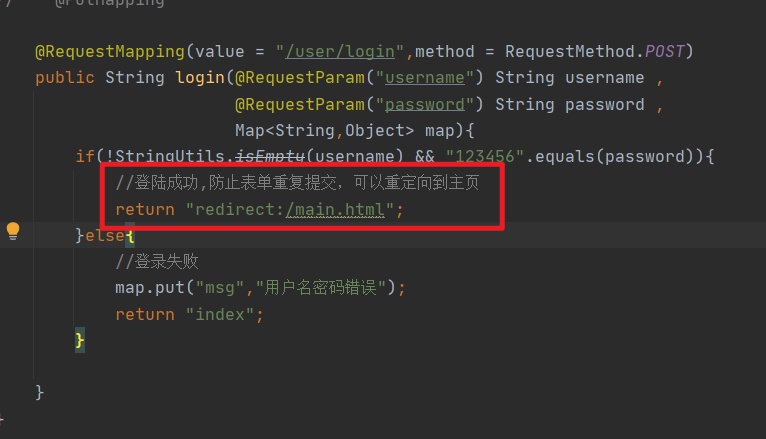
- **登录之后刷新页面会造成表单重复提交,为了防止表单重复提交**,可以重定向嗷!!!(表单重复提交就有问题嗷!!!)
- how to solve:
- 
- 
- 问题:不用登录,直接/main.html就能够访问这个页面嗷!
### 拦截器:
- 正常登录设置session:
```java
@Controller
public class LoginController {
// @RequestMapping(value = "/user/login",method = RequestMethod.POST)
// @DeleteMapping
// @GetMapping
// @PutMapping
@RequestMapping(value = "/user/login",method = RequestMethod.POST)
public String login(@RequestParam("username") String username ,
@RequestParam("password") String password ,
Map<String,Object> map , HttpSession session){
if(!StringUtils.isEmpty(username) && "123456".equals(password)){
//登陆成功,防止表单重复提交,可以重定向到主页
session.setAttribute("loginUser",username);
return "redirect:/main.html";
}else{
//登录失败
map.put("msg","用户名密码错误");
return "index";
}
}
}编写拦截器的工具类,放入component下面:
1 | |
- 在config中注册拦截器和进行相应的配置:
1 | |
Restful - CRUD:
- RestfulCRUD:CRUD满足Rest风格
- CRUD满足Rest风格
- URI:/资源名称/资源标识 HTTP请求方式区分对于资源的CRUD操作

- 实验的请求架构:
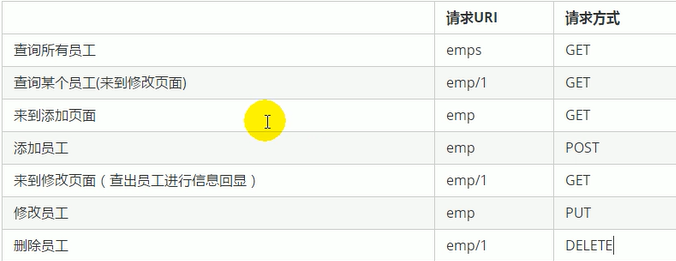
员工列表:
根据设计来设置这里的href,然后编写对应的Controller处理这个请求。
- 将与员工相关的目录放在templates下的emp目录中
- 编写对应的controller处理请求:
1
2
3
4
5
6
7
8
9
10
11
12
13
14
15
16
17
18
19@Controller
public class EmployeeController {
@Autowired
EmployeeDao employeeDao;
//查询员工返回列表页面
@GetMapping("/emps")
public String list(Model model){
Collection<Employee> employees = employeeDao.getAll();
//放在请求域中共享
model.addAttribute("emps",employees);
//默认去拼接字符串
//classpath:/templates/emp
return "emp/list";
}
}
thymeleaf抽取公共片段:
- 使用之前记得加上thymeleaf的命名空间嗷!!
- 抽取方法:
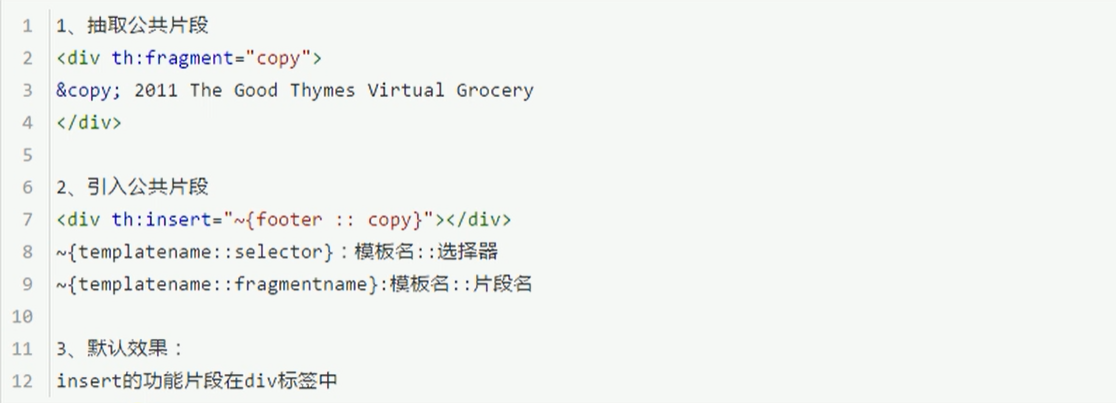
第一个无非就是给一整块儿命名,第二个就是在其他的块儿中,引入定义的已命名的块儿,并且这个被引入的块儿要放在div标签中嗷!!!(insert的使用)

- 上面的片名字是th:fragment=””,这个后面赋予的嗷。选择器则是html中类似于class和id这样的选择器嗷,一样的#id这样的嗷!!!

- 其他的真正的抽取的方法(三种属性):
- th:insert(如上):
- 公共片段整个插入到声明引入的元素中
- th:replace:
- 用法和上面差不多
- 将声明引入的片段替换为声明引入的元素中
- th:include:
- 用法和上面差不多
- 将被引入的片段的内容包含到这个标签中
- 如果是用th:insert等属性进行引入,可以不写~{}
- 行内写法要加上~{}
- th:insert(如上):
员工列表高亮:
- active属性标中的就是高亮嗷!!!
- 使用thymeleaf中的参数化数字签名来操作。
- 映入片段的时候专门可以传参
- 这个时候凸显了共享代码片段(组件的重要性),专门抽取公共代码嗷!!!(新建一个commons文件夹存放共同组件)
1 | |
- 然后在对应位置引入:
1 | |
对于active属性需要进行判断嗷!!!
- ```java
1
2
3
4
5
- 还要不同的映入的地方,传入对应的参数嗷!!!
- ```html
<div th:replace="commons/bar::#sidebar(activeUri='emps')"></div>
- ```java
获取员工信息:
1 | |
日期格式化:
1 | |
- 增加对应的删除和编辑功能:
1 | |
员工添加功能:
应用Rest风格来设计对应的页面和请求哈!!!
<h2><a type="button" class="btn btn-sm btn-success" href="emp" th:href="@{/emp}">添加员工</a></h2>1
2
3
4
5
6
7
8
9
10
11
12
13
14
15
- 由于Department是要求从数据库中查询得来,我们需要查询相应的内容来显示列表供我们选择嗷!!!(departmentDao)
- ```java
@Autowired
DepartmentDao departmentDao;
//来到员工添加页面
@GetMapping("/emp")
public String toAddPage(Model model){
//来到添加页面
Collection<Department> departments = departmentDao.getDepartments();
model.addAttribute("depts",departments);
return "emp/add";
}查询出来的值,放入全局变量model中,来给前端取
<div class="form-group"> <label>Department</label> <!--提交的部门id嗷!!!--> <select class="form-control"> <option th:each="dept:${depts}" th:text="${dept.departmentName}" th:value="${dept.id}"></option> </select> </div>1
2
3
4
5
6
7
8
9
10
11
12
13
14
15
16
17
18
19
20
21
22
23
24
25
26
- 上面这个样子就能够遍历并显示所有的值嗷!!!
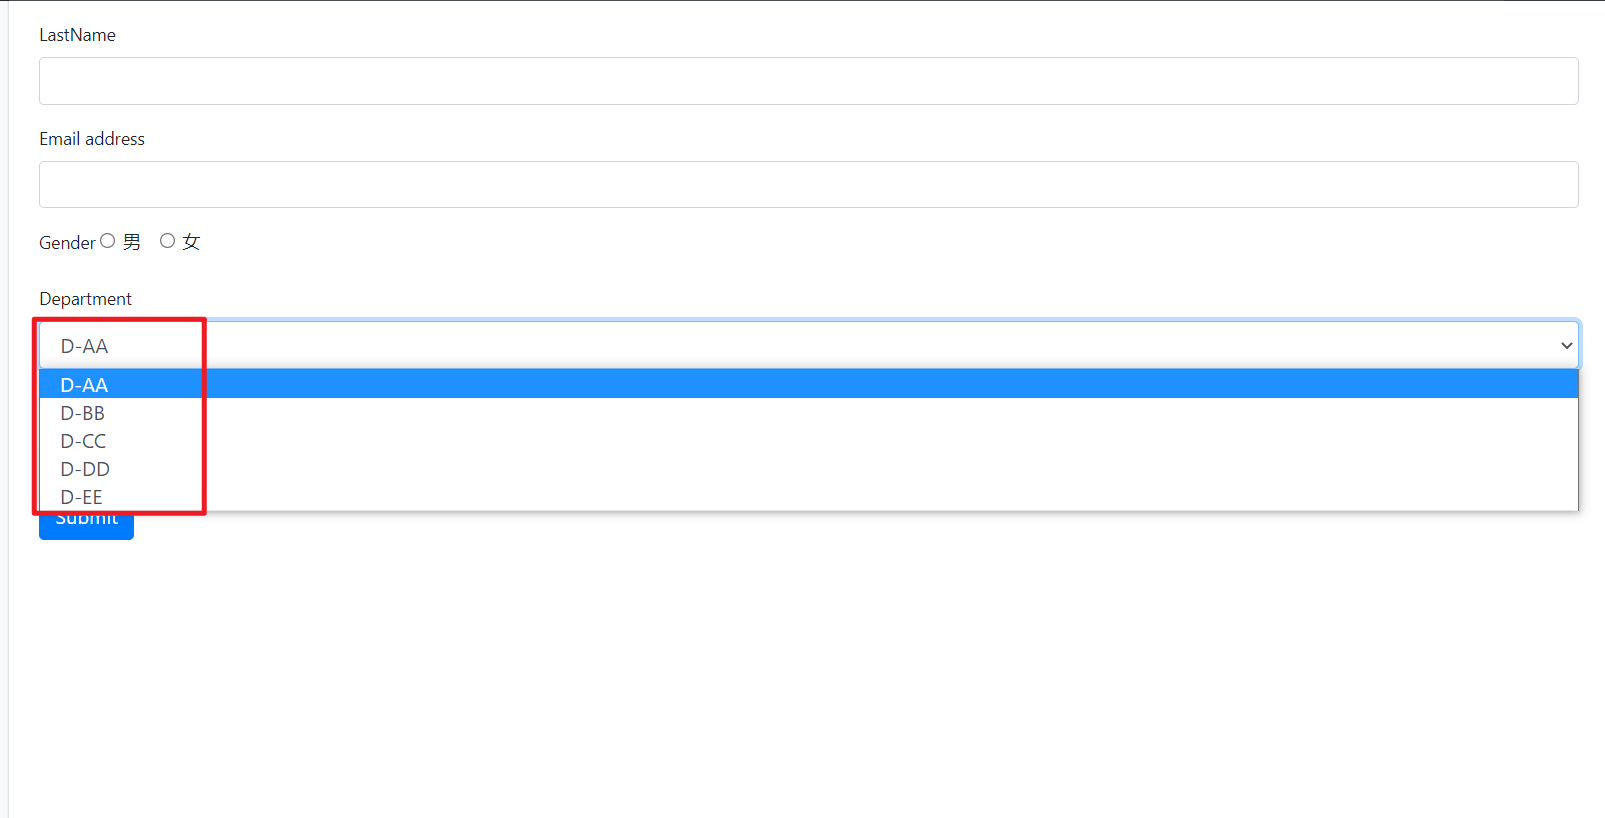
效果如上所示。
- 把表做好了,下一步才是真正的添加功能的实现
- 来到emps:
- 重定向(redirect到一个地址)
- 转发(forward到一个地址)
- ```java
//员工添加
//MVC自动将请求参数和入参的属性一一绑定,要求了请求参数的名字和javaBean的入参对象的属性名是一样的
@PostMapping("/emp")
public String addEmp(Employee employee){
//来到员工列表页面
//redirect: 表示重定向到一个地址,/代表当前项目路径
//return+路径就是纯粹用于跳转页面。 而return+redirect就用于再次转向controller
System.out.println("保存员工的信息为:"+employee);
employeeDao.save(employee); //保存员工信息
return "redirect:/emps";
}上面这个就是用于跳转的嗷!!!这里重定位就是为了使得Controller再次生效嗷!!!
提交的数据格式不对就会400:2020/1/1可以,2020-1-1就是引起bad request
这个时候,就需要我们对于用户的输入进行处理和格式化嗷!!!默认日期是通过/来分割的嗷!
日期的格式化可以通过
spring.mvc.date-format=yyyy-MM-dd这种形式来自己配置嗷!!!
员工修改功能:
- 点击编辑按钮,来到修改页面。回显信息再修改嗷!!!
- 所有的按钮都用a标签就可以了!!!
- 页面内容的修改:
1 | |
- 效果如下:
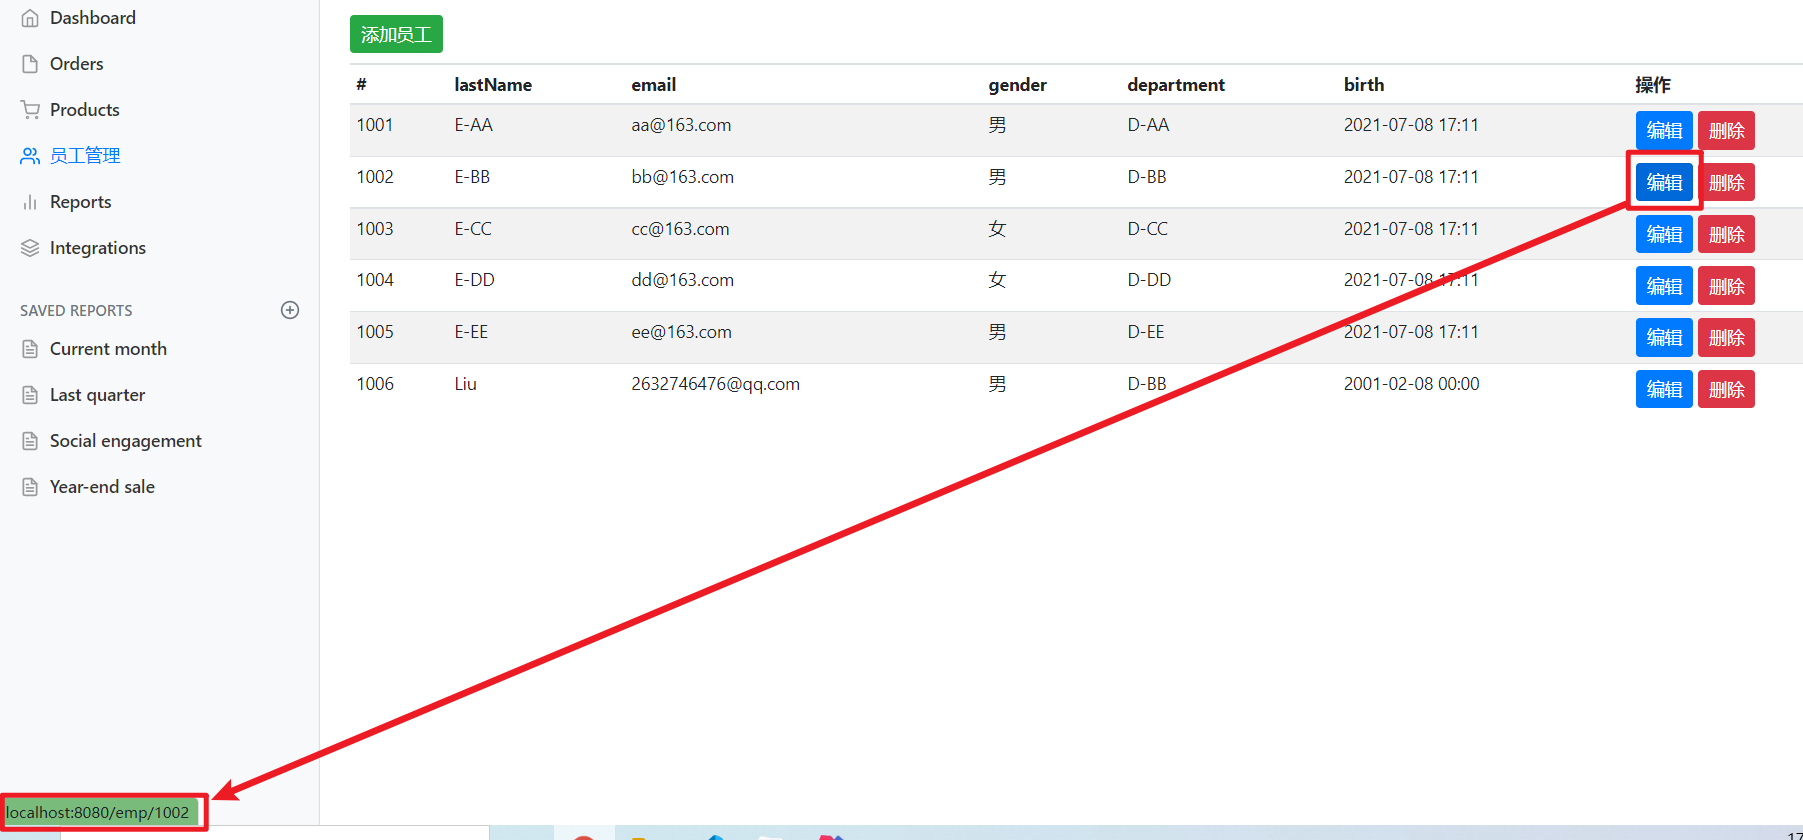
- 根据发的链接不一样,我们需要对于Mapping进行编写,接收并分析路径值:
1 | |
- 测试等一步一步来,先去判断是否页面跳转成功。
- 需要修改是员工修改还是员工添加,两者区别:一个是只有部门信息,一个有员工信息又有部门信息。所以在取员工之前,我们需要判断员工是否为空先。
1 | |
PUT请求如何发送:
- 首先,表单只能够是get和post请求,不支持put请求嗷。
- MVC中配置一个叫做HiddenHttpFilter的东西(Boot自动配置好的嗷!!!,打开默认的配置项即可)
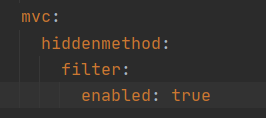
- 创建一个post表单
- 创建一个input项,名字是’_method’。值就是我们指定的请求方式
1
<input type="hidden" name="_method" value="put" th:if="${emp!=null}">员工的id如何操作:
携带员工id:
1 | |
- 对应的Controller:
1 | |
员工删除功能:
和编辑是一样的,需要我们去拼接action
<td> <a class="btn btn-sm btn-primary" th:href="@{/emp/} + ${emp.id}">编辑</a> <form th:action="@{/emp/} + ${emp.id}" method="post"> <input type="hidden" name="_method" value="delete"> <button type="submit" class="btn btn-sm btn-danger">删除</button> </form> </td>1
2
3
4
5
6
7
8
9
10
- 这个delete不需要新的页面,之需要对应的Controller对它进行处理进行了嗷!!!
```java
//员工删除
@DeleteMapping("/emp/{id}")
public String deleteEmployee(@PathVariable("id") Integer id){
employeeDao.delete(id);
return "redirect:/emps";
}可以使用JS来简化这个过程嗷!!!
错误处理机制:
把咱们的Interceptor(拦截器)给注释掉嗷!!!拦截器对应了一种处理方法嗷!!!
默认效果:
- 返回一个默认的错误页面
利用Postman可以来测试接口(作为其他客户端),如果是客户端就会通过JSON返回数据。
原理:可以参照
ErrorMvcAutoConfiguration自动配置嗷!!!DefaultErrorAttributes(给容器中添加了以下组件)
BasicErrorController
ErrorPageCustomizer
DefaultErrorViewResolver
步骤:
出现错误(4xx或5xx):ErrorPageCustomizer就会生效,定制错误的响应规则。系统出现错误的时候,来到/error请求进行处理(类似于web.xml注册的错误规则)
/error请求会被BasicErrorController接收处理/error请求:
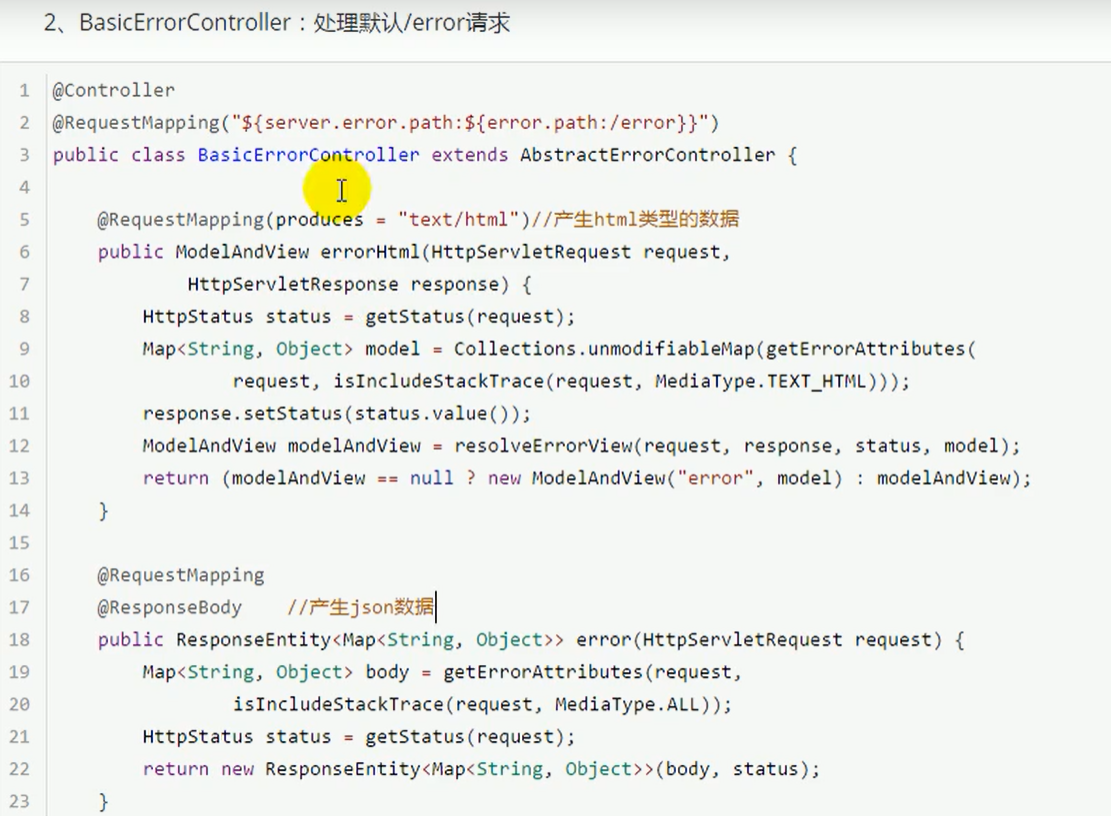
- 之所以浏览器和客户端可以分别处理,就是因为存在这个请求头中的内容不一样嗷!!!
- 响应页面:
1
2
3
4
5
6
7
8
9
10
11
12
13
14
15
16protected ModelAndView resolveErrorView(HttpServletRequest request, HttpServletResponse response, HttpStatus status, Map<String, Object> model) {
//所有的ErrorViewResolver得到ModelAndView
Iterator var5 = this.errorViewResolvers.iterator();
ModelAndView modelAndView;
do {
if (!var5.hasNext()) {
return null;
}
ErrorViewResolver resolver = (ErrorViewResolver)var5.next();
modelAndView = resolver.resolveErrorView(request, status, model);
} while(modelAndView == null);
return modelAndView;
}去哪个页面是由DefaultErrorViewResolver解析得到的,其中储存了不同的状态码和页面。boot可以去找到一个页面,页面为error/404等。如果模板引擎可以解析这个页面地址,就用引擎解析。不可用的话,就在静态资源文件夹下找errorViewName对应的页面嗷!!!
DefaultErrorAttributes:帮助我们在页面共享信息嗷!
页面能够获取的信息:
- 时间戳(timestamp)
- status:状态码
- error:错误提示
- exception:异常对象
- message:异常消息
- errors:JSR303数据校验相关的内容

定制错误响应:
如何定制错误的页面:
有模板引擎:
有模板引擎的情况下:error/状态码(放在templates文件夹下面)【将错误页面命名为:错误状态码.html,放在模板引擎文件里面的error文件夹下面】。发生此状态码的错误,就会来到对应的页面。
4xx.html可以匹配4开头的所有的错误哦,如果有更加具体的,就用更加具体的嗷!!!(最长前缀匹配???)
页面能获取的信息
没有静态引擎(模板引擎找不到这个文件),静态资源文件夹下:
- static文件下,只是模板引擎用不了
都没有:
- 默认来到boot默认的错误提示页面
如何定制错误的JSON数据:
- 定义异常处理器:
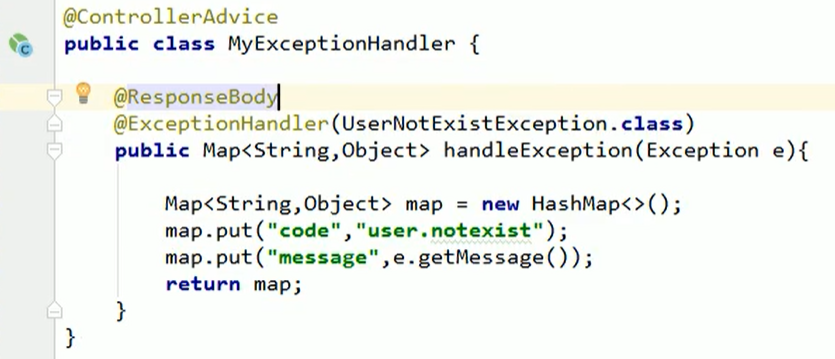
- 没有自适应效果,写死之后,浏览器和客户端返回的都是一样的JSON效果嗷!!!
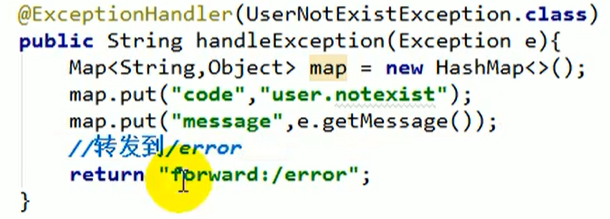
- 转发到error进行自适应响应效果处理:
默认解析的解析不到了orz:
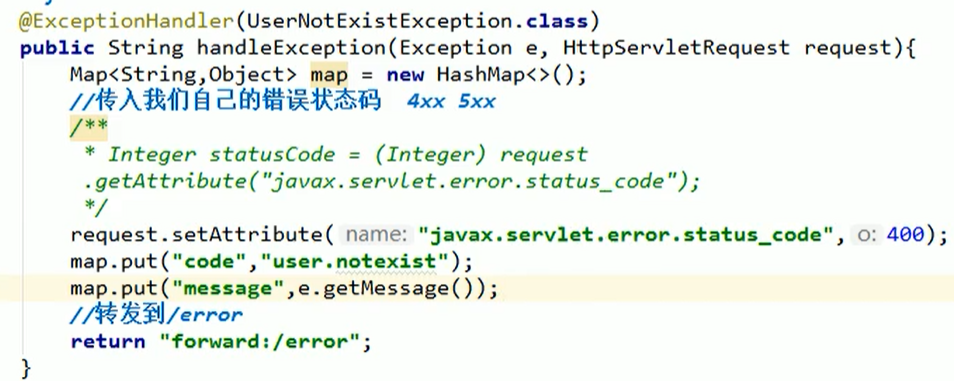
- 主要是状态码出了问题嗷!!!因此这里设置状态码,才能进入错误页面解析流程
将我们的定制数据携带出去:
- 出现错误之后,会来到/error请求,会被BasicErrorController处理。
- 响应的数据是由getErrorAttributes得到的(是AbstractErrorController规定的方法。)
- 编写ErrorController的实现类,或者是AbstractErrorController的子类,放到容器中来解决。

- 页面上能用的数据或者是json返回能用的数据,都是通过errorAttributes.getErrorAttributes得到的。相当于容器中DefaultErrorAttributes.getErrorAttributes()默认进行数据处理的。
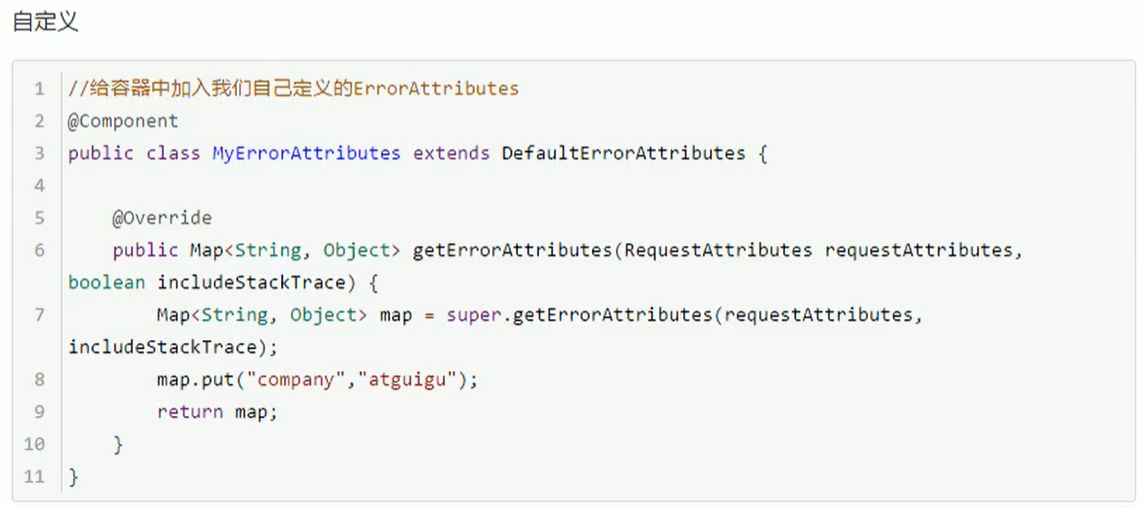
- 上面这个返回的map就是页面和json能够获取到的所有字段
- 代码改进:
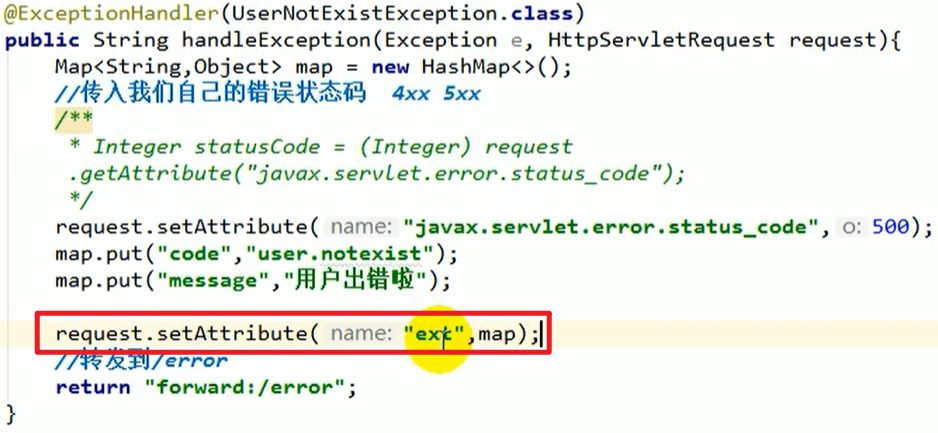

- 相当于handler向request中设置了很多值,这些值被getErrorAttributes读取出来之后添加到实际返回json和html中获取到的error数据。实际返回的这些全局变量中,就可以得到这些内容啦!!!
- 定义异常处理器:
配置嵌入式Servlet容器:
嵌入式Servlet容器:
- 配套Tomcat来启动Tomcat
- Boot默认使用嵌入式的Tomcat作为嵌入式的Servlet容器
- xxxCustomier都是给用户自己定制的嗷!!!
依赖关系:

定制Server相关内容
问题:
定制和修改Tomcat容器:
通用的servlet容器设置:server.xxx(ServletProperties)
编写一个EmbeddedServletContainerCustomizer:

上面两种底层都是一样的嗷!!!

能否支持不同的容器
注册三大组件:

- 步骤:
- 首先去编写一个自己的Servlet
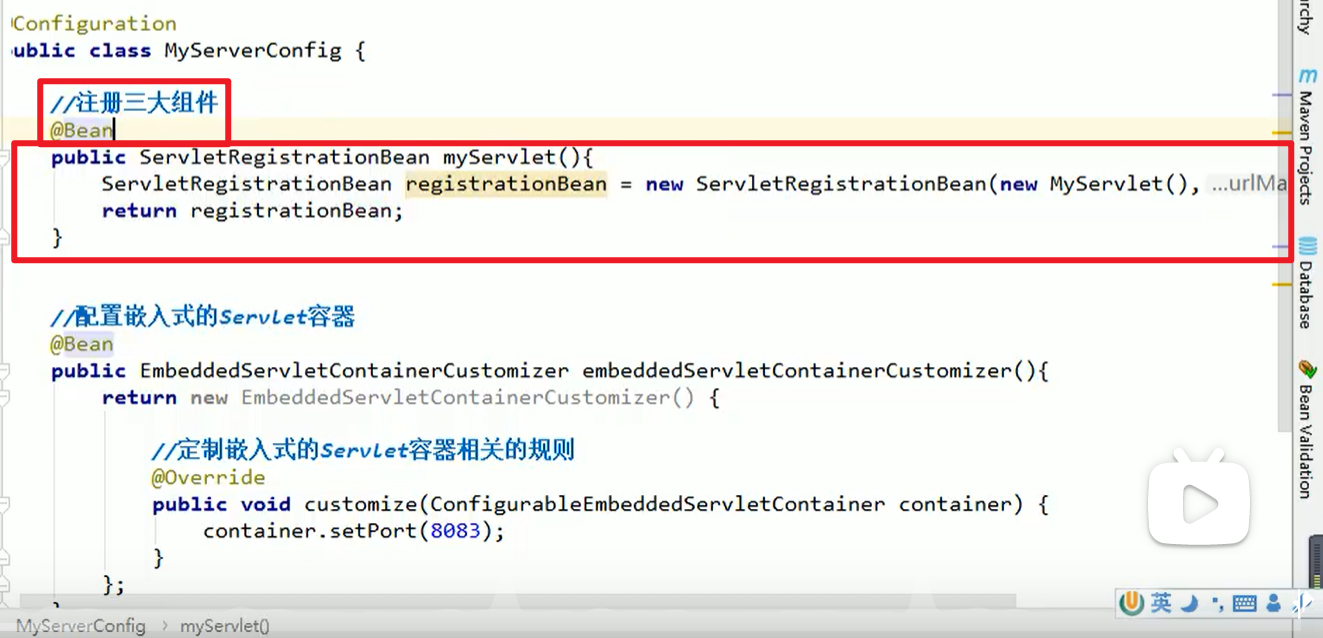 根据boot的要求,对于自己写的Servelt进行相应的配置。
- Filter和Listener都是类似的嗷!!!

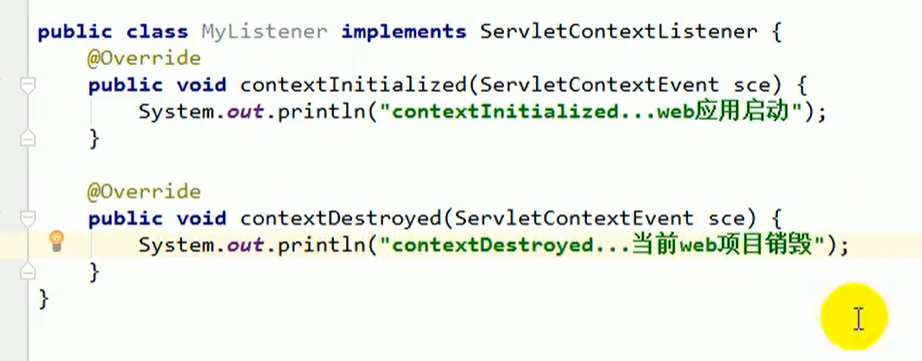
- Listener:
- Boot帮助我们自动配置的时候,帮助我们自动配置的前端的DispatcherServlet:
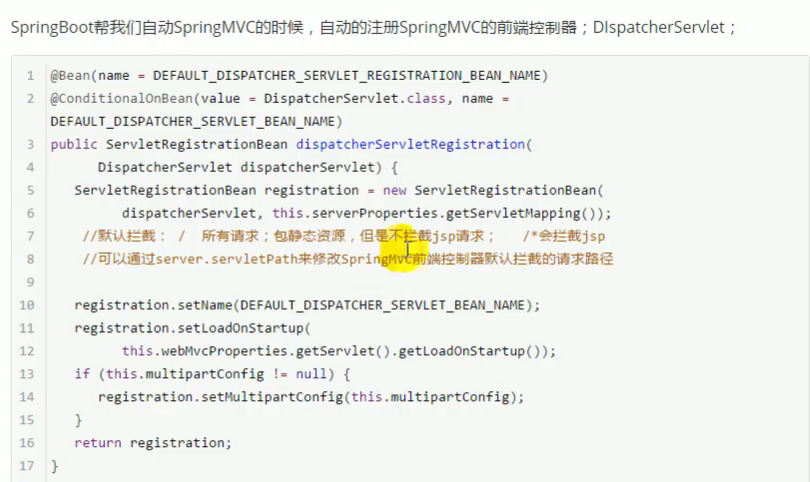
切换其他Servlet容器:
- Undertow(不支持JSP)
- Jetty(长连接)

- 将依赖树中的spring-boot-starter-Tomcat排除掉,引入新的其他容器的依赖即可嗷!!!
嵌入式配置原理:
EmbeddedServletContainerAutoConfiguration:
ConditionalOnClass(Servlet.class , Tomcat.class)
ConditionalOnMissingBean(value = EmbeddedServletContainerFactory.class , search = SearchStrategy.CURRENT)
EmbeddedServletContainerFactory.class:
- getEmbeddedServletContainer,生产嵌入式的Servlet容器:

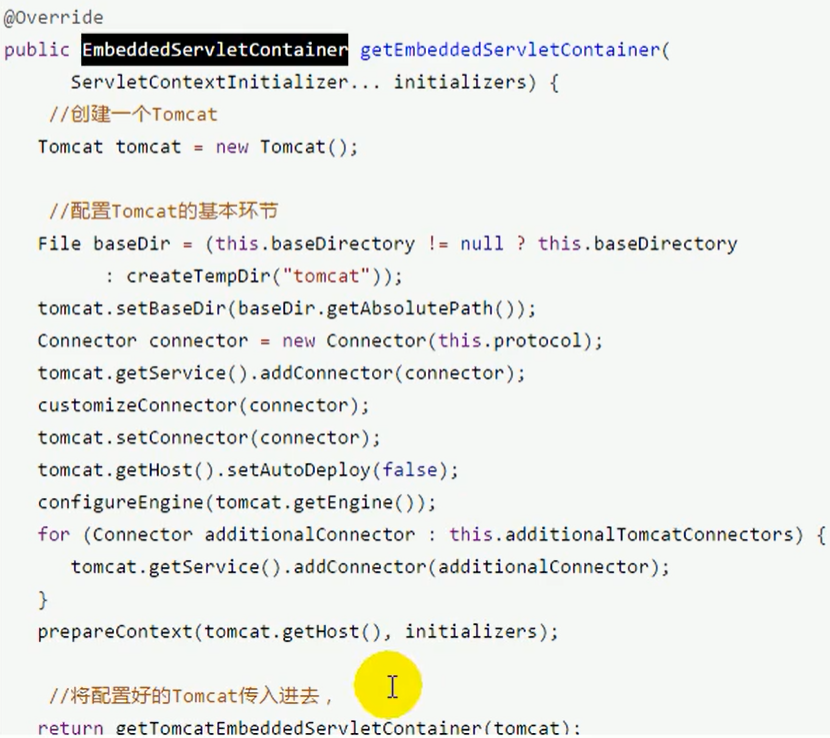
- 最后哪个getTomcatxxx,返回一个EmbeddedServletContainer,并且启动Tomcat服务器
通过ConditonOnClass来判断生产哪个Container嗷!!!
对于配置容器的修改是怎么生效的???
- ServerProperties , EmbeddedServletContainerCustomizer
- EmbeddedServletContainerCustomizer指定器帮我们修改了默认配置
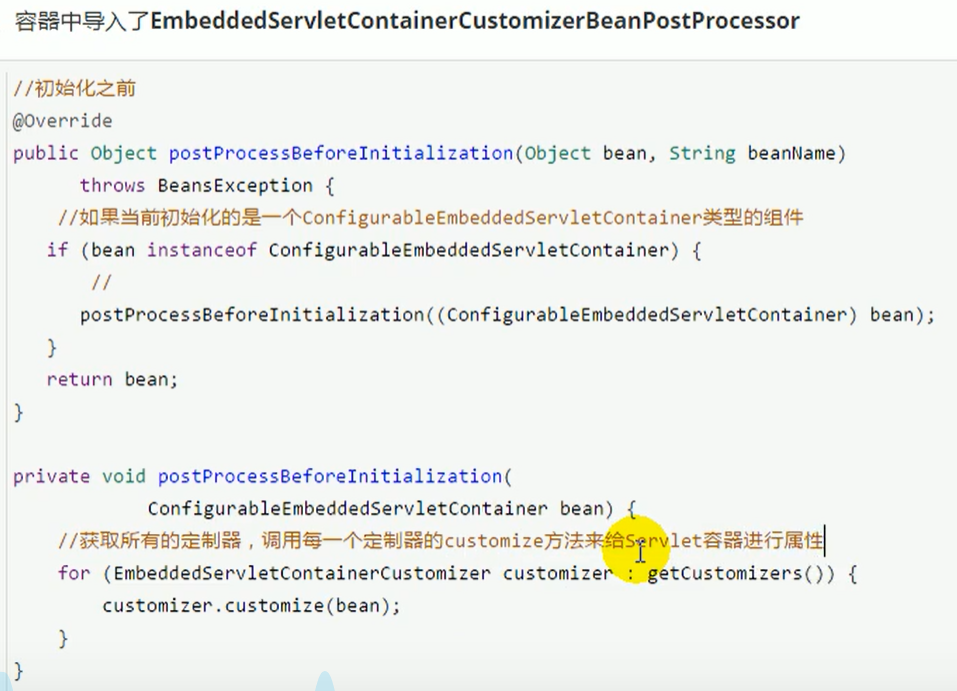


步骤:
- boot根据导入的依赖情况,给容器中添加相应的xxxFactory
- 容器中某个组件要创建对象(@Bean)就会惊动后置处理器postProcessBeforeInitialization。只要是嵌入式的Servlet容器工厂,后置处理器就会工作。
- 后置处理器,从容器中获取所有的EmbeddedServletContainerCustomizer,调用定制器的定制方法。
嵌入式Servlet容器原理:
什么时候创建嵌入式的Servlet容器?什么时候获取容器并获取Tomcat
获取容器工厂:
SpringBoot的run方法
refreshContext(context),SpringBoot刷新IoC容器【创建IoC容器对象,初始化容器,创建容器中的每个组件】。如果是web创建AnnotationConfigEmbeddedWebApplicationContext,否则创建默认的AnnotationConfigApplicationContext
refresh(context) , 刷新刚才创建好的ioc容器。
在refresh中onRefresh方法实际上实现了刷新过程
onRefresh中webioc容器会创建嵌入式的Servlet容器:createEmbeddedServletContainer()
获取嵌入式的ServletEmbeddedServletFactory containerFactory = getEmbeddedServletContainerFactory()
从ioc容器中获取EmbeddedServletContainerFactory组件,TomcatEmbeddedServletContainerFactory创建对象,后置处理器就会去获取所有的定制器来先定制Servlet容器的相关配置。
使用容器工厂获取嵌入式的Servlet:this.embeddedServletContainer = containerFactory.getEmbeddedServletContainer(getSelfInitializer());
嵌入式的Servlet容器创建对象并启动容器对象
- 先启动嵌入式的Servlet容器,再将ioc容器中剩下没有创建的对象获取出来。
本质的summary:IOC容器在启动过程中创建Servlet容器。
使用外置的Servlet容器:
- 嵌入式:
- 简单
- 缺点:默认不支持JSP,优化复杂(使用定制器ServerProperties , 也可以自定义EmbeddedServletContainerCustomizer),自己编写嵌入式的Servlet容器的创建工厂。
- 外置的Servlet容器:
- 外面安装Tomcat — 外置的容器
- 创建项目的时候选择war,不要选择jar
- 生成的文件夹,由于使用外置的Tomcat,还需要生成webapp文件夹。如何添加webapp文件夹?
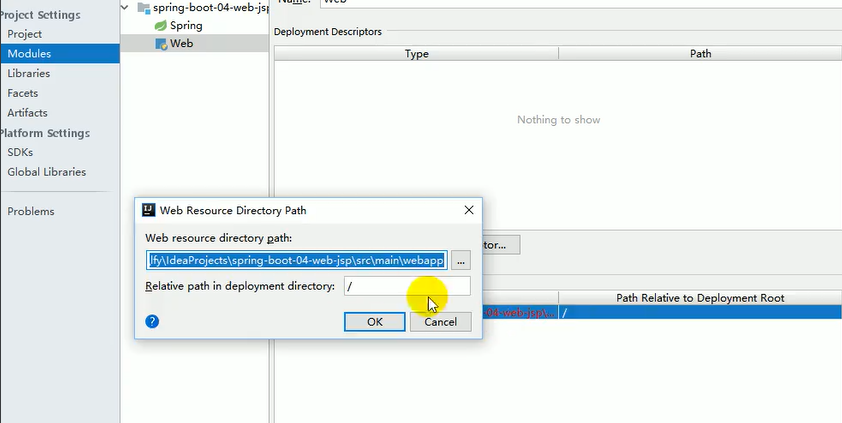
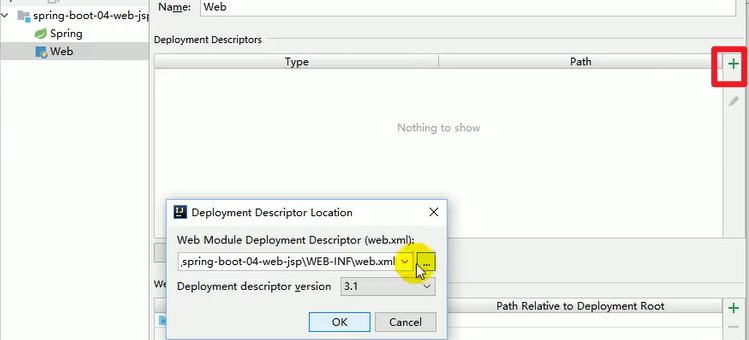
web.xml的创建,要重新改路径,放在webapp文件夹下面嗷
- 还需要和之前一样配置Tomcat,然后部署war exploded
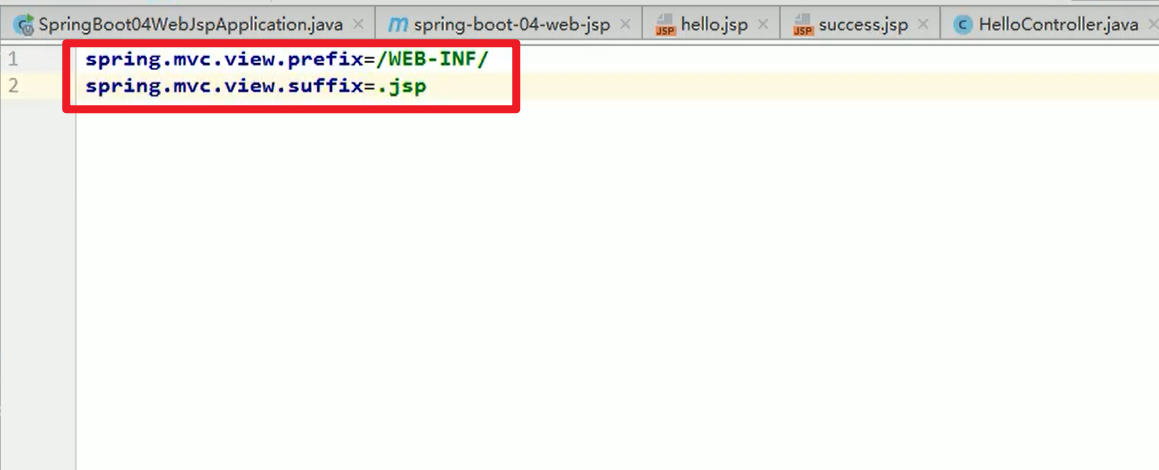
- JSP写在webapp目录下就行,和之前一样的,WEB-INF下的是看不到的嗷。和mvc中一样,可以在boot中配置相应的视图解析器,来对于前后缀进行解析嗷!!!
总结:
- 创建一个war项目
- 将嵌入式的Tomcat指定为provided:

- 生成项目的时候会自动生成ServletInitilizer嗷!!!必须编写一个SpringBootServletInitializer的子类,并且调用configure方法,闯入SpringBoot应用的主程序。
- 启动服务器就可以使用啦!!!
- 注意:
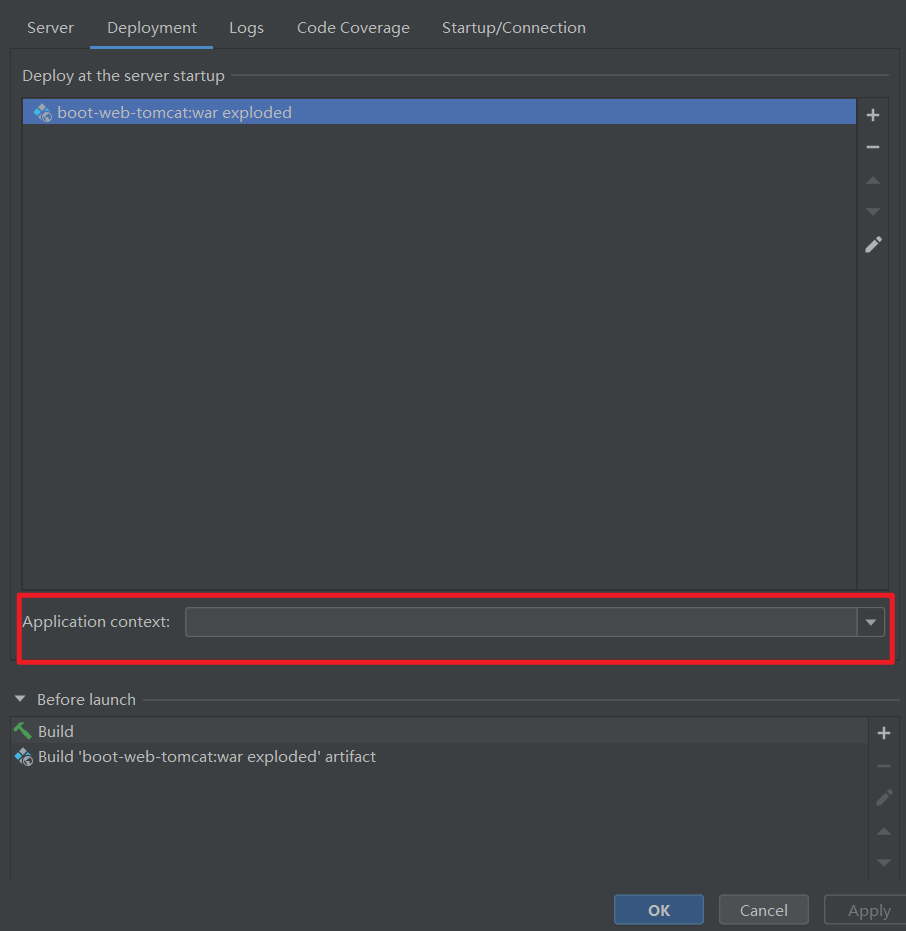
deploy的端口号也要注意嗷!!!
启动原理:
jar包:执行Boot主类的main方法,启动ioc容器,创建嵌入式的Servlet容器。
war包:启动服务器,服务器启动springboot应用,启动ioc容器。
规范文档:
- Web应用启动会创建每一个jar里面的ServletContainerInitializer的实现类的实例。
- ServletContainerInitializer的实现放在jar包的META-INF/services文件夹下,内容就是ServletContainerInitializer的实现类的全类名
- 可以使用@HandleTypes注解,可以在启动的时候加载我们感兴趣的类。
流程:
启动Tomcat
Spring的Web里面有个文件:org.springframework.web.SpringServletContainerInitializer。
SpringServletContainerInitializer.class标注的所有的这个类型的类型都传入到onStartup的方法的Set<Class<?>>,为这些WebApplicationInitializer类型的类创建实例。
每一个创建好的实例(WebApplicationInitializer)都调用自己的onStartUp方法:

- 相当于我们的SpringBootServletInitializer的类会创建对象,并执行onStartUp方法
- SpringBootServletInitializer示例执行onStartUp的时候会创建createRootApplicationContext:创建容器:
- 创建SpringApplicationBuilder
- 调用Configurer,子类重写了这个方法,将Boot的主程序类传入了进来
- 使用builder创建一个Spring应用
- Spring的应用就启动了
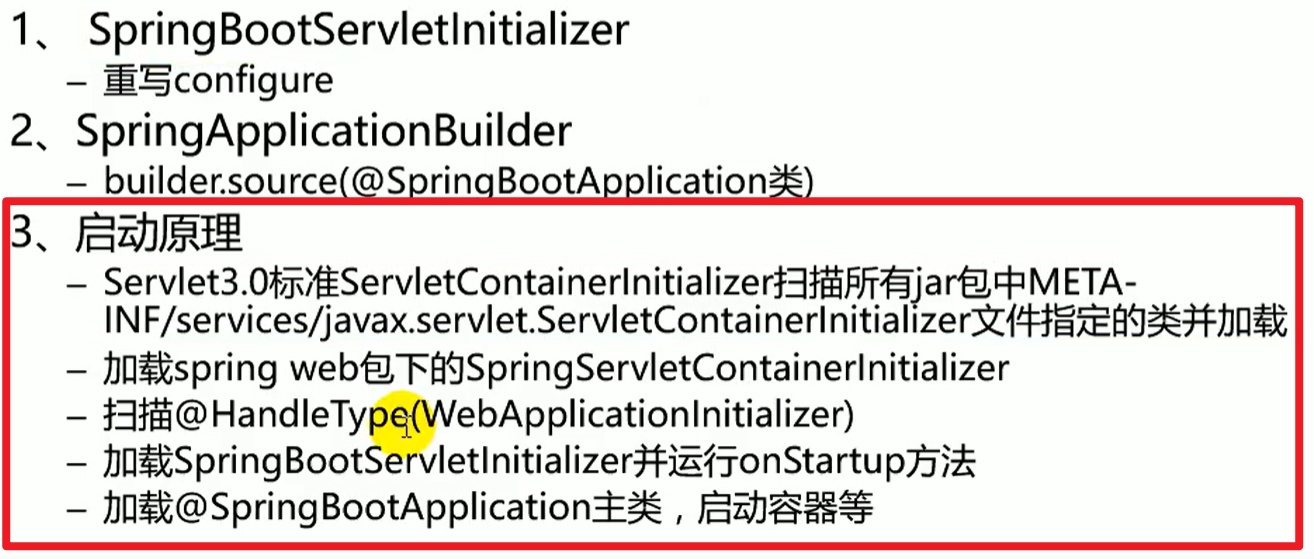
本质上先启动Servlet容器,再启动SpringBoot
Boot与Docker:
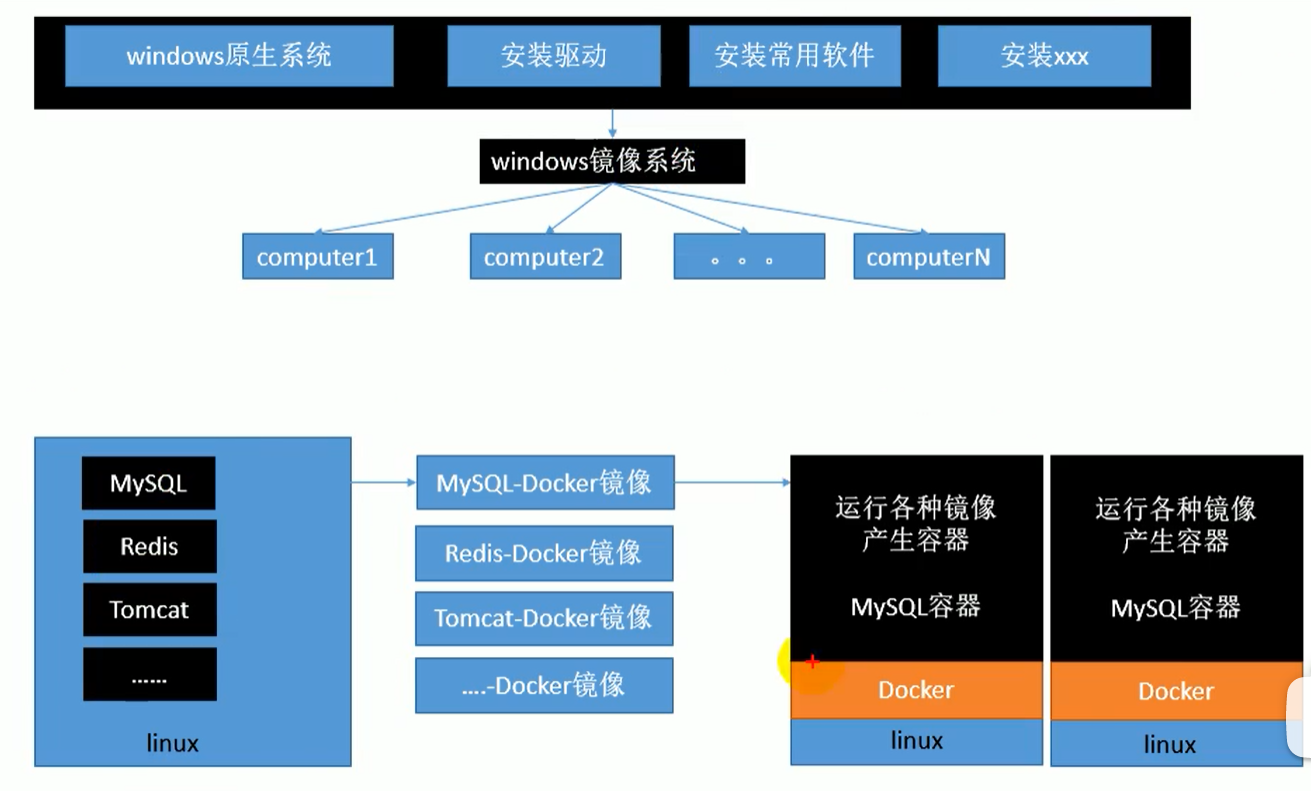
核心概念:
- Docker主机:用于执行Docker守护进程和容器
- Docker客户机:连接docker主机进行操作
- Docker仓库:用来保存各种打包好的软件镜像
- Docker镜像:软件打包好的镜像,放在Docker仓库中
- Docker容器:Docker启动后就为容器(独立的一个或一组应用程序)
步骤:
- 安装Docker
- Docker仓库找到软件对应的镜像
- 使用docker运行这个镜像,这个镜像就会生成一个Docker容器。
- 对于容器的启动停止就是对于软件的启动停止。
常用docker相关启停操作:
uname -r检查内核版本yum install docker安装dockersystemctl start docker启动dockersystemctl enable docker设置docker为开机启动systemctl stop docker停止docker
常用镜像操作:
docker search mysql在dockerhub中搜索镜像docker pull 镜像名 tag(不加tag的话,默认是latest版本),例子:docker pull mysql:5.5(标签要上docker hub找对应的版本嗷!!!)docker images可以查看所有的镜像docker rmi image id删除指定的本地镜像
常用容器操作:
docker run --name container-name -d image-name, –name是给容器命名,-d是以后台的形式命名。标签和上面一样的,如果要指定话就要写,默认是latestdocker ps查看运行中的容器docker stop 名字/id停止某个容器docker start 名字/id开启某个容器docker ps -a查看所有的容器docker rm 容器名/id删除指定的容器(只能删除停止的容器嗷!!!)- docker使用run的时候用于端口映射的参数
docker run -d -p 8888:8080 --name myredis docker.io/redis。-p将主机端口映射到容器的一个端口,8888是虚拟机的端口,8080是容器的端口。
要注意Linux或云服务器的防火墙状态嗷!!!
service firewalld status:防火墙状态service firewalld stop:关闭防火墙
其他命令:
docker logs container-name/container-id可以查看日志嗷!!!!- 更多命令参考官方文档
环境搭建:
- mysql
- redis
- rabbitmq
- elasticsearch
mysql为例子:
- search
- pull
- 错误启动:
docker run --name mysql01 -d msyql - 查看错误原因:
docker logs mysql01

- 查看docker官方文档:
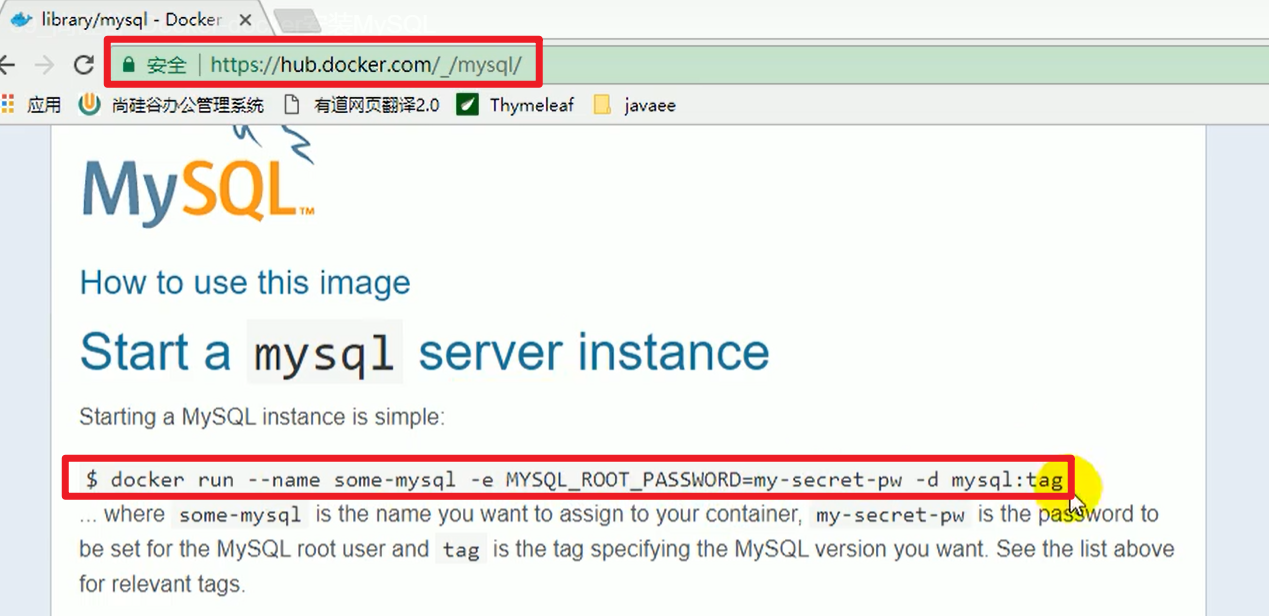
还是访问不到,需要做端口的映射嗷!!!
官网上记得可以看一下mysql相关的一些使用方式啊之类的:
- 自定义mysql配置文件啊(-v操作,挂载文件夹,虚拟机的文件和容器中的文件映射啊之类的嗷!!!)
其他的几个可以自己去装一下哈,navicat如果没有的话,可以使用IDEA和VSCode中的工具去连接云服务器嗷!!!
SpringBoot和数据访问:
- boot默认采用整合Spring Data的方式进行统一处理,添加大量自动配置,屏蔽了很多设置。引入了xxxTemplate和xxxRepository来简化我们对于数据访问层的操作。
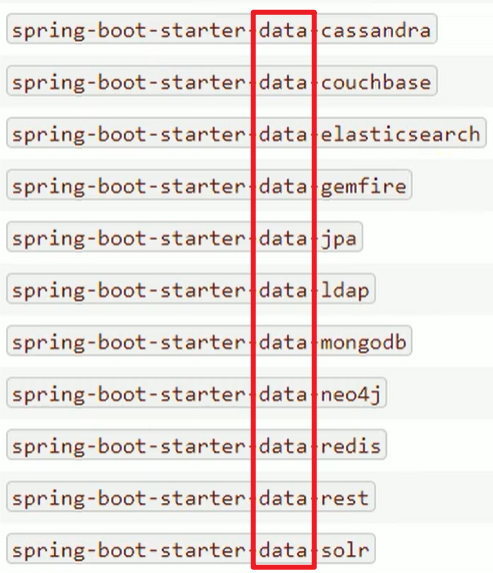
整合基本的JDBC和数据源:
- 引入starter:
- spring-boot-starter-jdbc
- 配置application.yml
- 测试
- 高级配置:使用druid数据源(引入druid,配置属性)
- 配置druid数据源监控
项目创建:
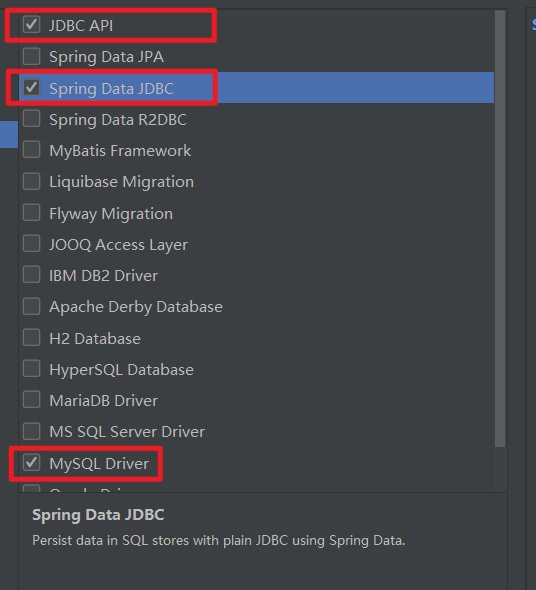
- 引入模块:
1 | |
Boot配置文件的书写:
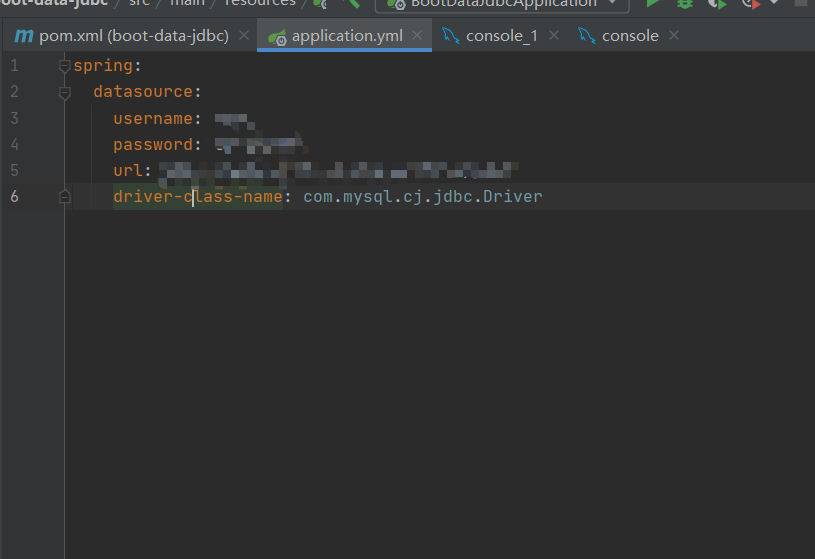
创建application.yml文件
相应配置书写(用于mysql连接的相应配置):
- test类中测试连接:
1 | |
- 所有配置都可以在DataSourceProperties中找到嗷!!!
自动配置原理:
- org.springframework.boot.autoconfigure.jdbc
- 参考DataSourceConfiguration,根据配置创建数据源,默认使用Tomcat连接池,可以通过spring.datasource.type指定自定义数据源的位置。
- 默认可以支持:

- 自定义数据源类型:
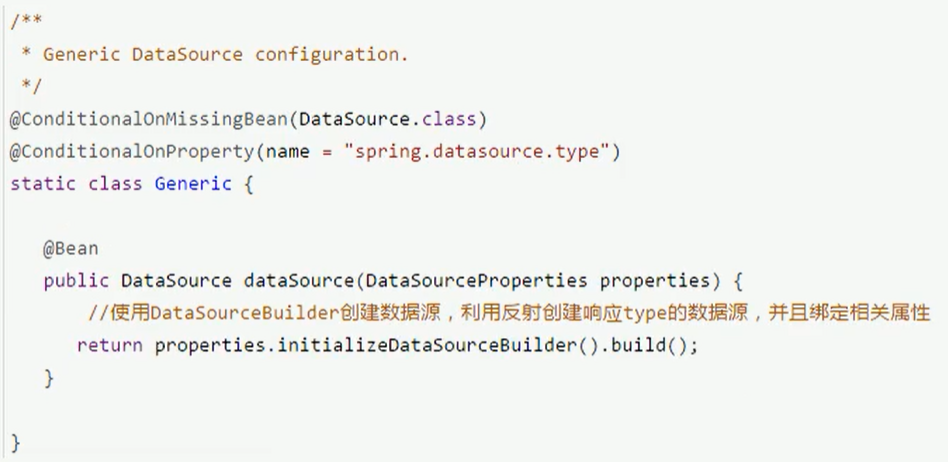
DataSourceInitializer是一个监听器:ApplicationListener,作用:
- runSchemaScripts(),运行建表语句
- runDataScripts(),运行插入数据的sql语句
默认只需要将文件命名为schema-.sql和data-.sql就行,放在resources文件夹下,就能够自动执行嗷!!!
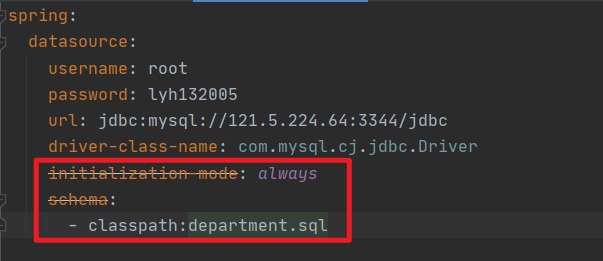
- 自己配置要加载的sql脚本:
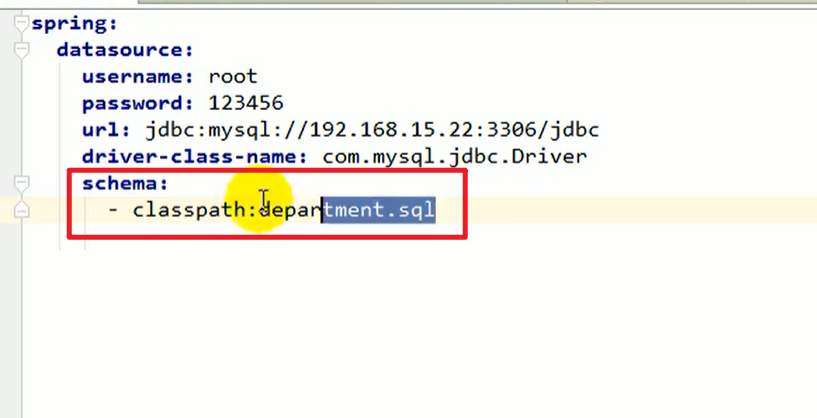
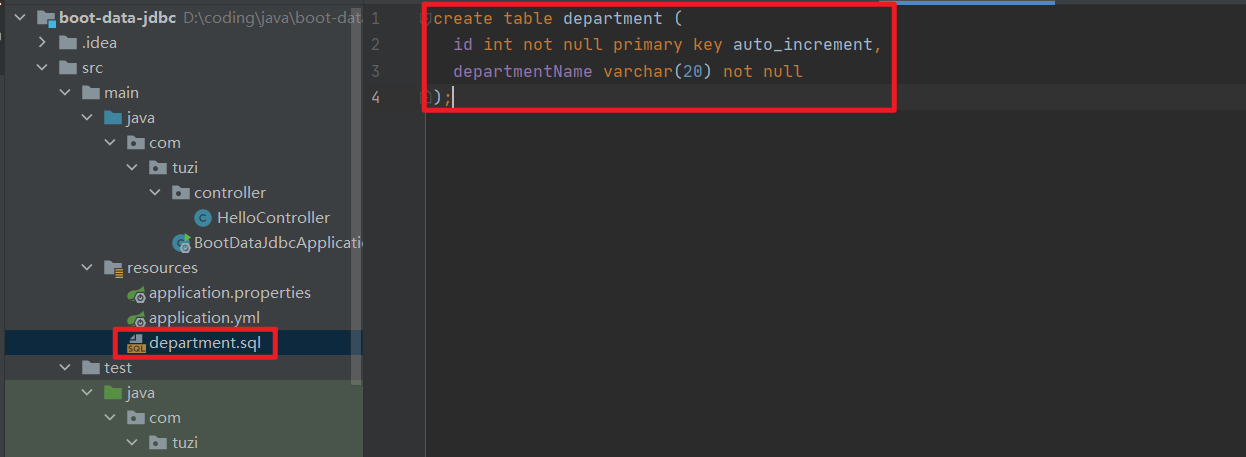
2.0之后,还要配置
initialization-mode: always- 注意,每一次启动都会自动执行一次sql脚本嗷,使用一次过后要及时移除嗷!!!
- 操作数据源的数据控制:
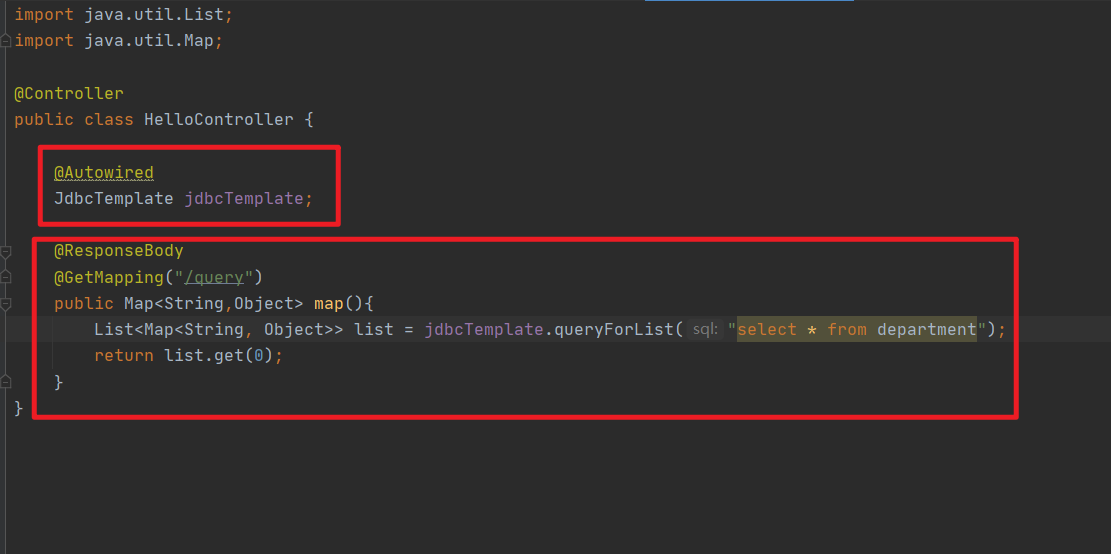
- 自动配置了jdbcTemplates操作数据库
- 使用自动注入获取这个对象实际上就可以操作数据库啦!!!
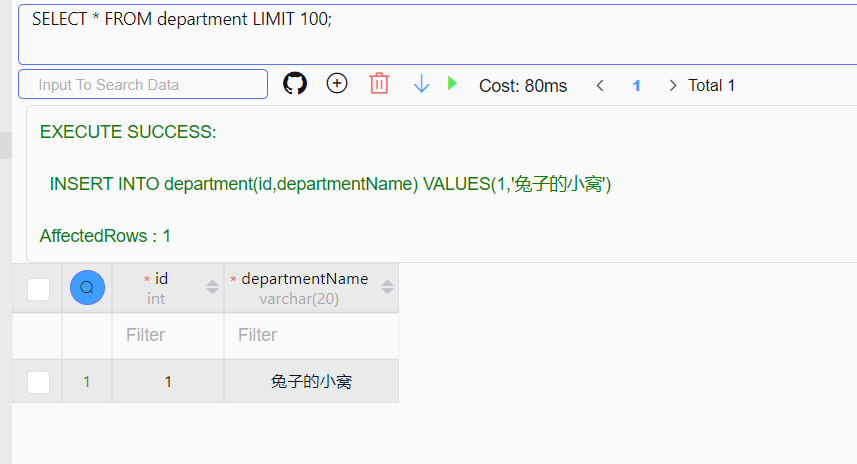
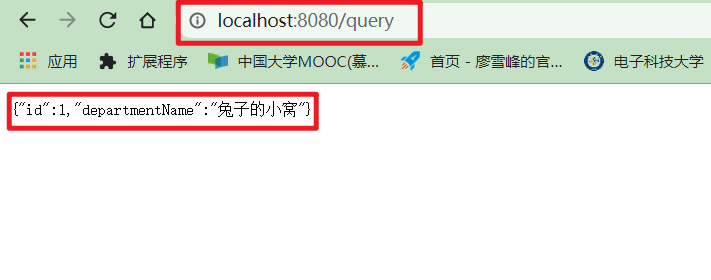
编写对应的Controller处理query请求:
引入druid数据源:
- maven仓库中先找到对应的东西然后添加依赖来引入druid
- 指定使用的type:
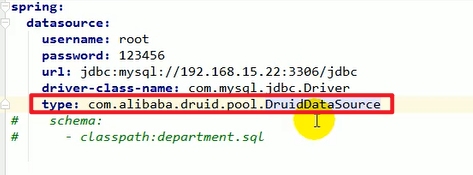
- 遇到的一个天坑,加入了依赖之后,druid这个数据源找不到!!
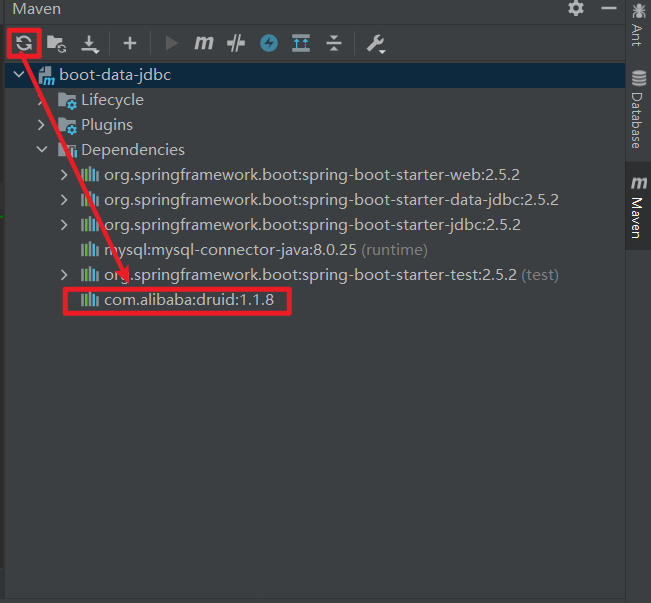
这个时候需要刷新pom,重新引入这个包嗷!!!(引入了之后侧边的Maven是会有相关的Dependencies记录的嗷!!!)
- 其他的一些配置:
1 | |
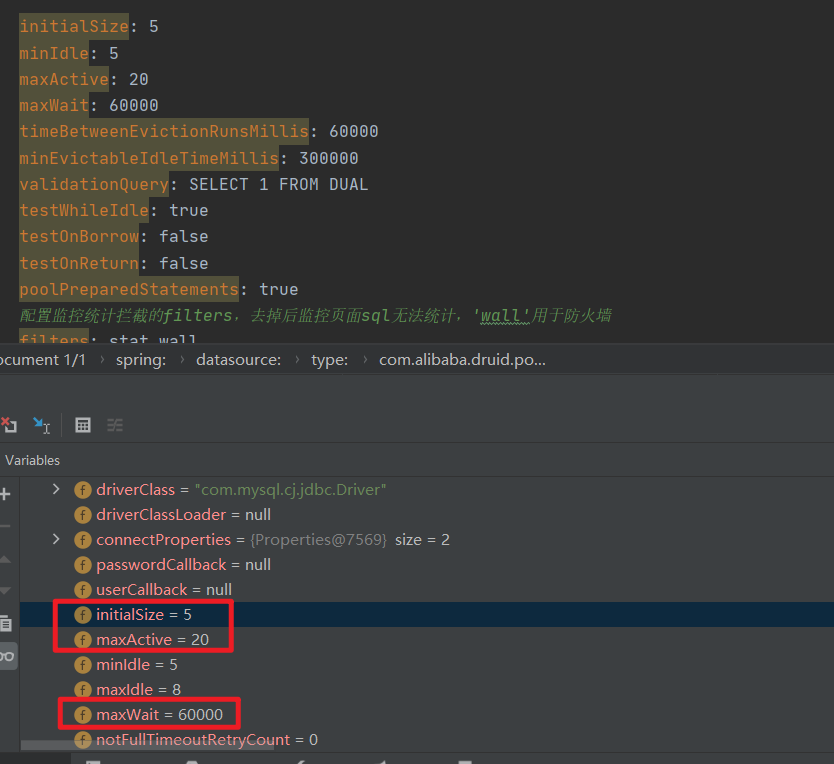
上面这些都是黄色的,意味着不是我们默认的配置,绑定不到数据库的Properties里面嗷!!!那如何让其起作用呢?
- 编写对应的配置类:
1 | |
上面这个将文件中的配置读取出来配置给DruidDataSource。
配置结果:
- 监控配置和管理后台配置:
1 | |
- 帅啊,这个时候启动了之后,在localhost下的/druid就可以打开对应的后台监控(本质上就是个Servlet),如果后台执行了Sql语句的话,还会有SQL的记录嗷!!!
- 整合druid:
1 | |
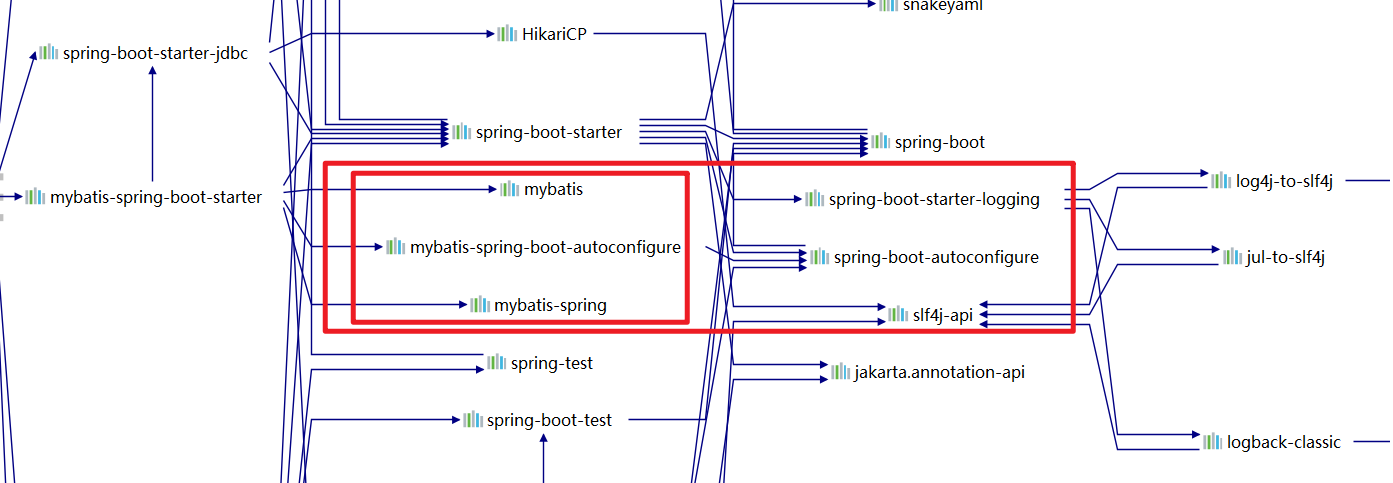
- 关系图如下所示:
- 同样引入druid依赖嗷!!!
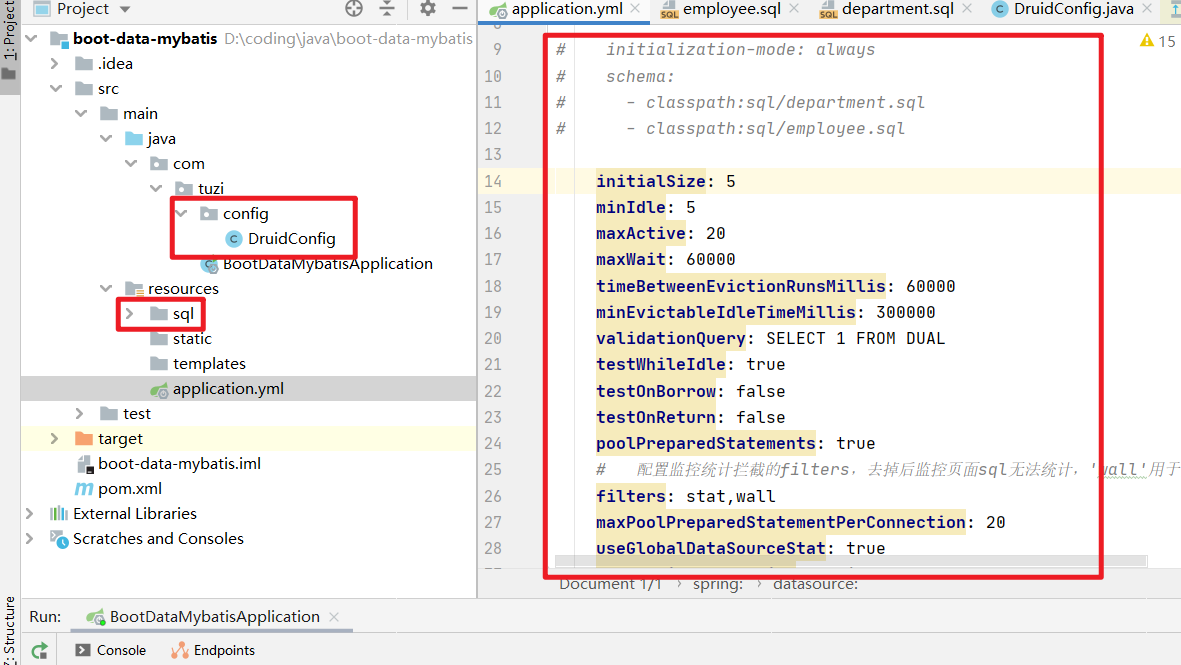
- 对于数据源的配置从之前的里面去拷贝下来嗷!!!
- 同时,拷贝对应的sql语句建立表格,建立完成之后把对应的注释内容注释掉就方便很多了嗷!!!
-
整合MyBatis:
- MyBatis依赖如下:
1 | |
和之前的有点不一样嗷,这个starter不是spring-boot官网的starter嗷,是第三方的starter嗷!!!
为了实现增删改查,我们创建对应的实体类
步骤:
- 配置数据源相关属性(见Druid)
- 给数据库建表
- 创建javaBean(entity)
Mapper配置MyBatis:
- 创建Mapper:
之前的时候需要mapper规定接口,然后需要一个xml去标志我的sql,现在有更加简单的形式啦!!!
1 | |
- 上面是注解版的Mapper,自动给我们配置好的嗷!!!
- 如何插入时获取自增id呢?(多次发起请求为null)
1 | |
驼峰命名法:departmentName和属性中的department_name对应补上,并且现在也没有配置文件。
- 自定义配置文件
- 配置文件的设置:
1
2
3
4
5
6
7
8
9
10
11
12
13
14
15
16
17
18
19package com.tuzi.config;
import org.apache.ibatis.session.Configuration;
import org.mybatis.spring.boot.autoconfigure.ConfigurationCustomizer;
import org.springframework.context.annotation.Bean;
@org.springframework.context.annotation.Configuration
public class MyBatisConfig {
@Bean
public ConfigurationCustomizer configurationCustomizer(){
return new ConfigurationCustomizer(){
@Override
public void customize(Configuration configuration) {
configuration.setMapUnderscoreToCamelCase(true);
}
};
}
}上面这个放在config下,标明为配置类,然后把相应的Customizer加入到Bean中,即可被识别嗷!!!使用自定义mybatis配置规则:需要给容器中添加Customizer组件就行,和之前是一样的哦!!!
Mapper注解一定要有嗷!!!这种情况下就可能同时有多个Mapper,就比较乱。这个时候在主配置类上加上一个MapperScan注解来扫描,可以扫描mapper包,其下的所有接口都会相当于自动添加了
@Mapper注解嗷!!!使用MapperScan批量扫描所有的Mapper接口。
配置文件MyBatis:
- 不管哪种方式,@Mapper或者@MapperScan都是必不可少的嗷!!!
- resources下专门创建MyBatis文件夹和其下的对应的主配置文件和对应的xml文件。
- 比如这里要实现Employee对应的mapper规定的方法:
1 | |
- xml配置文件的例子:
1 | |
- yaml中配置使得知道MyBatis配置的存在
1 | |
上面这个玩意儿是为了让boot知道我MyBatis的主配置文件。
- EmployeeMapper注入进来进行测试(数据库中插入相关的数据后,就可以进行测试了!!!)
1 | |
- 这种情况下配置驼峰原则就会更加的简单:
1 | |
只需要去官网文档中找到对应的配置项就可以进行使用了嗷!!!
- 重启之后某些属性使用驼峰的方法也就能够成功取到了嗷!!!
- 配置文件版:
- config-location:指定全局配置文件的位置
- mapper-location:指定sql映射文件的位置
- 这两个指定完成之后以后的使用就和我们之前使用MyBatis的用法是一样的了嗷!!!
整合JPA:
简化数据访问的操作,统一各种接口。面向Spring Data编程就可以了嗷!!!
JPA:ORM(Object Relational Mapping):
- 编写一个实体类(entity)和数据表进行映射,并且配置好映射关系
- 编写JPA中的实体类:
1
2
3
4
5
6
7
8
9
10
11
12
13
14
15
16import javax.persistence.*;
//使用JPA注解配置映射关系
@Entity //告诉jpa这是一个实体类(和数据表映射的类)
@Table(name = "tbl_user") //@Table指定和哪个数据表对应,如果省略默认表名是类名小写嗷
public class User {
@Id //这是一个主键
@GeneratedValue(strategy = GenerationType.IDENTITY) //定义这个键为自增主键
private Integer id;
@Column(name = "last_name",length = 50) //和数据表对应的列
private String lastName;
@Column //默认列名就是我们的属性名
private String email;- 编写Dao接口来操作实体类对应的表(Repository):
1
2
3
4
5
6
7
8
9
10package com.tuzi.repository;
import com.tuzi.entity.User;
import org.springframework.data.jpa.repository.JpaRepository;
//继承JpaRepository来完成对于数据库的操作
public interface UserRepository extends JpaRepository<User,Integer> {
//第一个是我们要处理的类型,第二个是主键的类型
}- 基本的配置(yaml):
1
2
3
4
5
6
7spring:
jpa:
hibernate:
# 更新或创建数据表结构
ddl-auto: update
# 控制台显示SQL
show-sql: trueyml中的相关配置都在JpaProperties这个类中嗷,例如创建和更新表啊之类的嗷!!!
上面配置完成之后直接运行项目就能够跑出来数据库中那张对应的表嗷!!!
Controller的编写嗷!!!
1 | |
SpringBoot的默认配置:
思想(如何修改Boot的默认配置):
- SpringBoot在自动配置很多组件的时候,先看容器中有没有用户自己配置的嗷(@Bean , @Component),如果没有才自动配置。有些组件可以有多个,将用户配置的和自己默认的组合起来。
- Boot中会有非常多的xxxConfigurer,帮助我们拓展配置,遇到他们我们要更加留心嗷!!!
Boot自动启动原理:
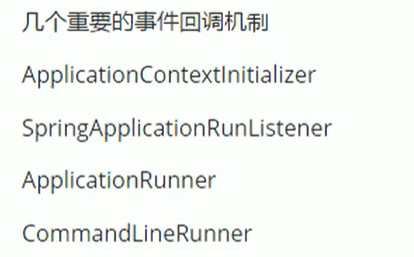
启动流程:
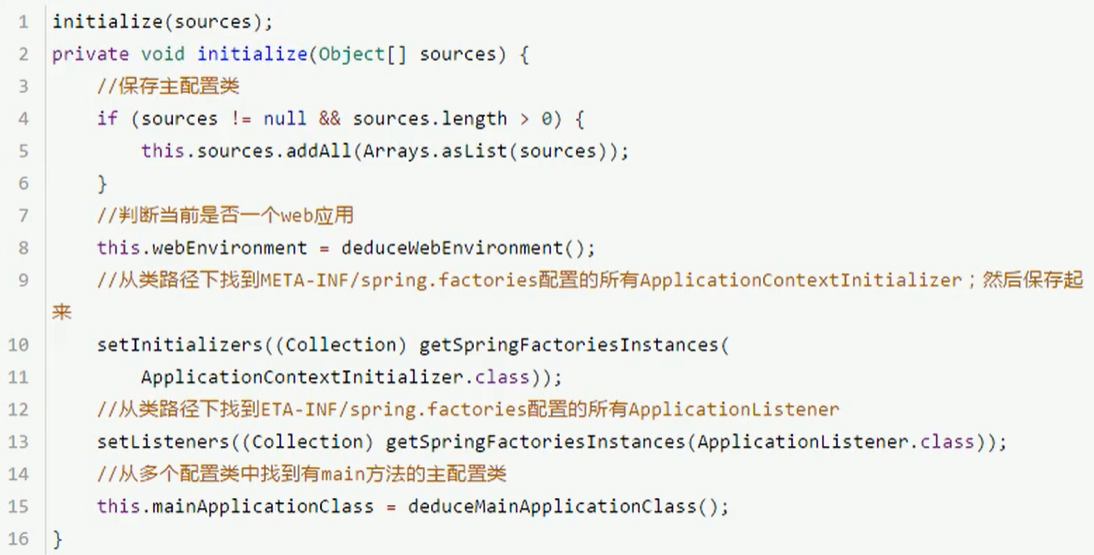
- 创建SpringApplication对象:
- 运行run方法:
事件监听机制:
- SpringApplicationRunListener之类的,相应的东西都是类似的,对于类似于Run的过程,IoC的初始等之类的操作都可以监听。
- boot监听器配置
自定义starters:
starter:
- 使用到的依赖(jar包)
- 如何编写自动配置:
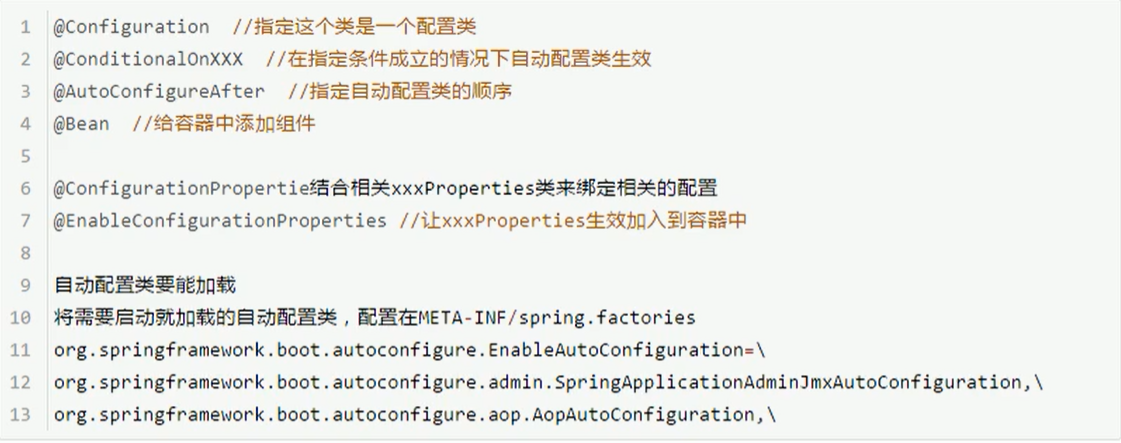
- 模式:
启动器:
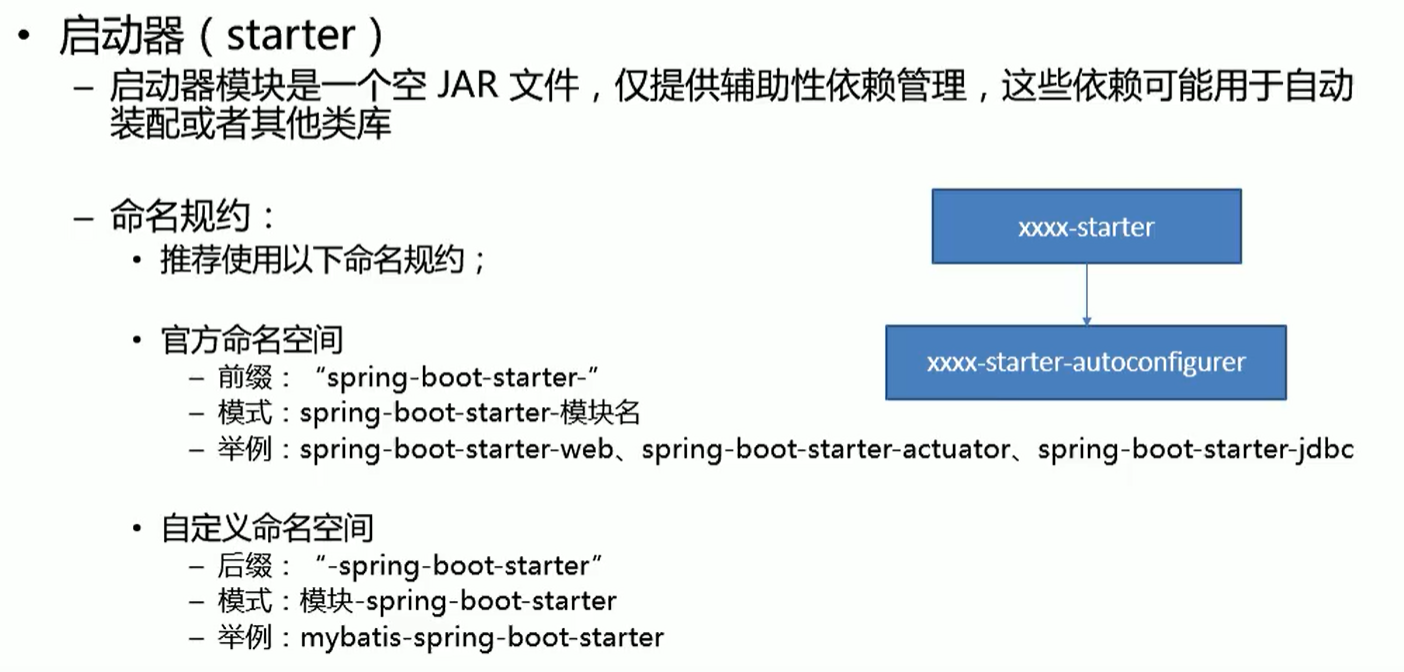
- 启动器只用来依赖导入。启动器依赖自动配置,所以需要相应的类似于AutoConfigurer,Properties类之类的
非常重要!!!starters自定义视频

