JDBC学习
本文最后更新于:4 年前
学习完数据库后,使用Java去操作数据库是十分必要的,这个教程就是用Java操作数据库。同时,还学习了PowerDesigner这种数据表创建工具的使用。后端内容后期再去更新,接下来的技术栈应该是Mybatis。老杜的教程走的后面是HTML和CSS,然后走向Servlet,都是要学习的技术栈。我就先跟着把前端相关知识再去温习一遍。
JDBC课程资源
JDBC是什么
- Java DataBase Connectivity
- 本质是啥?
- 是SUN公司制定的一套接口(interface)
- 面向接口调用,面向接口写实现类,属于面向接口编程
- why面向接口编程?
- 解耦合:降低程序的耦合度,提高程序的拓展力。
- 多态机制就是非常典型的面向抽象编程 , (不要面向具体编程)。
- 处于
java.sql.*包下面
- 为什么制定一套JDBC接口呢?
- 因为每一个数据库底层都有自己的原理
- 实现接口的是数据库厂家,你只用写上层就好了,用标准的SQL写代码就很轻松。
- Java程序员就是面向JDBC接口写代码。对应的jar为驱动!!!
- Mysql就要有对应的驱动,驱动就是一个jar包,所有数据库驱动都是以jar包存在的,驱动不是SUN提供的,是数据库厂家提供的。
JDBC编程六步
- 注册驱动(告诉Java连接哪个平台的数据库)
- 获取连接(JVM进程和数据库进程的通道打开了,进程间的通信,重量级的,使用完要记得关闭。)
- 获取数据库操作对象(专门执行SQL语句的对象)
- 执行SQL语句(DQL , DML …)
- 处理查询结果集(只有执行的是select才有处理查询结果集)
- 释放资源(使用完资源之后一定要关闭资源,进程间的通信是重量级的!!!要记得这个!!!)
example 1:
package org.example; import java.sql.Connection; import java.sql.DriverManager; import java.sql.SQLException; import java.sql.Statement; import com.mysql.cj.jdbc.Driver; public class JDBCTest01 { public static void main(String[] args){ //外面这里的才是全局,要习惯 Statement stmt = null; Connection conn = null; //注册驱动 try { DriverManager.registerDriver(new Driver()); //获取连接(打开通道) String url = "jdbc:mysql://localhost/mysqllearning?serverTimezone=GMT%2B8"; String username = "root"; String password = "xxx"; conn = DriverManager.getConnection(url,username,password); System.out.println("数据库连接对象:"+conn); //数据库连接对象:com.mysql.cj.jdbc.ConnectionImpl@4f6ee6e4 /*url: 统一资源定位服务,网络中某个资源的绝对路径,包括:协议,IP,PORT,资源名*/ /* * jdbc:mysql:// 协议 * 127.0.0.1 IP地址,这儿用localhost也可以的 * 3306 mysql端口号 * 后面那个是表名 * */ /* * 什么是协议?通信协议是通信前就订好了的数据传送格式 * 数据包具体怎么传数据,格式提前定好的 * */ //获取操作对象 stmt = conn.createStatement(); //执行sql // String sql = "insert into dept(deptno,dname,loc) values(50,'人事部','beijing')"; // int count = stmt.executeUpdate(sql); // //专门执行DML语句 // //返回值是“影响数据库中的记录条数” // System.out.println(count==1?"保存成功":"保存失败"); // String sql = "delete from dept where deptno = 50"; // //返回值是影响数据库中高的记录条数 // int count = stmt.executeUpdate(sql); // System.out.println(count==1?"删除成功":"删除失败"); //处理查询结果集 //释放资源 } catch (SQLException e) { e.printStackTrace(); }finally{ //为了保证资源一定释放,释放资源写在finally里面 //遵循从小到大依次关闭 //分别对其try...catch...,这样才能保证能够两个都执行到 if(stmt != null){ try { stmt.close(); } catch (SQLException throwables) { throwables.printStackTrace(); } } if(conn != null){ try { conn.close(); } catch (SQLException throwables) { throwables.printStackTrace(); } } } } }1
2
3
4
5
6
7
8
9
10
11
12
13
14
15
16
17
18
19
20
21
22
23
24
25
26
27
28
29
30
31
32
33
34
35
36
37
38
39
40
41
42
43
44
45
46
47
48
49
50
51
52
53
54
55
56
57
58
- example 2:
- ```java
package org.example;
import com.mysql.cj.jdbc.Driver;
import java.sql.Connection;
import java.sql.DriverManager;
import java.sql.SQLException;
import java.sql.Statement;
public class JDBCTest02 {
public static void main(String[] args) {
Statement stmt = null;
Connection conn = null;
//注册驱动(告诉要连接哪个数据库)
try {
//注册驱动
DriverManager.registerDriver(new Driver());
//获取连接(打开通道)
String url = "jdbc:mysql://localhost/mysqllearning?serverTimezone=GMT%2B8";
String username = "root";
String password = "xxx";
conn = DriverManager.getConnection(url, username, password);
System.out.println("数据库连接对象:" + conn);
//获取对象
stmt = conn.createStatement();
//执行sql语句
String sql = "update dept set dname='销售部' loc='天津' where depno=20";
int count = stmt.executeUpdate(sql);
System.out.println(count==1?"更新成功":"更新失败");
} catch (SQLException e) {
e.printStackTrace();
}finally{
try {
stmt.close();
} catch (SQLException throwables) {
throwables.printStackTrace();
}
try {
conn.close();
} catch (SQLException throwables) {
throwables.printStackTrace();
}
}
}
}
JDBC中的语句不用写分号。
反射用于JDBC
我们查看了Driver的源代码中的静态代码块儿,发现了其中有
DriverManager.registerDriver(new Driver());!!!这个玩意儿就是我们写的,我们想到了,可以通过反射机制使静态代码块自动执行,从而完成驱动的注册!!!Class.forName("classname")反射执行静态代码块来实现数据库的驱动注册
还可以把相应的数据放入到jdbc.properties中,通过ResourceBundle去获取这些对应的资源和对应的值。这个文件注意要放置在resources文件中。这样很方便,以后只需要更改资源文件就可以很快的调整数据库了。
常用注册驱动的方式!!!
1
2
3
4
5
6
7
8
9
10
11
12
13
14
15
16
17
18
19
20
21
22
23
24
25
26
27
28
29
30
31
32
33
34
35
36
37
38
39
40
41
42
43
44
45
46
47
48
49
50
51
52
53
54
55
56
57
58
59
60
//将连接数据库的所有数据配置到配置文件中
package org.example;
import java.sql.Connection;
import java.sql.DriverManager;
import java.sql.SQLException;
import java.sql.Statement;
import java.util.ResourceBundle;
public class JDBCTest04 {
public static void main(String[] args) {
Statement stmt = null;
Connection conn = null;
//使用资源绑定器,把配置文件写在java文件外
ResourceBundle bundle = ResourceBundle.getBundle("jdbc");//这儿不用写后缀嗷!
String driver = bundle.getString("driver");
String url = bundle.getString("url");
String username = bundle.getString("username");
String password = bundle.getString("password");
//注册驱动(告诉要连接哪个数据库)
try {
//注册驱动
Class.forName(driver);
//获取连接(打开通道)
conn = DriverManager.getConnection(url, username, password);
System.out.println("数据库连接对象:" + conn);
//获取对象
stmt = conn.createStatement();
//执行sql语句
// String sql = "update dept set dname='销售部' loc='天津' where depno=20";
// int count = stmt.executeUpdate(sql);
// System.out.println(count==1?"更新成功":"更新失败");
System.out.println("可以执行到sql语句啦!!!");
} catch (SQLException e) {
e.printStackTrace();
} catch (ClassNotFoundException e) {
e.printStackTrace();
}finally{
try {
stmt.close();
} catch (SQLException throwables) {
throwables.printStackTrace();
}
try {
conn.close();
} catch (SQLException throwables) {
throwables.printStackTrace();
}
}
}
}1
2
3
4driver=com.mysql.cj.jdbc.Driver
url=jdbc:mysql://localhost/mysqllearning?serverTimezone=GMT%2B8
username=root
password=xxx实际开发中,不建议把连接数据的信息写死到java程序中。这样一方面是好调整,另一方面对于用户十分友好嗷!!!
不同sql语句对应的情况
int executeUpdate(insert/delete/update)ResultSet executeQuery(select)select语句使用例子:
1
2
3
4
5
6
7
8
9
10
11
12
13
14
15
16
17
18
19
20
21
22
23
24
25
26
27
28
29
30
31
32
33
34
35
36
37
38
39
40
41
42
43
44
45
46
47
48
49
50
51
52
53
54
55
56
57
58
59
60
61
62
63
64
65
66
67
68
69
70
71
72
73
74
75package org.example;
import java.sql.*;
import java.util.ResourceBundle;
public class JDBCTest05 {
public static void main(String[] args){
Connection conn = null;
Statement stmt = null;
ResultSet rs = null;
ResourceBundle bundle = ResourceBundle.getBundle("jdbc");
String driver = bundle.getString("driver");
String url = bundle.getString("url");
String username = bundle.getString("username");
String password = bundle.getString("password");
try {
//注册驱动
Class.forName(driver);
//获取连接
conn = DriverManager.getConnection(url,username,password);
//获取操作对象
stmt = conn.createStatement();
//执行sql
String sql = "select empno a, ename b, sal c from emp";
rs = stmt.executeQuery(sql); //这条语句专门执行DQL语句的方法
//查询结果集
System.out.println(rs);
//rs.next()为取下一行,当有数据时返回true,没有数据时返回false,用于循环遍历
//rs.getString()方法,返回String,无论原来是什么,传入的参数可以是第几列,注意从1开始嗷!
//传入的参数也可以是“查询出来表的列名”,查询结果集的列名称
//类比于上面,这里getString之外类似的也可以是getInt,getDouble,getFloat之类的
while(rs.next()){
String empno = rs.getString("a");
String ename = rs.getString("b");
Double sal = rs.getDouble("c");
System.out.println(empno+","+ename+","+(sal+100));
}//while循环完了一整get就完事儿了,遍历结果集
} catch (ClassNotFoundException e) {
e.printStackTrace();
} catch (SQLException e){
e.printStackTrace();
}finally{
//在finally中取释放资源才是正确的嗷!!!
//从小到大释放资源
//分别括起来,以免释放过程中出现了bug释放不了
try {
rs.close();
} catch (SQLException throwables) {
throwables.printStackTrace();
}
try {
stmt.close();
} catch (SQLException throwables) {
throwables.printStackTrace();
}
try {
conn.close();
} catch (SQLException throwables) {
throwables.printStackTrace();
}
}
}
}如果没有导入对应的包的话,在idea中从file中选择open module settings,点击libraries,然后添加java库中,选择对应的jar包就可以导入。但是但是但是,我有Maven啊。。。
登录功能实现
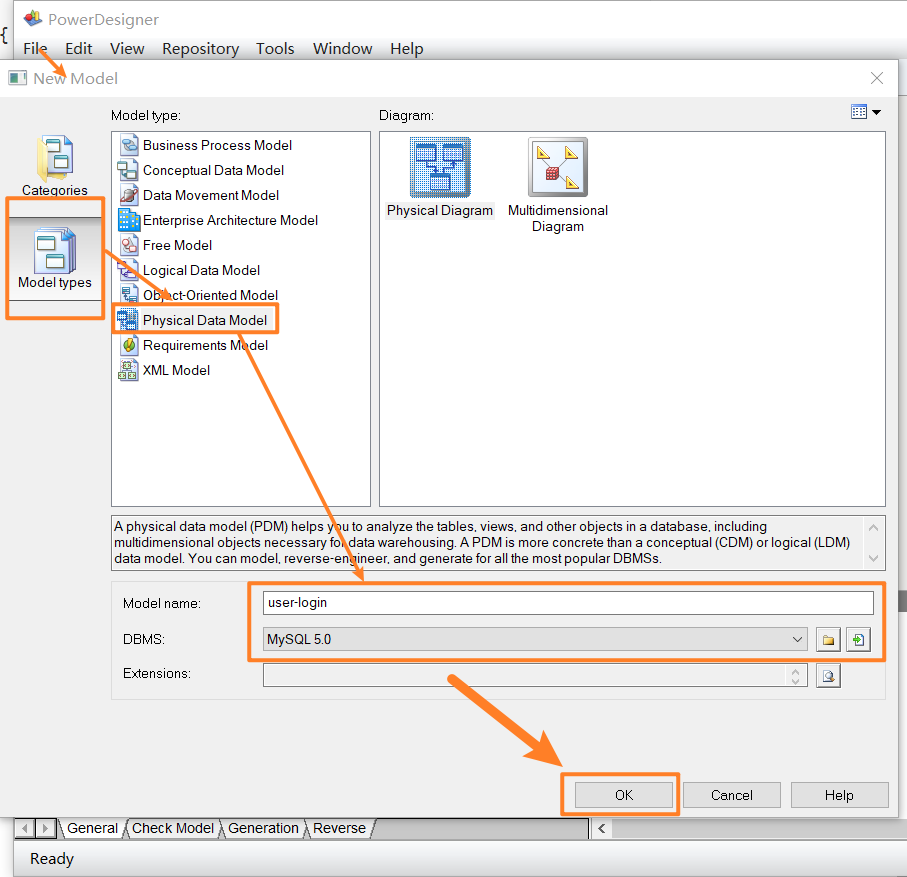
建表工具的下载与使用
- 首先需要表吧~这里给了一个软件工具,系统架构师用的,专门用于建表,叫PowerDesigner
- 新建一张表嗷!!!我用的mysql8.0的数据库,但是实际上如果这里选择mysql5.0也可以正常的使用的,问题不是特别大。
- 新建物理表的过程:
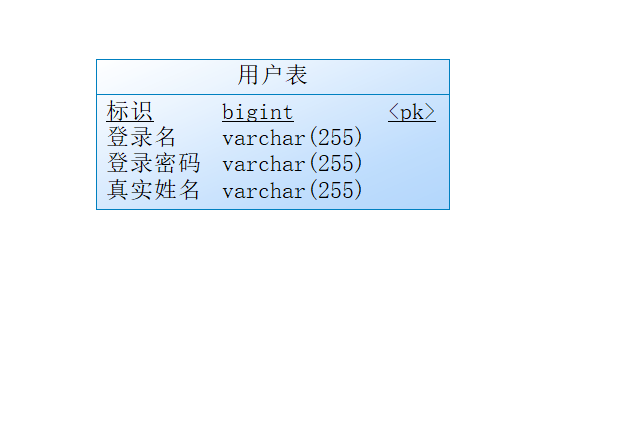
点击表格初始化,表会发在那个网中,可以Ctrl+鼠标方法,双击表进行初始化
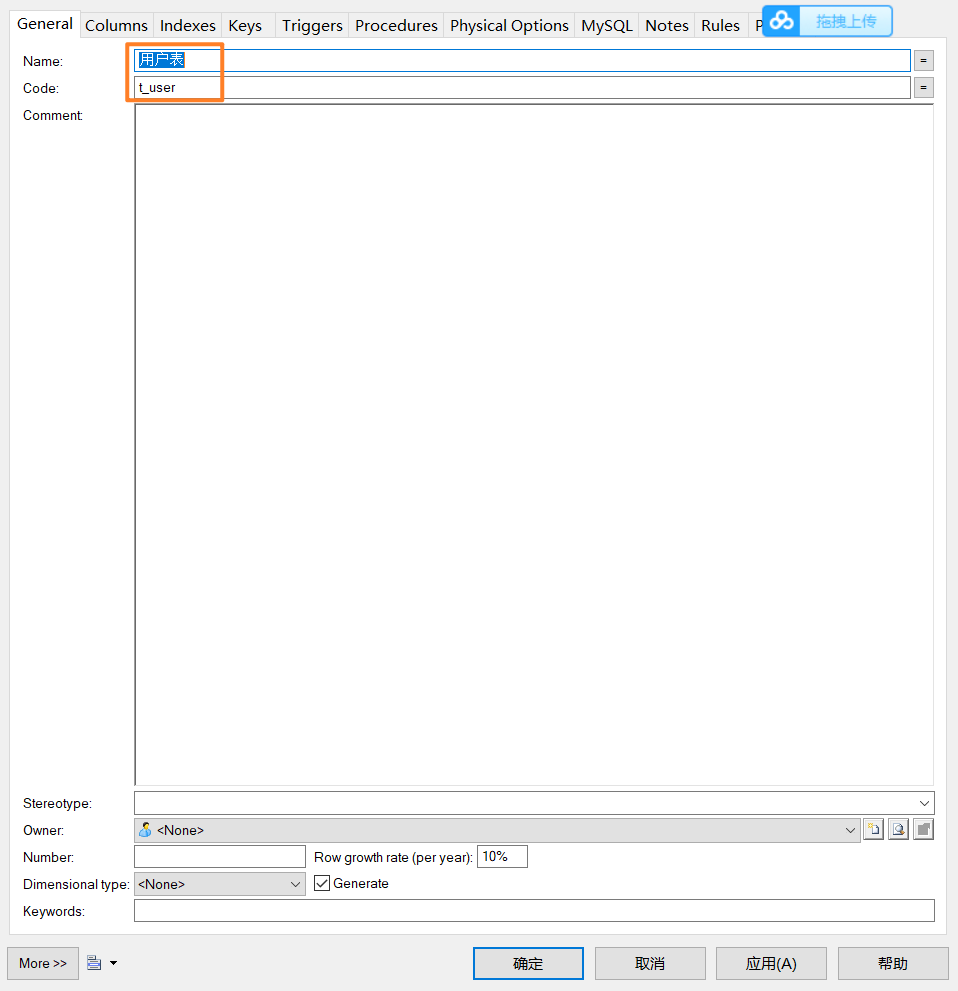
表的一些设置:
设计完成之后点击应用,在最右边的preview中,就可以看到生成的用于建表的sql语句:
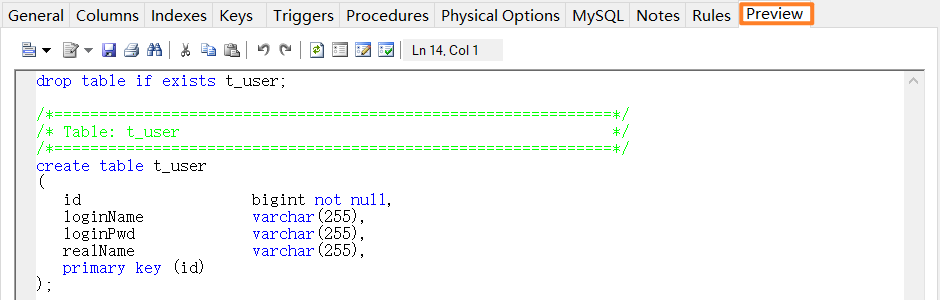
ctrl+S还可以将对应的sql语句保存一下:重新打开网格太多,表找不到怎么办,右键你要找的表的名称,点击Find in Diagram方法就能找到对应的表。

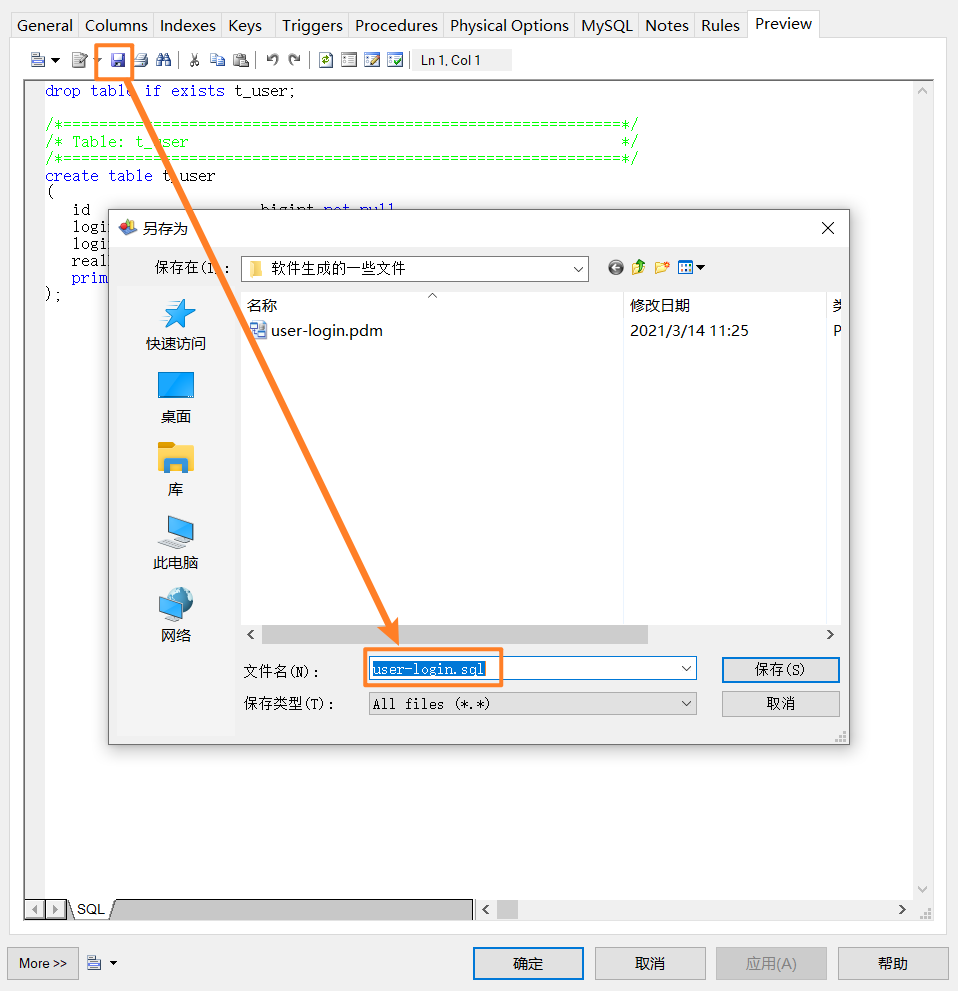
生成的sql的使用:
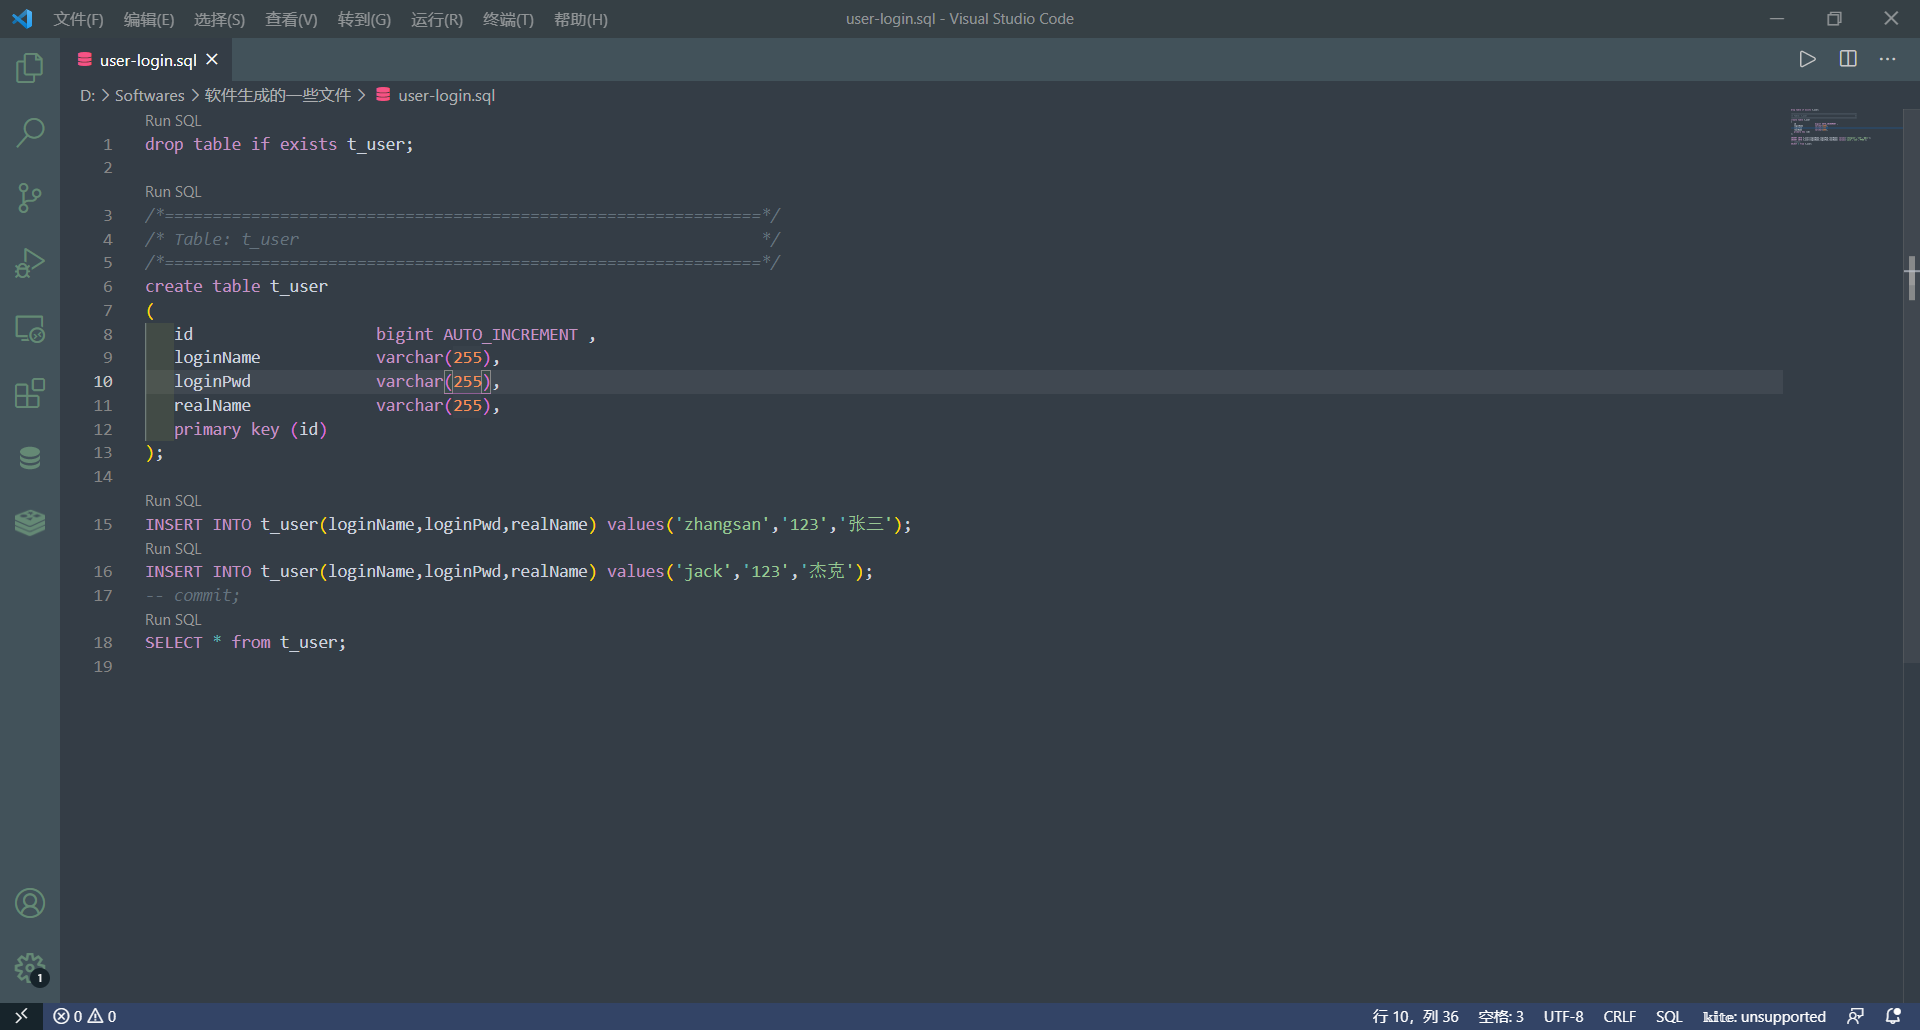
- 注意,编码可能还会有一些问题嗷!!!

- 由于数据库中,在cmd中默认的是GBK编码显示,所以在底下把UTF-8改成GBK再去保存,这样保证了在cmd中使用source语句的时候,能够正常使用嗷!!!
- 上面不要改!!!,因为你的java中是用utf-8的,所以你如果改成GBK,会导致插入数据库中的数据编码不一样。为了解决mysql中的显示问题,可以考虑显示的时候,在cmd中换显示模式
完整代码
要养成打标记的意识
要养成把对应的功能写成函数模块的意识
package org.example; import java.sql.*; import java.util.HashMap; import java.util.Map; import java.util.ResourceBundle; import java.util.Scanner; /* * 实现功能: * 1. 需求,模拟用户登陆功能实现 * 2. 业务描述: * 运行时提供一个入口,用户输入用户名和密码 * 程序获得信息之后,连接数据库,并进行比对 * 若比对成功,则登录成功,否则登录失败 * 3.数据的准备: * 实际开发中,表的设计会使用专业的建模工具,对于数据库表格进行设计 * */ public class Login { public static void main(String[] args) { //先初始化一个界面,因为以后要使用嘛,第一反应,封装一个函数!!! Map<String,String> userLoginInfo = initUI(); //上面这里应该要返回一个装有用户名和密码的容器,考虑用什么容器:字典啊,元组啊 //验证用户名和密码 boolean loginSuccess = login(userLoginInfo); System.out.println(loginSuccess?"登录成功":"登录失败"); } /** * 用户登录 * @param userLoginInfo 用户登录信息 * @return false表示失败,true表示成功 */ private static boolean login(Map<String, String> userLoginInfo) { //把要用的变量先提取出来 String loginName = userLoginInfo.get("loginName"); String loginPwd = userLoginInfo.get("loginPwd"); //打标记的意识,这个要培养 boolean loginSuccess = false; //JDBC代码 Connection conn = null; Statement stmt = null; ResultSet rs = null; ResourceBundle bundle = ResourceBundle.getBundle("jdbc"); String driver = bundle.getString("driver"); String sql = bundle.getString("url"); String username = bundle.getString("username"); String password = bundle.getString("password"); try { //1. 注册驱动 Class.forName(driver); //2. 获取连接 conn = DriverManager.getConnection(sql,username,password); //3. 获取数据库操作对象 stmt = conn.createStatement(); //4. 执行sql语句 String sqlMission = "select * from t_user where loginName = '"+loginName+"' and loginPwd = '"+loginPwd+"'"; rs = stmt.executeQuery(sqlMission); if(rs.next()){ loginSuccess = true; } } catch (ClassNotFoundException e) { e.printStackTrace(); } catch (SQLException e) { e.printStackTrace(); } finally{ if(rs!=null){ try { rs.close(); } catch (SQLException throwables) { throwables.printStackTrace(); } } if(stmt!=null){ try { stmt.close(); } catch (SQLException throwables) { throwables.printStackTrace(); } } if(conn!=null){ try { conn.close(); } catch (SQLException throwables) { throwables.printStackTrace(); } } } return loginSuccess; } /** * 初始化用户界面 * @return 返回用户输入的用户名和密码等登录信息 * */ private static Map<String,String> initUI() { Scanner s = new Scanner(System.in); System.out.print("用户名: "); String username = s.nextLine(); System.out.print("密码: "); String password = s.nextLine(); Map<String,String> userLoginInfo = new HashMap(); userLoginInfo.put("loginName", username); userLoginInfo.put("loginPwd", password); return userLoginInfo; } }1
2
3
4
5
6
7
8
9
10
11
12
13
14
15
16
17
18
19
20
21
22
23
24
25
26
27
28
29
30
31
32
33
34
35
36
37
38
39
40
41
42
43
44
45
46
47
48
49
50
51
52
53
54
55
56
57
58
59
60
61
62
63
64
65
66
67
68
69
70
71
72
73
74
75
76
77
78
79
80
81
82
83
84
85
86
87
88
89
90
91
92
93
94
95
96
97
98
99
100
101
102
103
104
105
106
107
108
109
110
111
112
113
114
115
116
117
118
119
120
121
122
123
124
125
126
127
128
129
130
131
132
133
134
135
136
137
138
139
140
141
142
143
144
145
146
147
148
149
150
151
152
153
- 思路还是挺简单的,但是对于Map啊之类的数据结构用的不是很清楚,其实这里用数组也是可以滴!!!
# SQL注入问题
- 上面的代码存在问题,实际上是sql注入问题。
- 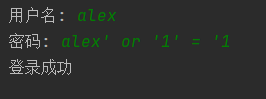
- 导致sql的最根本原因是因为程序完成了sql语句的拼接步骤,将用户提供的非法信息编译进去,导致sql语句的原意义被扭曲了。
## 解决sql注入问题
- 只要用户提供的信息不参与sql语句的编译就行了!!!
- 使用预编译的数据库操作对象`java.sql.PreparedStatement`
- 这个接口继承了Statement,原理是预先对于sql语句框架进行编译,只能给sql语句传值。
- 一个问号表示一个占位符,接收一个值,注意单引号不要用括号引起来。
- 还是六步,只是第三步获取连接那一步,我们使用preparedstatement,先对于sql语句进行预编译。
- ```java
package org.example;
import java.sql.*;
import java.util.HashMap;
import java.util.Map;
import java.util.ResourceBundle;
import java.util.Scanner;
/*
* 这个版本是为了解决sql注入问题
* */
public class JDBCTest06 {
public static void main(String[] args) {
//先初始化一个界面,因为以后要使用嘛,第一反应,封装一个函数!!!
Map<String,String> userLoginInfo = initUI();
//上面这里应该要返回一个装有用户名和密码的容器,考虑用什么容器:字典啊,元组啊
//验证用户名和密码
boolean loginSuccess = login(userLoginInfo);
System.out.println(loginSuccess?"登录成功":"登录失败");
}
/**
* 用户登录
* @param userLoginInfo 用户登录信息
* @return false表示失败,true表示成功
*/
private static boolean login(Map<String, String> userLoginInfo) {
//把要用的变量先提取出来
String loginName = userLoginInfo.get("loginName");
String loginPwd = userLoginInfo.get("loginPwd");
//打标记的意识,这个要培养
boolean loginSuccess = false;
//JDBC代码
Connection conn = null;
// Statement stmt = null;
// //这里要换掉statement
PreparedStatement ps = null; //使用preparedstatement
ResultSet rs = null;
ResourceBundle bundle = ResourceBundle.getBundle("jdbc");
String driver = bundle.getString("driver");
String url = bundle.getString("url");
String username = bundle.getString("username");
String password = bundle.getString("password");
try {
//1. 注册驱动
Class.forName(driver);
//2. 获取连接
conn = DriverManager.getConnection(url,username,password);
//3. 获取预编译数据库操作对象,这里有区别哦
String sql = "select * from t_user where loginName = ? and loginPwd = ?";
ps = conn.prepareStatement(sql);
//给占位符要记得传值哦
//第一个?下表为1,第二个为2,JDBC中都是从1开始的
//这里调用的还可以为setInt方法等,很智能的
ps.setString(1,loginName);
ps.setString(2,loginPwd);
//4. 执行sql语句,上面编译了,这里不用传sql语句了
rs = ps.executeQuery();
//5. 处理结果集
if(rs.next()){
//登录成功
loginSuccess = true;
}
} catch (ClassNotFoundException e) {
e.printStackTrace();
} catch (SQLException e) {
e.printStackTrace();
} finally{
if(rs!=null){
try {
rs.close();
} catch (SQLException throwables) {
throwables.printStackTrace();
}
}
if(ps!=null){
try {
ps.close();
} catch (SQLException throwables) {
throwables.printStackTrace();
}
}
if(conn!=null){
try {
conn.close();
} catch (SQLException throwables) {
throwables.printStackTrace();
}
}
}
return loginSuccess;
}
/**
* 初始化用户界面
* @return 返回用户输入的用户名和密码等登录信息
* */
private static Map<String,String> initUI() {
Scanner s = new Scanner(System.in);
System.out.print("用户名: ");
String username = s.nextLine();
System.out.print("密码: ");
String password = s.nextLine();
Map<String,String> userLoginInfo = new HashMap();
userLoginInfo.put("loginName", username);
userLoginInfo.put("loginPwd", password);
return userLoginInfo;
}
}关键词不参与编译没有作用,就ok了。
Statement和PreparedStatement
- 输入第二次的重复的语句,sql就不编译了,直接执行
- Statement每次传入值后再编译,要编译两次。而PreparedStatement是先编译再传入值替换掉?,这样只用编译一次,后者跑的快嗷。
- PreparedStatement跑的快
- PreparedStatement会在传值阶段进行类型的安全检查
- PreparedStatement进行类型检查。
- %99用PreparedStatement , 1%有业务需要进行sql语句拼接和注入的就只能用Statement。(例如点击排序等功能,后面order by asc/desc)价格从高到低/价格从低到高这种,不能加入’asc’吧,必须要拼接asc到sql语句后面。这个时候必须要用sql注入。
- 不同情况使用不同的类型
PreparedStatement完成insert delete update
无非编译往上了一些嘛,然后传入值运行都是一样的。
package org.example; import java.sql.*; import java.util.ResourceBundle; public class JDBCTest07 { public static void main(String[] args) { //数据准备 ResourceBundle bundle = ResourceBundle.getBundle("jdbc"); String url = bundle.getString("url"); String driver = bundle.getString("driver"); String username = bundle.getString("username"); String password = bundle.getString("password"); //搭架子 Connection conn = null; PreparedStatement ps = null; try { //1. 注册驱动 Class.forName(driver); //2. 建立连接 conn = DriverManager.getConnection(url,username,password); //3. 获取prepared操作对象 // String sql = "insert into dept(deptno,dname,loc) values(?,?,?)"; // ps = conn.prepareStatement(sql); // // ps.setInt(1,60); // ps.setString(2,"销售部"); // ps.setString(3,"上海"); // String sql = "update dept set dname = ? , loc = ? where deptno = ?"; // // // ps = conn.prepareStatement(sql); // ps.setString(1,"研发一部"); // ps.setString(2,"北京"); // ps.setInt(3,60); String sql = "delete from dept where deptno = ?"; ps = conn.prepareStatement(sql); ps.setInt(1,60); //4. 执行sql语句 int count = ps.executeUpdate(); System.out.println("Affect "+count+" rows!!!"); } catch (ClassNotFoundException e) { e.printStackTrace(); } catch (SQLException throwables) { throwables.printStackTrace(); }finally{ if (ps!=null){ try { ps.close(); } catch (SQLException throwables) { throwables.printStackTrace(); } } if(conn!=null){ try { conn.close(); } catch (SQLException throwables) { throwables.printStackTrace(); } } } } }1
2
3
4
5
6
7
8
9
10
11
12
13
14
15
16
17
18
19
20
21
22
23
24
25
26
27
28
29
30
31
32
33
34
35
36
37
38
39
40
41
42
43
44
45
46
47
48
49
50
51
52
53
54
55
56
57
58
59
60
61
62
63
64
65
66
67
68
69
70
71
72
73
74
75
76
77
78
79
80
81
82
83
84
85
86
87
88
89
90
91
92
93
94
95
96
97
98
99
100
101
102
# JDBC控制事务
- JDBC事务时自动提交的,只要执行任意一条DML语句,自动提交一次,这是JDBC默认的事务行为。这个称为JDBC的自动提交机制。
- 但是实际开发过程中,DML多条执行一个功能,所以事务要改的。
- alt / ctrl + 鼠标选中多行,这两者有不同的效果。
- 重点代码
- `conn.setAutoCommit(flase);`
- `conn.commit();`
- `conn.rollback();`
- 源码:
```java
package org.example;
import java.sql.*;
import java.util.ResourceBundle;
/**
* JDBC事务机制
* */
public class JDBCTest09 {
public static void main(String[] args) {
ResourceBundle bundle = ResourceBundle.getBundle("jdbc");
String url = bundle.getString("url");
String driver = bundle.getString("driver");
String username = bundle.getString("username");
String password = bundle.getString("password");
Connection conn = null;
PreparedStatement ps = null;
// ResultSet rs = null;
try {
//注册驱动
Class.forName(driver);
//建立连接
conn = DriverManager.getConnection(url,username,password);
conn.setAutoCommit(false); //设置自动提交事务为false
System.out.println("数据库连接成功!设置自动提交事务成功!");
//获取操作对象
String sql = "update emp set ename=? where job=?";
ps = conn.prepareStatement(sql);
//执行数据库语句
ps.setString(1,"tutu");
ps.setString(2,"xixi");
int count = ps.executeUpdate();
//执行数据库语句
ps.setString(1,"lele");
ps.setString(2,"hehe");
count += ps.executeUpdate();
System.out.println(count);
//程序走到这里说明程序运行正常
System.out.println("程序运行正常,接下来提交事务嗷!!!");
conn.commit(); //事务提交
} catch (Exception e) {
System.out.println("问题出现了!!!");
if(conn!=null){
try {
conn.rollback(); //回滚事务
} catch (SQLException throwables) {
throwables.printStackTrace();
}
}
e.printStackTrace();
}
finally{
if(ps!=null){
try {
ps.close();
} catch (SQLException throwables) {
throwables.printStackTrace();
}
}
if(conn!=null){
try {
conn.close();
} catch (SQLException throwables) {
throwables.printStackTrace();
}
}
}
}
}
Java工具类的封装
封装一条语句没有必要,因为你调用的时候都要一条语句来调用orz。
其他封装细节和技巧如下:
1
2
3
4
5
6
7
8
9
10
11
12
13
14
15
16
17
18
19
20
21
22
23
24
25
26
27
28
29
30
31
32
33
34
35
36
37
38
39
40
41
42
43
44
45
46
47
48
49
50
51
52
53
54
55
56
57
58
59
60
61
62
63
64
65
66
67
68
69
70
71
72
73
74
75
76
77
78
79
80package org.example.util;
import java.sql.*;
import java.util.ResourceBundle;
/**
* JDBC工具类,简化JDBC编程
* 将重复的代码封装
*/
public class JDBCUtil {
/**
* 工具类中的构造方法都是私有的
* 因为方法都是静态的,不需要new对象,直接采用类名调用
*/
private JDBCUtil(){} //建议私有化,工具不用对象,这样就把外界堵死了,只有内部能调用
//由于注册驱动只需要走一次,在类加载的时候执行,所以想到了静态代码块!!!
static{
ResourceBundle bundle = ResourceBundle.getBundle("jdbc");
String driver = bundle.getString("driver");
try {
Class.forName(driver);
} catch (ClassNotFoundException e) {
e.printStackTrace();
}
}
public static Connection getConnection() throws SQLException {
Connection conn = null;
// //注册驱动
// Class.forName(driver);
//获取连接
ResourceBundle bundle = ResourceBundle.getBundle("jdbc");
String url = bundle.getString("url");
String username = bundle.getString("username");
String password = bundle.getString("password");
conn = DriverManager.getConnection(url,username,password);
//这里注意一下哈,这里应该抛出异常的,方便上层程序捕捉处理
return conn;
}
/**
*
* @param conn 连接对象
* @param ps 数据库操作对象
* @param rs 结果集
*/
public static void close(Connection conn, Statement ps, ResultSet rs){
if(rs!=null){
try {
rs.close();
} catch (SQLException throwables) {
throwables.printStackTrace();
}
}
if(ps!=null){
try {
ps.close();
} catch (SQLException throwables) {
throwables.printStackTrace();
}
}
if(conn!=null){
try {
conn.close();
} catch (SQLException throwables) {
throwables.printStackTrace();
}
}
}
}简化后的原程序:
1
2
3
4
5
6
7
8
9
10
11
12
13
14
15
16
17
18
19
20
21
22
23
24
25
26
27
28
package org.example;
import org.example.util.JDBCUtil;
import java.sql.*;
/**
* 两个任务:
* 1. 使用封装好的方法
* 2. 模糊查询
*/
public class JDBCTest10 {
public static void main(String[] args) {
Connection conn = null;
PreparedStatement ps = null;
ResultSet rs = null;
try {
//获取连接,释放资源
conn = JDBCUtil.getConnection();
} catch (SQLException throwables) {
throwables.printStackTrace();
}finally{
JDBCUtil.close(conn,ps,rs);
}
}
}
实现模糊查询
1 | |
模糊查询使用数据库中字符匹配来做的,记得模糊查询应该在编译后再传入,编译前如果加了那些奇怪的东西实现不了嗷!
- 这里记住,问号就是一个整体,编译的时候是不能改的哦!
行级锁
悲观锁:
select语句在语句后面加一个for updata,这个就表示,相应的行被锁住了,别的语句都不能动这个语句。作用的时间是在这次事务的过程中不能动的。
- 悲观锁:(行级锁,就是上面讲的这个,select语句最后加上update)
- 数据锁住了不允许并发的
这个事务在操作数据时,另外一个事务只能卡住,不能操作数据。只有当一个事务提交了之后,另外一个事务才能进行操作。
乐观锁:
- 支持并发,事务也不需要排队。但是需要一个版本号。
- 事务一:版本号1.1 -> 版本号1.2
- 事务二:版本号1.1,但是交的时候???版本变成1.2了???事务二直接回滚!!!
乐观锁会比悲观锁并发性更加强一些